Saturday, December 3, 2011

Ottobre 06/2011-34

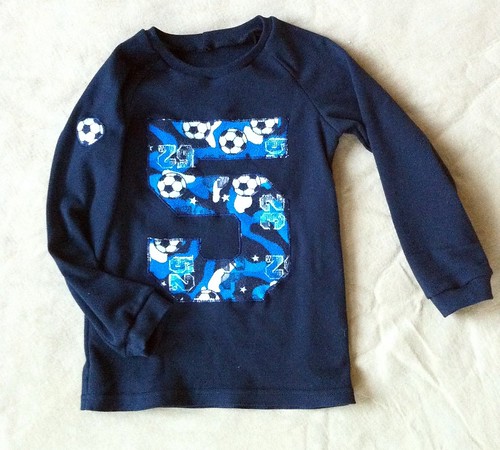
I'm afraid that I am notorious for neglecting necessary (but boring) sewing. Poor Logan falls into that category all too often. It's particularly pronounced in the pajama department. He has exactly enough sets of PJs (that he likes) to get him from one wash day to the next, so when he tore a hole in one of his PJ tops, it was a bit of an emergency. Naturally, the hole was front and center in the middle of the fabric - not repairable. The top was really too short anyway, but the pants still fit great, so instead of attempting a sad looking repair, I used the remains of the old top to applique a new one.
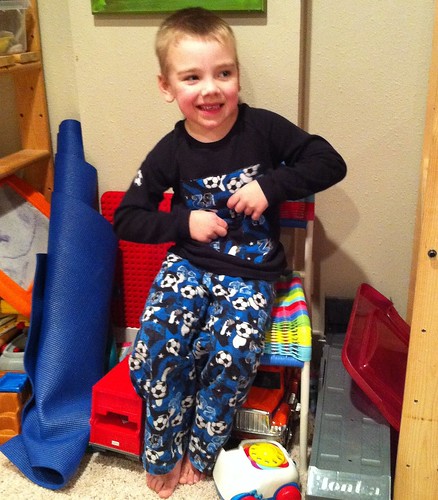
He was more interesting in playing with it than getting a good picture.
The pattern is from the most recent issue of Ottobre, 06/2011. It is #34, which is a raglan sleeved PJ top with a fun bulldog applique. I went a little simpler and made a large number 5 on the front of the shirt and a little soccerball snipped out of the print on the right sleeve.
The fabric is a super soft cotton rib knit. I really wish I remembered where it came from. I want some more!! Before I got my serger, I really struggled sewing rib knits. It seemed like no matter what I did, the seams would ripple. Now, I just crank the differential feed up to 2 and stitch away! This tee really did whip up quickly. As is typical for Ottobre, it is beautifully drafted. The neckband seemed way to small when I was first attaching it, but it turned out just right. I did lengthen the shirt and sleeves to the next size up, as it looked short in the magazine. On Logan, the fit is nicely slim and the length is good. There is a little room to grow, but not so much that he's swimming in it.
This was supposed to be a PJ top, but when Logan saw it, he told me that it is to wear to preschool. So, you may be seeing some more boy PJs here soon... And a few more of these. It's a good basic, and he could use more long sleeve shirts. It gets cold out there!

Thursday, December 1, 2011

Monthly Roundup: November 2011

Can you believe I still haven't cut that houndstooth??? I was so disappointed in the muslin for Simplicity 2764 that I am scissor shy now. I toyed around with the idea of a cape, and while I think that would have been amazing, I only have enough yardage for a cropped one, which I don't think I'd be as fond of. So, the houndstooth wool has been returned to the stash for the moment. I still managed to sew and knit a few things this month.

1) Ottobre 03/2009-19 cardigan for Myra
2) Nosewarmer cowl for Mitch
3) Ottobre 01/2009-23 pants for Logan
4) Simplicity 8170 PJ top and bottom for Myra
5) McCalls 3830 skirt X3 for me
6) Not Quite A Baby mitts and hat for Duncan
7) DanDoh scarf for me
8) New Look 6926 pinafore for Myra
9) Style 2867 blouse for Myra
10) New Look 6926 purse for Myra
11) Christmas Tree for all the kids
12)Vogue 8330 jeans for me
13)Ottobre 06/2011-34 tee shirt for Logan - not yet blogged

That ends up being 12 finished sewn garments and 4 knitted items. And a cut and glue crafty Christmas tree. :) I sewed 17.5 yards of fabric and 15.5 was from the stash!! Woo-hoo!! The only non-stash sewing I did this month was two of the knit pencil skirts, which actually never made it into the stash. I'm not sure what my favorite garment this month is. Everything is getting good use, although Duncan prefers to eat his mittens and hat, rather than wear them.
What to do for December?? Well, I still have coats, jackets and jeans on the brain. I ordered some Faux Mink from Fabric Mart to make a jacket and I really still want that houndstooth in my closet. I love my new skinny jeans, but I also want to make some wide legs. Myra could really use some jeans, too and she's big enough for Jalie 2908 now. I think the low rise would be perfect for her *ahem* figure. Between her low front waist and ghetto booty, RTW doesn't fit her at all. I'm feeling a bit of sewing ADD right now actually. There are a ton of things I want to do, but I can't get my brain to settle on one. Maybe I'll go make a knit top. That always settles me down!

Tuesday, November 29, 2011

Vogue 8330

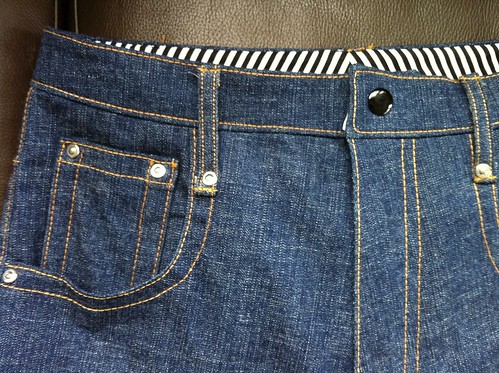
The heavy duty snap was hammered and these babies are done!
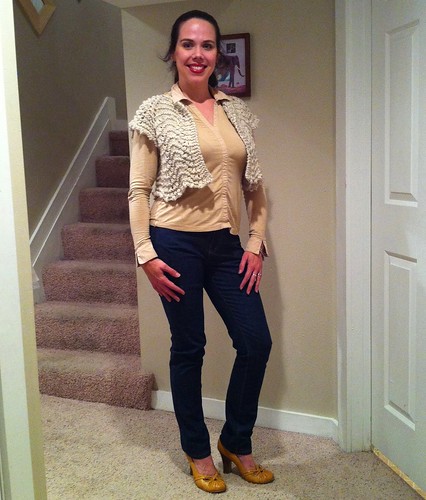
I love them!! When I first started seeing skinny jeans, I was horrified. Could anything be more unflattering?? What would Stacy and Clinton say??? But the more I saw them, the more I liked them.  Still, I couldn't convince myself to put in the effort to sew a pair when I wasn't sure that I liked the style. So, I did the unthinkable and actually bought a pair of jeans. I know. After some judicious back waist darts, the RTW pair fit OK, and I found myself wearing them all the time, even though the fit was only OK. It was obviously time to sew myself a pair that actually fit.
The pattern I used was Vogue 8330, which I found at the thrift store. I was thrilled to see very favorable reviews on PR. Erica B even made these! The only thing I didn't like about the pattern was the low rise, so I raised it to just below my natural waist. That took 3 inches in front, tapering down to 2 inches at center back.
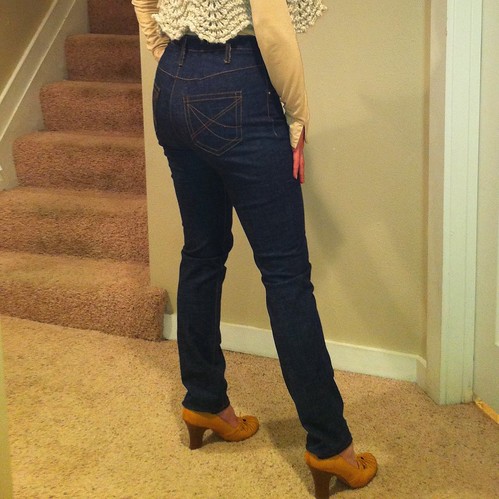
I added 2 of the three inches above where the pocket sits, to enlarge the pocket opening, but I should have lowered the coin pocket. It looks a little strangely tall. The topstitching was done with C&C "jeans" thread on my Janome. The jeans were constructed on the serger as well as my vintage Singer. She purrs through denim like butter.
I used Dritz rivets, although I have some nicer ones coming soon from Hot Patterns. I couldn't wait, so they'll go on my next pair of jeans. For the closure, I used a heavy duty snap, also from Dritz. It was much easier than fighting Janome to make a buttonhole with jeans thread. I will have to explore other color options though. Hancock's only has black and old gold, which doesn't match the silver rivets they carry. Hello.
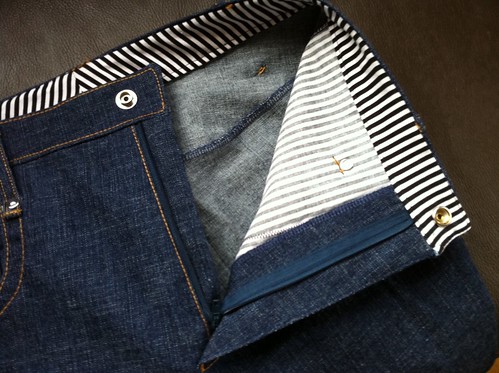
Inside, I used a striped cotton for the waistband facing and pockets. I extended the pocket bag across the front all the way to center front. I first saw this done on Beangirl's blog, but have since seen that some of my Burda pants pattern have that feature as well. It is really great for keeping those pocket bags tucked in, but also provides a little tummy control for those of us who perhaps don't have the tummy tone of yesteryear.
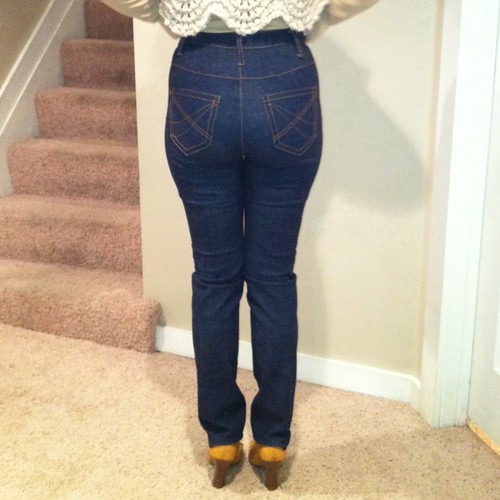
Changes I made for fit are mostly detailed here and here. I think these are my best fitting pants to date, so I am pleased. Despite the fact that I get front wrinkles if I move, I am still pleased to have figured out the front crotch curve as having a good fit there makes these pants quite comfortable. Nothing pulls, binds or rides up. I'm not sure I am thrilled with the fit of the waistband, since it tends to roll down on the sides. It is a contoured waistband, and I wonder if it doesn't curve too sharply for how high the waistline is on these pants.
Here are the pockets, now actually stitched on. I waited to sew them on until I had sewn and topstitched the center back seam, so that I could balance the pockets an equal distance from the topstitching. In looking at the pictures, I think they might have been a bit more flattering if I had placed them slightly closer in. I'll remember that for next time!

I'm pretty darn thrilled with my jeans. They are comfortable and despite the dogma about pant legs falling straight from the hips, I find these pretty flattering. It was fun to sew along with the ladies at It's a Jeans Thing as well. Thanks for letting me play!! I may try to squeeze another pair in before the 15th of December!
Monday, November 28, 2011

Christmas Spirit

I finally joined the Pinterest crowd a few weeks ago. That site can be a serious time sucker, but I have also found some fun ideas there. This is my first attempt at using one of my "pins".
The idea for the tree comes from this blog. She includes a pdf tutorial with patterns for the decorations. Very nice! Of course, I've never been very good at following directions. I cut the felt tree from a 1 yard piece of 72" wide felt. I only used half of the width, so I'm thinking about making another for their bedroom. For the ornaments, I used a roll of duct tape to make the circles and let the kids pick bits of trim to decorate, then I used the hot glue gun to affix their decorations. The "garland" is just mohair yarn. Nice and sticky with the felt.  Since felt sticks to itself, no velcro is needed. We all had a pretty fun time putting it together, and it was really quick - maybe 45 minutes total.
Here's Myra, rearranging the ornaments to best effect. She says it needs some presents, and I don't think she means felt ones...

In other news, my jeans are ALMOST done. All that is left is hammering on the snap. Seriously, that is all. Hopefully I can get that done today and get some pictures. I'm pretty excited about them. I can't wait to show you all!!

Saturday, November 26, 2011

Back Pockets

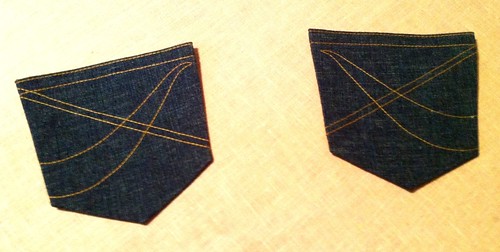
Whenever I make a new pair of jeans, the first thing I stitch is the back pockets. Having the pockets done gives me a little mojo burst, which I need at the beginning of an involved project.
I don't have an embroidery machine, so I have to work a little harder to get my pockets symmetrical. Over the course of my last several pair of jeans, I've worked out a system that works for me. I thought I'd share it.
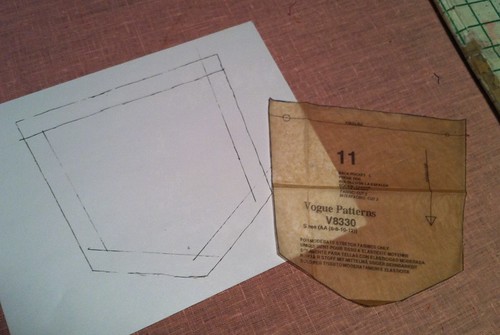
The first thing I do is trace the pocket pattern piece I'm using, then draw in the hem and seam allowances (if it has them). I copy this several times (on a regular copy machine/printer) to give me something to sketch on so that I can try out different design ideas in the space I'll actually have on the pocket.  Once I've settled on a design, I flip it over and trace it backwards so that the two pockets are symmetrical. I used regular computer paper today, but the next step is easier if you trace it onto tissue paper.
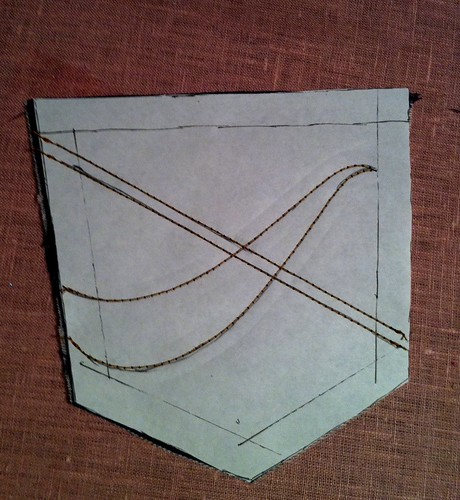
Cut out your tracing on the cutting line and glue it onto your fabric with a glue stick. Just dab a little glue in the upper and lower allowances. You don't want it glued permanently, but you don't want it to shift around when you stitch. Wonder Tape would work too, but glue sticks are cheaper. Pins are acceptable, but may distort your design as you stitch.
Now stitch your design through the paper. Go slowly and sew accurately along the lines you drew.
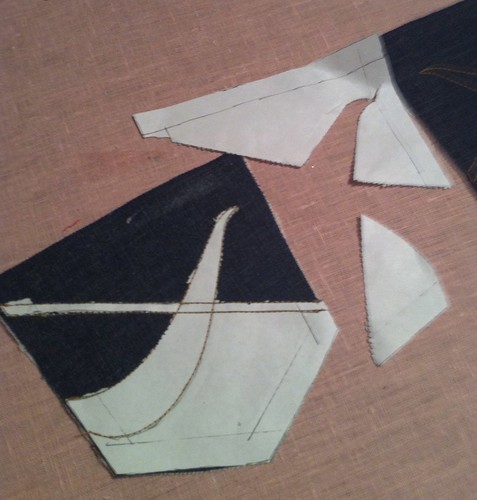
That big fat jeans needle you should be using does a nice job of perforating the paper, so it is easy to remove from your design! Just pull gently, starting with the big pieces of paper. When you get to the little ones, tug on your pocket a little. Even non stretch denim will stretch a little on the bias, and this will help detach the paper from your stitching.
Now all that is left is to press down your hem allowance on top and topstitch it in place, then press under the allowances on the other sides and bottom of the pocket. Since you already traced out the pocket shape, you have a template you can use for pressing. Handy!

Any other tips? Please share!