Showing posts with label Go To Patterns. Show all posts

Thursday, November 14, 2013

Pattern Anthology Winter Wonderland Collection

A couple of weeks ago, I got an email offering me the chance to be a part of the Winter Wonderland Blog Tour for this season's Pattern Anthology.
I've been kind of swamped lately, so I wasn't sure I'd be able to do it justice, but after I saw the patterns, I had to get in on this party! Seriously, the styles are so adorable.
And Duncan did need some new winter duds. Doesn't get much cuter than that, y'all.
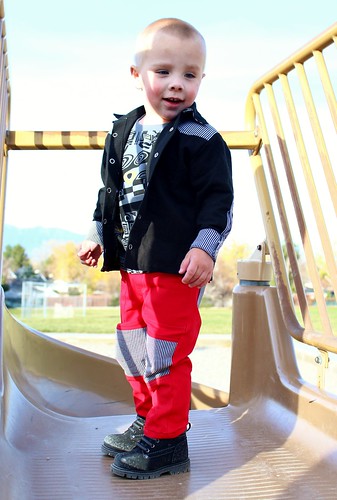
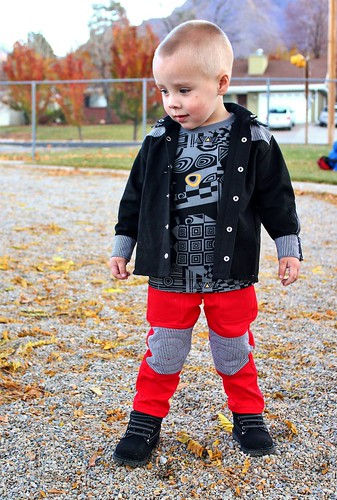
Our outfit starts with the 
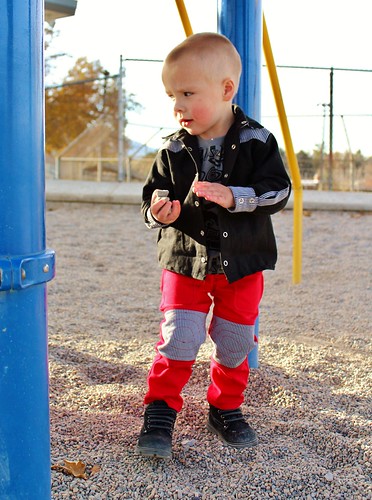
Tree Climber Trousers, by Go To Patterns. I think these were designed for my little Dr. Destructo here. Padded knee patches, a slim fit and plenty of pockets for storing rocks. They're perfect.
I also made him the Johnnie B Good Hoodie by Shwin Designs, but with the regular collar. Both options are included in the pattern. It features your choice of short or long sleeves, back yoke and front yoke patches as well as a breast pocket option. Tons of options in this one pattern!
Styling outfits for my busy guy has to start with functionality. If he can't play in it, he's not going to be happy wearing it. Duncan has some special sensory needs that mean his clothing has to be non-irritating, so soft waistbands and easy fit tops are a must.
When I'm planning what to sew (or buy) for Duncan, I like to start with an outfit, and then mix and match within his existing clothing by building around a palette of colors. For Duncan, his neutrals are black, grey and white and I accent with brights like yellow, blue and red. This way, most of his wardrobe coordinates, so even if he chooses his own clothing (or Dad does...) there's a good chance it will match.
For this outfit, I tied the handmade pieces together with a matching accent fabric - the black and white gingham, which I used in the patches and pockets on the pants as well as the cuffs, plackets, yokes and undercollar on the overshirt. I found a tee that incorporated the same graphic feel in a black and grey color scheme, but which brings in a pop of yellow.
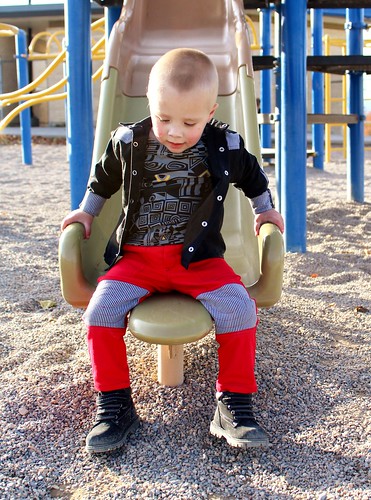
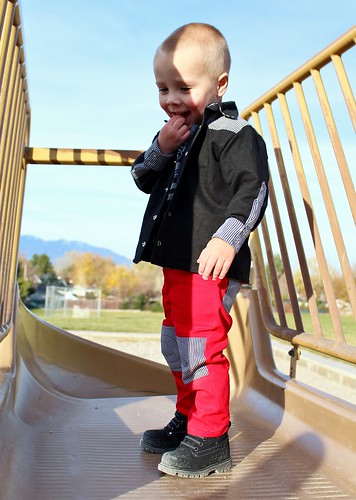
Duncan was very happy with his new outfit, and gave it a workout on the playground, but it was just as comfy for a quiet movie with Mom. A win! Be sure to go check out all of the beautiful patterns offered in this season's Pattern Anthology!

Saturday, May 25, 2013

Go To Patterns Go To Gift Bags

It's that time of year again. School is out for us next week, so it was time for me to come up with something to give the teacher's who have worked so hard all year teaching and loving my children. They both had amazing teachers this year, and truly nothing can really express how grateful I am for them.
I feel like making something with my own hands in some small way expresses how important they have been to us. But without sizes and measurements, it's hard to personalize a garment, so I decided instead to make bags. I'm not at all a bag maker generally, but I think these turned out pretty darn cute.
The pattern I used is the Go To Gift Bag, from Go To Patterns. The pattern includes 3 sizes of basic gift bags, a quilted wine bag and a gift card holder. This is the "medium" sized bag, which was the perfect size for a greeting card, and a few products from Burt's Bees. The bags have a boxed bottom and bias finished top edge. For the fabric, I elected to use a heavy weight upholstery fabric, since the pattern doesn't call for any interfacing. The upholstery fabric has plenty of body on it's own, so the bags stand up nicely.
The pattern includes a couple of strap options. I decided to go with grommets, into which I threaded gold drapery cord. I really like the way this turned out. When I first pulled out the pattern, I was a little dismayed to see that the bag was unlined, since I think the inside of a bag really needs to look nice, but I needn't have worried.
All of the seams are french seams, so the raw edges are fully enclosed. There was one thing that I changed about the construction, and that was the inner boxed corners. I am just not a very precise seamstress, so when I went to stitch down the corners, nothing lined up. It was a hot mess, and I ended up stitching the corners down in the ditch of the bottom seam, so they don't look too great in there.
For the other two bags, I stitched the corner as a french seam - stitching the first pass wrong sides together at 1/8 inch in from the seam line, then flipping the seam wrong sides out to stitch a 1/8 in seam right sides together. I'm much happier with the way it looks this way. Another feature I really loved about this pattern was the edgestitching along the corners of the bag. This keeps the bag nicely structured and helps it hold it's shape. Despite the nice seam finishes and bias binding, these bags were super quick to whip up, less than 1/2 hour each. I'll definitely be using the pattern again.

Saturday, April 13, 2013

Casual Lady Top

I sewed something that wasn't a muslin!! I was starting to think I had forgotten how.
After fighting with the fit of Mitch's pants for 2 weeks, I wanted to quick project that wouldn't require any fitting. When Andrea released the Casual Lady top, I knew I had my project.
Not only was this the perfect, easy project, proceeds from the pattern sale benefit young mothers trying to escape the sex trade, so not only do you get a fun sewing project, you do some good as well. The pattern is designed for fairly stable knits with good recovery. I chose a mint green rib knit that while fairly beefy, probably was a little more unstable than was ideal for the pattern.
The top is very simple - just 4 four pattern pieces, and goes together very quickly. There are a few other kimono sleeve tee patterns out there, but this one is a little different in that the neckline is finished with a facing rather than a band or binding. In general, I really hate facings, particularly on knits. There I said it. But they do have their place, and look quite polished when done right.
In my case, my fabric (This rib knit has somewhat poor recovery.) made getting the neckline right a bit of a challenge. Since the knit is quite stretchy, the neckline stretched out just a little bit while sewing, even with the presser foot pressure on the lightest setting. You can see in the above photo that the neckline sticks out just a little from the dress form. Still, it looks pretty nice and I love how smooth it looks without any topstitching. The facing spans across the shoulder and is caught in the sleeve hem, which is a great way to keep it in place. It also gives the shoulder a bit of structure, which makes this a fabulous layering top. It gives a very nice line under a cardigan or jacket.
I wore my top with a bias cut linen midi skirt and belted it with my Texas rodeo belt. Cowboy boots were obviously a must! It's a very wearable, comfortable top and easily dressed up or down. It was perfect for playing at the park today!

Sunday, November 18, 2012

Go To Leggings!

Myra REALLY didn't need new clothes, but when Andrea released the new Go To Leggings pattern, I had to try it out. So many cute details!! (And if you haven't been to her shop, be sure to click the link. She has an amazing collection of PDF patterns from all of your favorite designers.)
I also made another Ottobre cross-front tee, but since I just made one last week, I won't bore you with that.

This pattern has so many options to fancy up your leggings that I had a hard time deciding which one to try first! Since we still have snow on the ground, I decided the ruched leggings looked nice and cozy. Of course, Myra insisted on the skirt, which is included in the pattern. You can make it with the leggings or alone.
Isn't the ruching great? Myra says her pants are ruffly. She told me that she wants me to make all of her pants like this now. It was really easy to do, and the pattern instructions are really great, but I thought I'd share my little method for keeping my elastic ruching straight and where I want it.
I like to use clear elastic tape for ruching, since it stretches really far and has really great recovery, but it can be a little slippery and hard to control. To make my job a little easier, I always draw a chalk "I" along the line where I want my ruching to be, with the long line where I'm stitching my elastic, and the top and bottom marked clearly, so I know when to start and stop stretching the elastic. It also helps to cut your elastic an inch or two longer than you need and mark the actual length you need on the elastic itself (I use a Sharpie on clear elastic). Then you have the "tails" of elastic at the beginning and end to hold on to as you stretch. Just match your marks up with the top and bottom of your "I" and away you go!
The fabrics I used were a cotton jersey print for the skirt and top contrast, and some ITY left over from this dress for the leggings and shirt body. The cotton was one of those thin, curly jerseys, but it paired well with the slinky ITY. For the ruched leggings, you definitely want a fabric that isn't too bulky or it won't ruche well. The ITY was perfect in that regard, and it is very comfortable.
Myra LOVES her new leggings, and I love this pattern. It goes all the way up to a size 12, so I know I will get a lot of use out of it. Myra will definitely be getting the keyhole capris next Spring. Off you go then. Go get your pattern!