Showing posts with label #118. Show all posts

Tuesday, October 23, 2018

Disco Fever!

As you may have noticed, blogging hasn't been a big priority lately. But I had such fun sewing this, I wanted to write about it. Let's see if I remember how to do this...
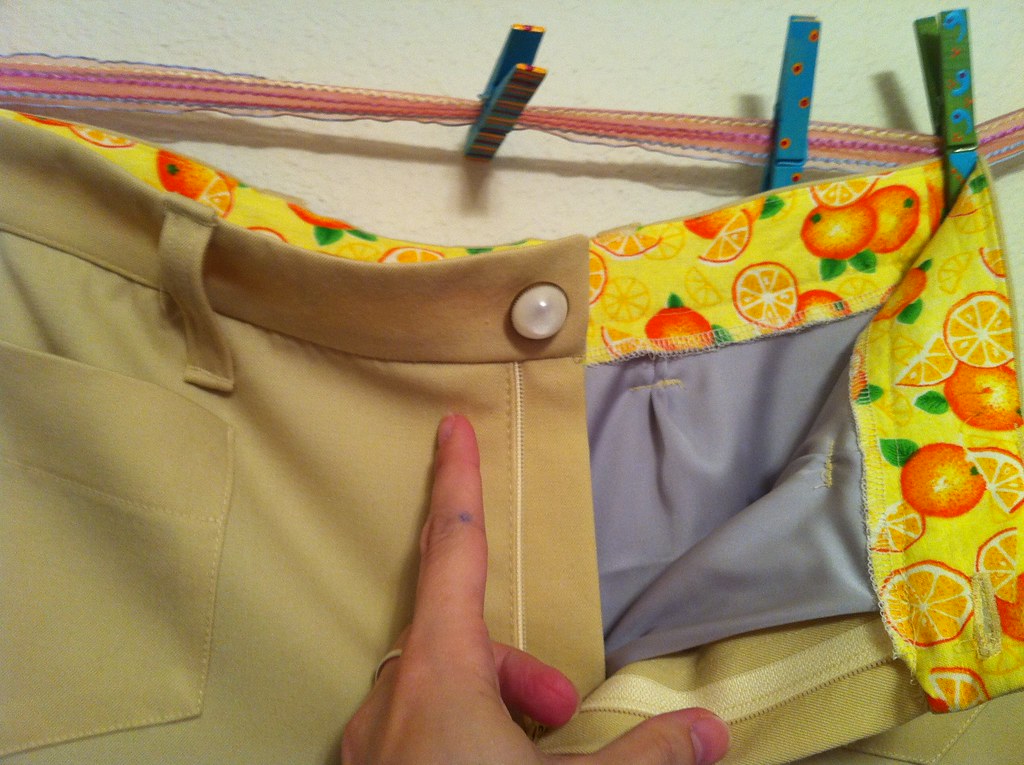
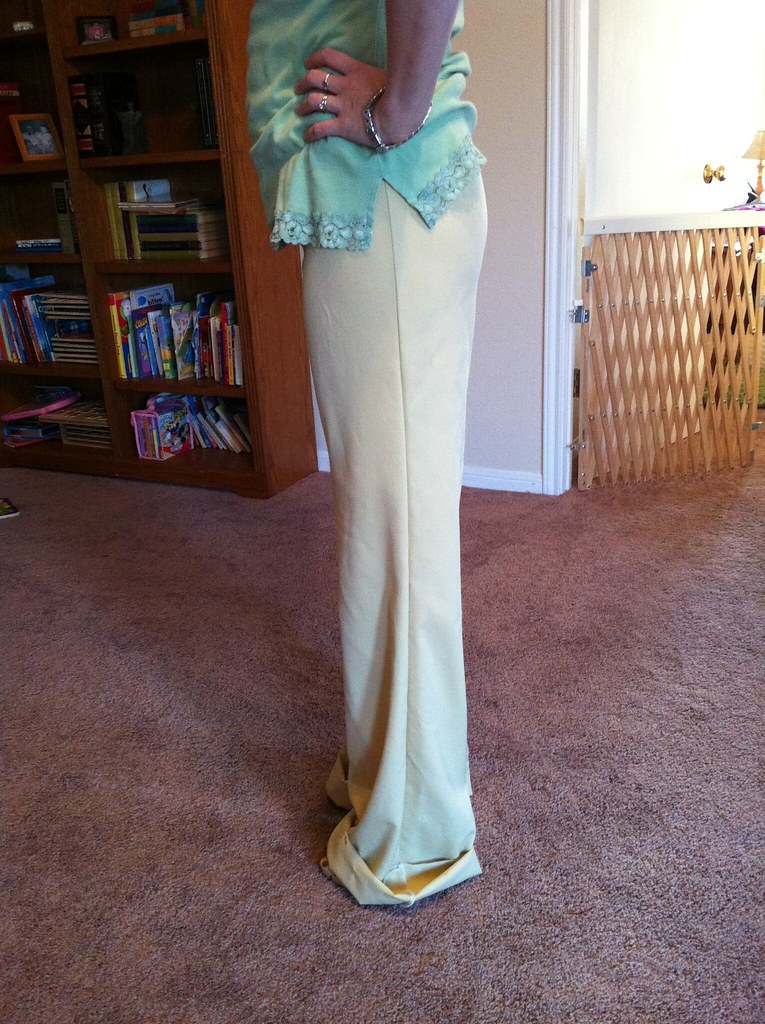
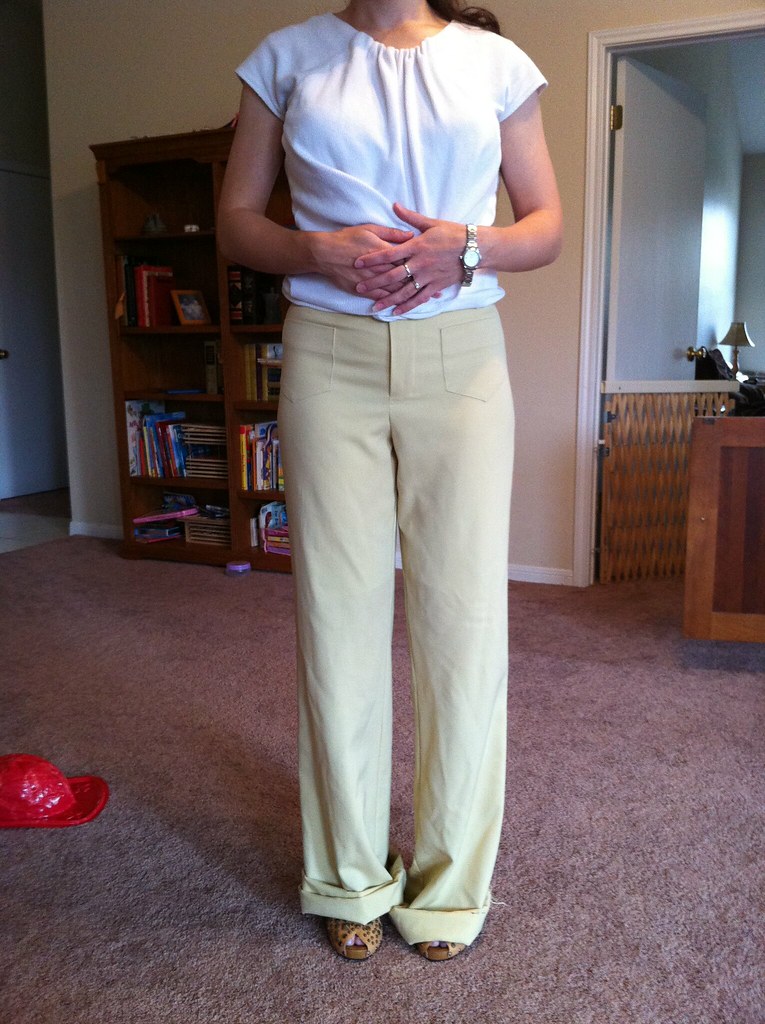
It all started with the jeans. I really needed jeans. I love my Jalie jeans, but you know, sometimes a girl needs something new and fun. So, this is Simplicity 7146, published in 1974. I seriously love all the fun details in this pattern. And that super high waistline! So me.
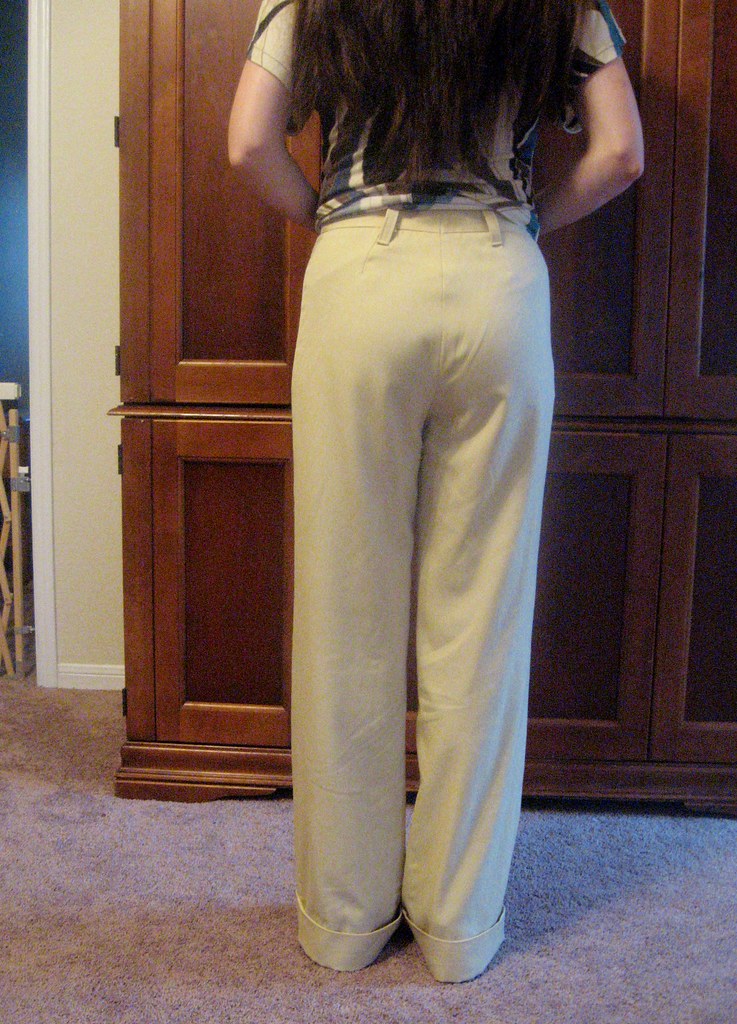
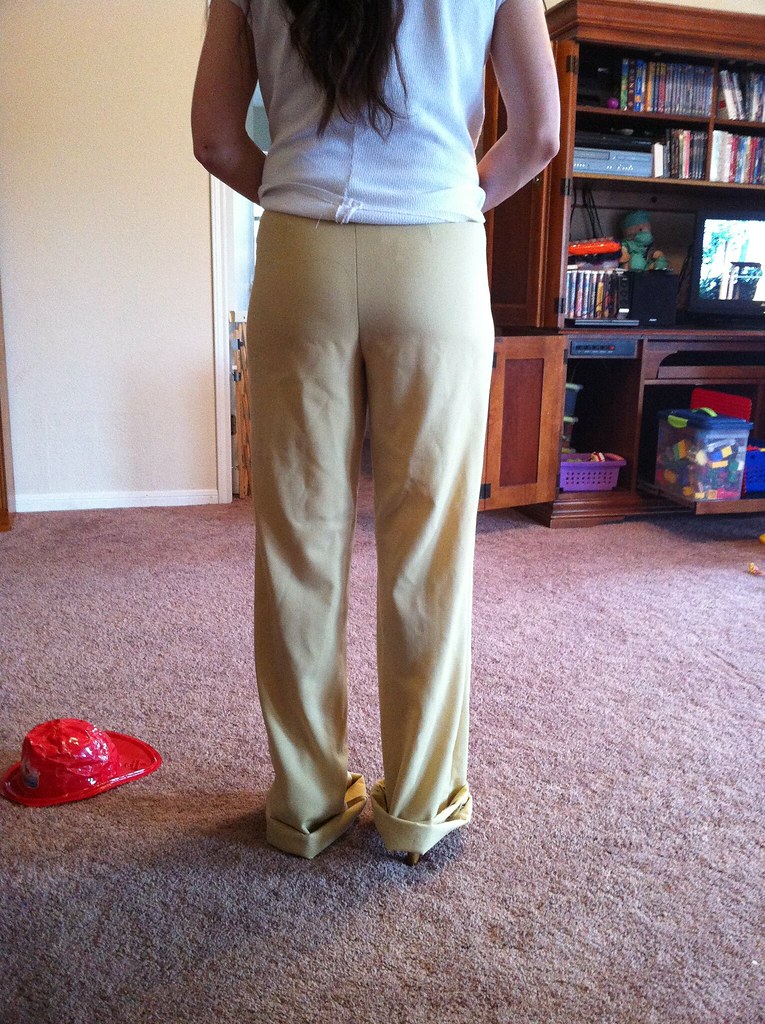
The back yoke is SO COOL! It curves down to the side seams in such a flattering way. It was not the funnest to sew... But worth it!! I did add the back pockets. They may not have needed a place for their phones back in '74, but I do! I echoed the yoke stitching in my pocket design. I didn't want to lose that nice curve. I also added star shaped rivets. Because fun.
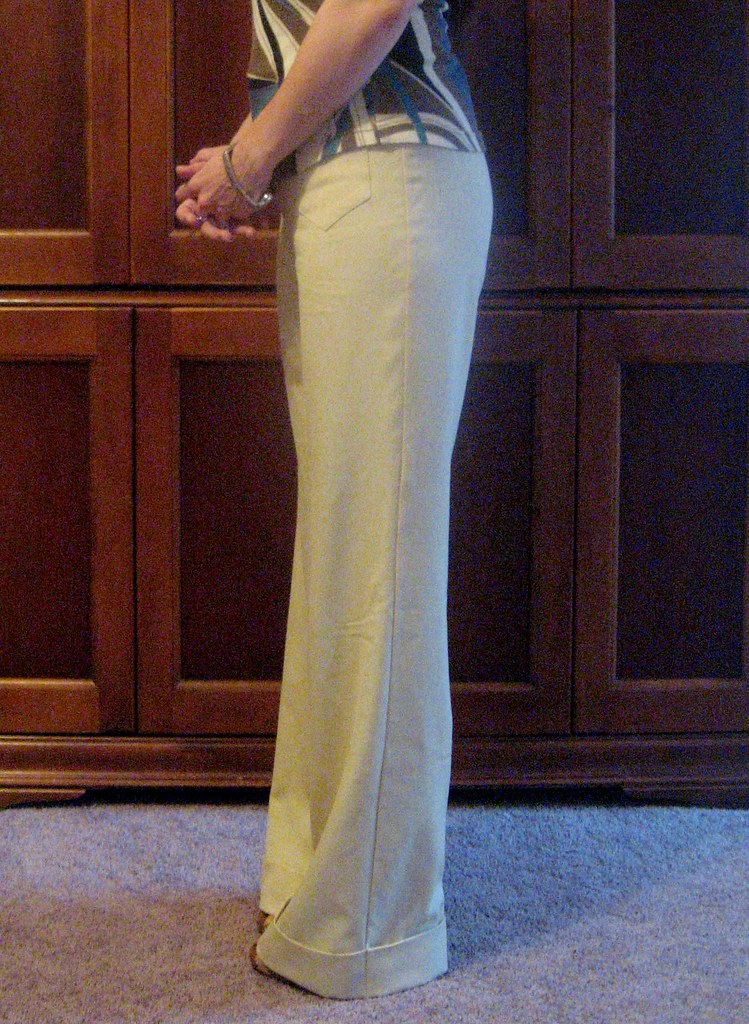
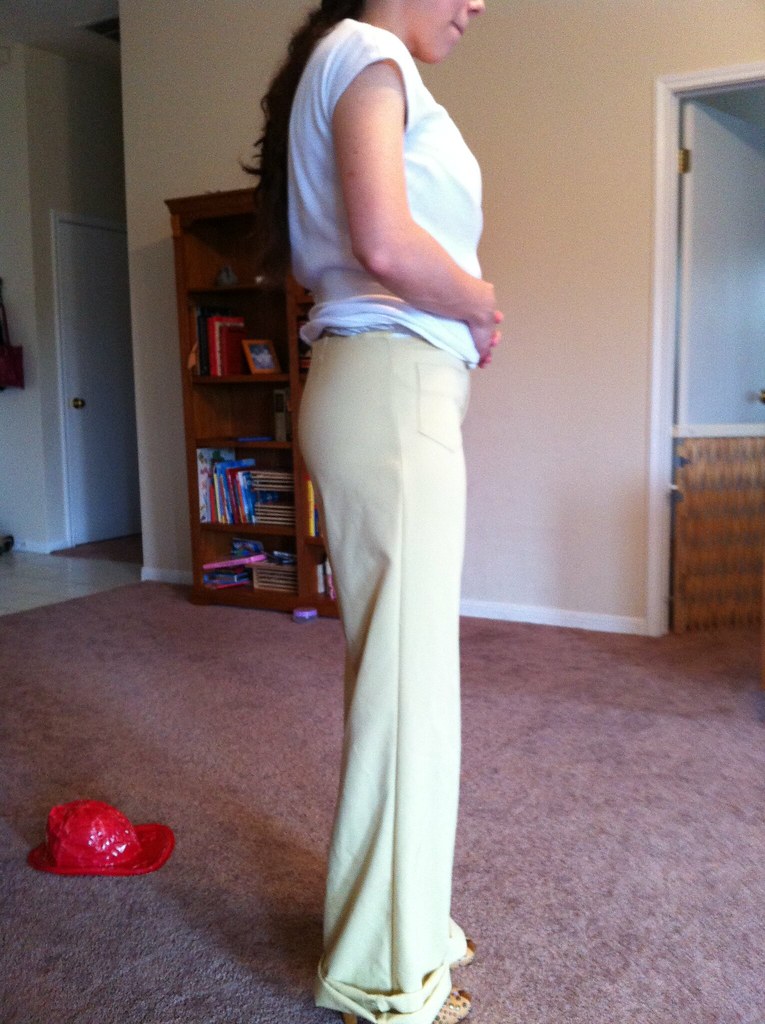
Those wide legs!! I love them!!! Alexa has played so much disco lately, both as I sewed and then again for pictures. Gotta get into the groove, baby!
For fit, I compared the pattern to my trusty Jalie, and it was an exact match. Like, seriously, I'm tempted to go find every pants pattern Simplicity published in 1974. How often do pants fit right out of the envelope?? I have lost a few pounds since the last pair of Jalies I made, so I took out 5/8 inch from the side seams before I added the waistband, but no other changes were needed. *Cue chorus of angels*
I'm seriously loving the high waisted rear view. I think the higher pockets and stitching are really flattering. This 40 year old butt will take all the visual lift it can get!
Sadly, my wardrobe is deficient in appropriately retro tops!! Burda magazine to the rescue. A peasant top has such an awesome 70's vibe, I flipped through at least a decade of burda back issues before I found the perfect one in 02/2010.
I think the cropped, blousy top is a nice complement to the wide leg jeans. I love the waistband, which reduces the likelihood of wardrobe malfunctions that might arise in a cropped top, and does a nice job visually cinching the waist.
The fabric is a mystery synthetic given to me years ago. It's stretchy and reasonably drapey, so there's gotta be some lycra in there somewhere. The print is a paisley in muted pinks and burgundy, with pops of bright apple green. You can see here that the top is quite voluminous. I don't think it would be very flattering in a crisper fabric, but it works in this.
Since the style is pretty unfitted, I didn't bother with an FBA, but I did shorten the neckband by about 2 inches and gathered it in tighter so that the neckline wouldn't drape off the shoulder as the pattern intended. Worked a treat! The neckline shape is very nice and hugs the body well.
You can see the pattern details a bit better in back. The neckband and waistband are shirred with elastic to give the pattern shape. I used my Singer 127 treadle to do the shirring. It was quite a workout, but really fun. The sleeves are gathered into bands which gives them nice puffiness without too much volume.
I've already worn these jeans a ton, so I know they're going to be a wardrobe workhorse. I love it when truly retro/vintage items work so well in a modern wardrobe.

Tuesday, February 12, 2013

Burda Magazine 04/2011-118 tunic top

I made more #oonapants, y'all. They are so crazy comfortable. That means I need more tunics though.
Right?!?! I'm pretty sure I wore this outfit in 1989. I'm totally breaking my rule about wearing a trend the second time around, but I don't care.
The top is from the 04/2011 issue of Burda magazine. This is top #118, but lengthened to about halfway to the dress length. It is a really simple top - only 4 pattern pieces, and it went together really easily, at least it would have, if I had chosen an easier fabric...
The fabric is a poly/lycra single jersey from Fabric.com. They called it "Roma" jersey, whatever that means. It was literally the only piece of solid black jersey in my stash, which is sort of ridiculous. It's pretty thin and crazy curly, so it was a serious pain to sew. Such a pain in fact, that I couldn't bring myself to hem the bottom.
You can see the design features a little better here. The top has batwing sleeves, cut on to a yoke both front and back. The seam hits just above the bust. The neckline is a bateau style and finished with a simple turn and stitch hem. The sleeves are drafted VERY long, but I had to shorten them 7 inches because of fabric limitations. In this pic, I have them slightly scrunched up. They are bracelet length when pulled down. They are also VERY slim. If my fabric had any less stretch (this stuff could be swimwear lycra,  it's so stretchy), the sleeves would be too tight.
The other major alteration I made was to the length. I cut it between the dress and top length, as I wanted sort of a minidress/long tunic look. Initially, I put in the pockets, but they were an utter disaster in this thin knit. I looked like I had saddlebags hanging from my hips. I serged them off, and the silhouette is much better, but  now I have no pockets. Boo.
I wore my top today in full out 80s style, with my newest pair of leggings. These are the same pattern as the previous pair, this time in a cotton-lycra jersey from Nature's Fabrics. I wore it with wedge heel booties from Target, a vintage jean jacket and purple glitter sunnies from Target.

Friday, June 8, 2012

Burda Magazine 10/2010-118A

Thanks everyone for your lovely comments on my Qiana maxi dress! It is definitely a new favorite and I know I'm going to wear it a lot.

I've been browsing through my patterns lately, with an eye toward one that would make the perfect gingham blouse. This one totally wasn't even on my radar, until I saw ManiMayor's  review on PR. Her version was so lovely, I knew I needed one of my own.
The pattern is from the 10/2010 issue of Burdastyle magazine. It has three different views in the magazine, each view with a different tie. It is a very basic blouse with little in the way of shaping, set in sleeves, and a bias bound, gathered neckline with a slit. The fabric I used is a stretch cotton from FabricMart. It reads as a gingham at a glance, but is actually an even plaid.
When I first put it on Sandra Dee, I thought I had a total wadder on my hands. It was seriously frumpy and sacklike. Fortunately, I had a belt lying around and popped it on. With some waist definition, I think it is pretty darn cute.
The only changes I made to the pattern were to the neckline. Several of the reviewers on PR mentioned that the slit was quite low, so I didn't even bother transferring the marking per the pattern. I just marked the slit where I wanted it while I was tissue fitting. Burda has you put the button on the inside, but I found a cute one that matched, so I sewed it on the outside instead.
For the tie, Burda's instructions called for the neckline to be finished with the bias strip, then for the tie to be topstitched on between the two shoulder seams. I didn't think this gave it a very nice finish, so I sandwiched the tie in between the neckline of the top and the bias strip and stitched them together to enclose the tie with the neckline. It looks very nice both inside and out.
The other major change I made was to make the tie significantly smaller. I cut the width in half and shortened the tie so that when tied in a bow, the ends fell at my waist. The original tie is really huge, and since my fabric already had a lot of body, it was really overwhelming. I think it would have worked in a softer, more draping fabric though.
It passes the sleeping baby test of comfort.
I had fun taking some pictures with different bottoms. I don't generally wear my tops tucked in, but this one has a good shape for it. The bottoms I paired it with are; McCalls 5592 white jeans, New Look 6816 silk pants, McCalls 3830 pencil skirt and black knit column skirt (pulled up to midi length). I'm kinda partial to the short black pencil skirt look myself. What do you think?

Wednesday, April 27, 2011

BWOF 04/2009-118 pants!

Thanks to all the fit help that I got from all of you, my best fitting pair of pants ever is finished!
I'm wearing them here with New Look 6816. I thought the Pucci-inspired print was a nice nod to the 70s and went with the bell bottom shape. I hemmed them extra long so that my toes just peep out in heels.
The pattern is BWOF 04/2009-118. It's been reviewed favorably on PR and I can see why. It is a very flattering shape and the waist comes high enough to cover my post-baby fluff, but not so high that they feel like "mom jeans". Alterations I made were to deepen the crotch curve. Back alterations are detailed here. In front I copied the curve from the Jalie 2908 pattern, as I get a good fit in front with them. I also had to take 2 inches off of the length, and I hemmed them for a 4 1/2 inch heel. Now, I am 5' 6" with most of my height in my legs. Flat footed, I have a 32 inch inseam. These suckers are LONG! I also lined them, which this version does not call for. As for the pattern instructions, I didn't use them at all as they are in French in my copy of the magazine. I'm pretty proud of myself for making lined pants without instructions, although I did refer to the Jalie pattern for the fly.
My facings are quilting cotton and I used a vintage button from the stash. It seemed appropriate, but I'm not sure it is going to be belt friendly. We'll see. The fabric for the shell is from a mystery bundle from FabricMart. I didn't burn test it, but it behaves like wool with a bit of poly. It didn't shrink or felt in the wash, but it sewed and pressed like wool. It also feels and smells like wool and is a bit water repellent. It shaped really well with steam. It was a pleasure to sew.
Here is the lining. It is a grey mystery fabric from the stash. It is actually nice and silky. I have about 4 yards left, so I think I may make a top to go with the pants. I saw a grey and yellow ensemble at the Banana Republic Fall 2011 show that I really liked, so I think a grey top would be fun with these pants. In the pictures they are reading as khaki, but they are closer to yellow.
And the fit? Worlds better than unaltered but not perfect. Still, I'm happy. I actually think the asymmetry that you see here is a sewing error. I had a bit of a mismatch in the side seam that I didn't correct and I wonder if that is what is making those ripples on the right. The left side is perfect!
Here is the left side seam. Nice and straight! You can see the shape of the pant better here as well. The flare is pretty pronounced. I really like it.
So, I think I may have a new TNT! As of my writing this, I've been wearing these for several hours and they are very comfortable. The lining makes them feel very luxurious. I'm glad I listened to Mitch on that one! I have another pair of pants from a 70s pattern cut out, and I've copied this crotch curve to them, so we'll see how that goes. They are much higher waisted, so it'll be interesting to see how that changes the equation. So, have you started your Bellbottoms yet?

Monday, April 25, 2011

Easter dress and pants fit update

I wore my dress today! You remember, the one I wasn't sure I liked.
And I love it!! The brown accents are fun and I love the length. It feels kicky and fun. The fit isn't bad, but I think I'm just getting more picky about fit. I'd have been thrilled to find anything that fit this well off the rack, so I'm pleased. That said, I think I'm going to need to start looking closer at the fit in my shoulders. I think I may need to start making a broad back adjustment as a standard change for me. I didn't in this dress and it pulls a bit when I cross my arms in front of my chest.

What about those pants I'm working on? I want to thank everyone for the comments, emails and links you all sent me. I love the support from the sewing community! You are all awesome!! Myrna, who has a similar figure to mine, reminded me of a similar journey that she made while fitting pants. Her posts here, here and here, were so helpful! I'm linking them for your benefit, but also so that I can find them again. The old memory just ain't what it used to be...
So, my next step will be to get a flexible curve to measure my own crotch curve more closely, but I did do some tweaking of the current pants to see what I could do just by deepening the crotch curve.
What do y'all think? I'm pretty happy with how well they fall now. It isn't perfect, but I'm calling it good enough.
Here is the altered pattern piece. The original seamline is in blue with my altered seamline in red. I dropped the crotch curve down nearly an inch and pinched out about 5/8 of an inch from the back waist. You can see how different the shape is from the original curve.
Joy had asked how the alteration affected the side seam, and I am happy to say, it is still nice and straight.

Pants fitting is very interesting. Everything is so interrelated, but not at all intuitive for me. I'm excited to have this pair coming along so nicely. Hopefully, I'll have a completed pair to show you in a couple of days. Every time I tried them on, Mitch asked if I was going to line them, so I finally took the hint and am adding a full lining.

Thanks again to everyone who helped me fine tune these. I so much appreciate all the help! It's so great to have so many educated eyes to scrutinize my work. You all rock!

Thursday, April 21, 2011

Pants fitting...

Somehow, I find myself in great need of new pants. Since I got my first burda magazine in April of 2009, I've wanted to sew model 118, these cute pants,
but my issue is in french, so that slowed me down a bit. I'm confident enough now in my pant construction skills to give it a go without instructions. What is slowing me down now is fit.
Here they are from the front. The inseams are sewn, but crotch and side seams are just basted so that I can adjust as needed. I think the fit is pretty good actually from this angle.
The side seams are nice and straight, but from here you can see that the back is not falling quite smoothly.
From the rear, I like the fit through the hips and backside, but I have wrinkles in the legs that radiate from hip to knee,
which disappear when I tug the center back up a bit. This does make the crotch just a wee snug, but it fixes the back wrinkles. So, dear friends, here is where you come in. What do you think is going on here? I'm thinking for this pair that I can make them work by shaving off a bit at the back waist, tapering to nothing at the side seams, then deepening the back crotch curve to compensate. What would you do?