I had a couple of folks ask about the different ways to finish the neck edge of a one piece collar that I referred to in my post about
Myra's seersucker blouse. I've noticed that kid's one piece collars tend to be constructed one of two main ways. BMV uses a method that involves clipping the collar at the shoulders, flipping the seam allowance of the undercollar in and hand sewing. Simplicity, Burda and Ottobre tend to use a strip of bias to finish the collar. I've used both methods several times, and I think each has it's pros and cons. Here they are, head to head.
For Myra's seersucker blouse (an Ottobre pattern) the bias finish was used. I've also used this finish
here,
here, and
here.
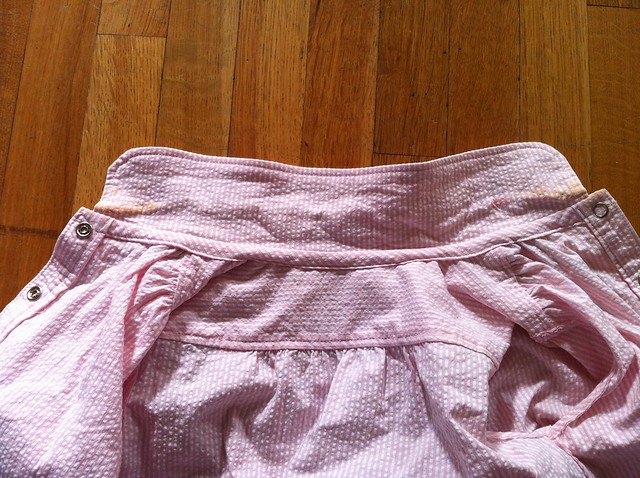
Here is how it looks on the inside. The collar seam is tucked into the bias strip, which in turn in tucked into the front facings, which in this case are stitched down, but they don't necessarily have to be.
(ETA for
Naptime Seamstress, I did enclose the yoke, using
kbenco's awesome tutorial.)
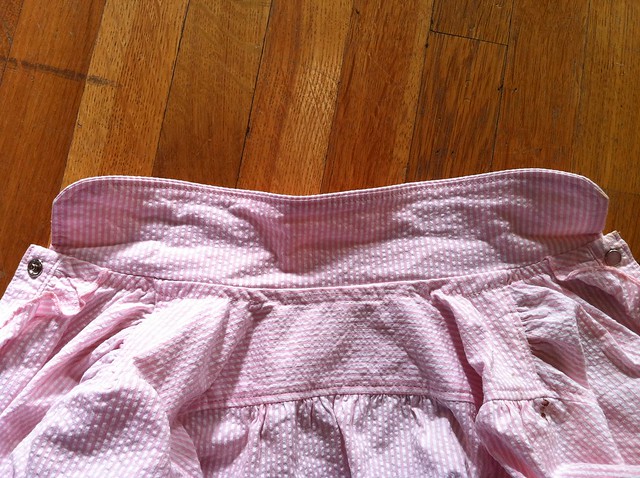
Here is how it looks from the outside. As you can see, the line of stitching to attach the lower edge of the bias strip is visible. Since the collar folds down over this, it doesn't generally show, unless you tend to "pop" your collars.
To construct this collar, you start by assembling the collar, just stitching right sides together, trim seam allowances, clipping if needed, turn and press. Topstitch now if you are going to.
For the visual learner, here are the instructions and diagrams from
New Look 6638. Basically, you baste the collar to the neckline, fold your front facings "backward" along their fold lines (ie, right sides together) over the collar and place the bias tape right side down on the seamline, overlapping the facings at either end. Stitch this big fat thing all together, then trim and grade the neckline seam. Flip the facings around to the wrong side (where they belong) and press the bias strip over the raw seams, turning under the raw edge of the bias. You should have a prettily enclosed seam with no exposed raw edges. Now comes the trickiest part - stitching down the bias. It is really easy to end up with little tucks in the seamline, so stretch the bias as you go and go slowly.
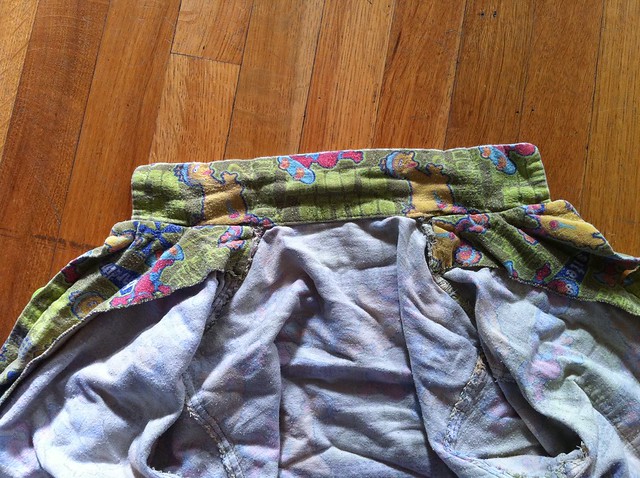
The second common method is shown here in Logan's PJs,made with
Butterick 4222. This is Logan's TNT PJ pattern, and I've made it at least 7 times.
Here is the inside. The facings enclose the collar to the shoulder seam, at which point the collar encloses the neckline seam. A disclaimer - I do not hand sew PJs, so this collar is actually edgestitched rather than hand sewn.
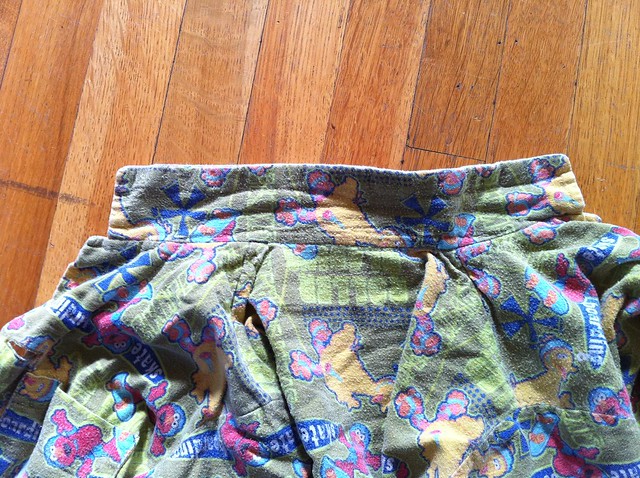
Here is the outside. On this one, there is no visible stitching, even on mine as I stitched in the ditch to attach the collar.
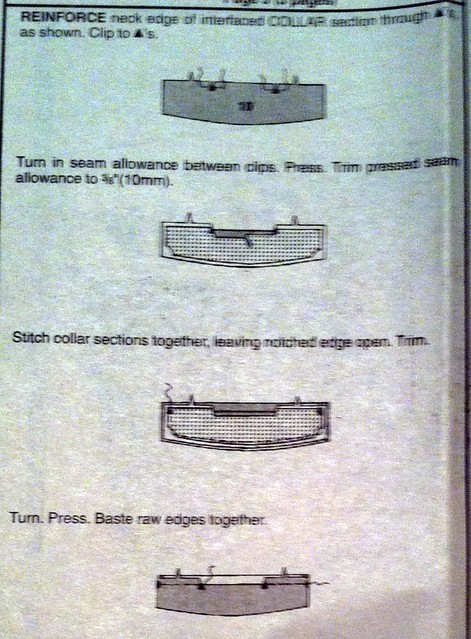
To assemble this collar, you have to start by preparing the collar fairly exactly.
Here are the instructions from
Butterick 4222. Since the seam allowances on this collar are both self enclosed and enclosed by the facing, they have to change direction. To make this possible, you have to reinforce and clip BEFORE you assemble the collar. In this case, the collar is notched where it lines up with the shoulder seam. As you recall, this is where the facing ends. Working with the interfaced collar only, you'll reinforce the stitching line at both notches, clip to the stitching line (don't be wimpy either - clip ALL THE WAY to the stitching line) and then press under the seam allowance between the clips. Now you can sew your interfaced, reinforced, clipped and pressed collar to the undercollar, with the undercollar against the garment right side. Trim, grade, turn, press - you know the routine. Now that your collar is assembled, you are ready to attach it.

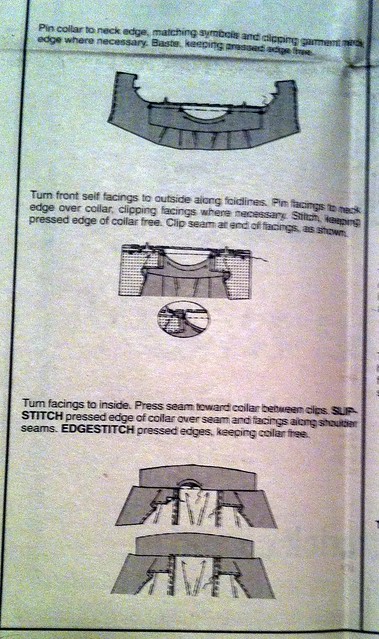
As with the last type, you'll first baste your collar to the neckline, right sides together. But this time, you don't want to stitch the undercollar in between the clips. I always stitch with the collar side up, so that I can be sure to hold the pressed under edge away from the needle. Once you've basted, you fold the facings again on the fold lineover the ends of the collar. Your facing should come right up to the edge of your clipped area. Again, stitch through all the layers, grade the seam allowances and clip them to the seamline even with the clipped bit of your collar. With your seam allowances clipped, you should be able to tuck them in to the collar where it is still unsewn. Press the seam toward the collar, tucking it inside and then handsew the opening or edgestitch it closed, as you prefer.
So, which method is better? I think that depends on you, your project and your goal for the finished product. Each method has it's pros and cons, and I think you'll find uses for each as you sew.

5 comments:
It's funny because while I"m not known for my love of Extra Work and the BMV method always seems like less work... when I finally get to that part of the project I invariably go for the bias method. Clearly, there's something about it I like. It's funny how you get attached to a certain method.
(Excellent explanitory tutorial, by the way!)
Thanks! After reading this good explanation of both types, I think I prefer the bias tape method. In the past, I've even used ribbon, if I didn't want the bias tape.
I think on the original post about Myra's blouse you mentioned enclosing the yoke seam. Did you? Could you explain that, too?
Thanks!
Interesting! I've been using the first of these methods because Burda, Ottobre AND Japanese patterns I've used for kids clothes use it - but the look of it on the outside annoys me. I want to try that second method!
@Naptime Seamstress - I did enclose the yoke. I always use the tutorial over at kbenco's blog Lined yoke tute
Very helpful - thanks! Makes me want to attack a real shirt again!
Post a Comment