One of my friends is having a little baby girl. After 3 boys, she's very excited (and a little nervous!) to be welcoming some pink into their family.
I thought this little set was nicely girly, but without making her big brothers want to run and hide! Both fabrics are from Chez Ami. The floral print is a cotton/lycra jersey and the aqua is a coordinating interlock. It's so soft I want to make my entire wardrobe out of it. Perfect for a wee princess.
The tunic is from the 06/2012 issue of Ottobre. It's very simple, but with some fun details.
The body of the tunic is gathered into a sweet round yoke, which is finished with a knit binding. The neckline is snug, but the binding has a lot of stretch, so it should be easy to get onto baby and comfortable to wear.
The full sleeve is gathered into a hemmed cuff. It's a pretty little detail. A full sleeve is lovely, but gets in the way sometimes. I think this is a nice functional compromise.
The pants are a basic legging pattern from the 06/2008 issue. I've made them quite a few times now. In fact, I think I've made a pair for every baby gift I've given for the last several years. Leggings are such an essential baby basic.
For this pair, I finished the leg opening with a binding, rather than a plain hem. I think this is a nice look and ties the two pieces together well.
I hope the sweet princess and her mom like her new clothes. I can't wait to meet her!
Showing posts with label baby. Show all posts
Monday, March 17, 2014
Tuesday, October 23, 2012
Mickey Mouse Costume
Naturally, since we have a Daisy and Donald Duck, we needed a Mickey Mouse.
Duncan's costume should have been the most simple, and the basic pieces were. The shirt is a raglan tee from the 04/2010 issue of Ottobre, and the shorts are from the 03/2011 issue, but really any basic tee and shorts would do. For warmth, I made both pieces out of fleece. The tights are purchased.
But Mickey's ears gave me the most trouble! My initial plan was to add a hood (Ottobre conveniently provided one with this tee pattern), and put ears into the hood. Unfortunately, the fleece was too stretchy and soft and my poor ears were limp. I tried everything to make them stand up - hair canvas, fusibles, batting, even popsicle sticks - but nothing worked.
Finally, I gave up on the hood idea, and decided to see what knitting patterns were available on Ravelry for a Mickey Mouse hat. There weren't any knit patterns I liked, but this crochet pattern immediately caught my eye. Of course, I've never crocheted a hat, but there's no time like the present to learn!
Then we tried the hat on the boy. And this happened. Every time. The other two kids love the hat, so I know it isn't uncomfortable. Duncan is just ornery.
I added some elastic bands with a velcro closure under the chin. (Safety note: If you are adding a chin strap to a hat for a small child, you must be sure that the closure is easy to open in an emergency. This is a major strangulation hazard. Velcro or snaps are a good choice. Ties are not.)
Fortunately, the strap seems to keep it nicely on his head, and his ears are nice and perky. Come on, Halloween! We are ready!!
Saturday, July 21, 2012
Ottobre 06/07-9, 06/08-2 and 01/10-2
A very dear and very old friend is having a wee girlie child this fall, and that means baby girl sewing!! There is something ridiculously satisfying about sewing itty bitty girl clothes.
This little outfit comes from three different issues of Ottobre. The pinafore dress is from 06/2007, the top from 01/2010 and the leggings from 06/2008. Have I mentioned how much I love my Ottobre magazines? They are the best.
The pinafore dress is the star of the show here. I made it out of a couple of quilting cotton prints. I love the way that the bodice lining and the pocket binding are the same sweet polka dot fabric. I even found a fun ribbon with a woven in polka dot to tie it all together.
Isn't that pocket ridiculously adorable?! I love the sweet little gathers and the narrow binding.
The pinafore closes with snaps and I used some tiny vintage metal ones. I really like the way that Ottobre designs for real life with babies. So many of these wrap-style dresses from other pattern companies have ties, and they are such a pain to put on a wiggly baby! Snaps are much more practical.
Since the wee princess is coming during the colder season, I made her a few layering pieces for under the dress. The top is from the 01/2010 issue, and is a simple tee with a slightly wide, gathered neckline and gathered, cropped sleeves. I made it out of a super soft rayon jersey that should be lovely for baby - light enough to layer over, but still warm. The leggings are the basic leggings from 06/2008 that I have made several times. I made them from a soft but sturdy rib knit. I hope they keep her warm and cozy!
Saturday, June 2, 2012
Ottobre 04/2010-2 & 06/2008-2
Now that I have given this little outfit to the recipient, I can show it to you.
I'm ridiculously please with how well this turned out, if the truth be known. The top is from the 04/2010 issue of Ottobre. I chose it for several factors - front closure, sleeves and easy fit, but I wasn't sure if I really LOVED the style, although I did like it pretty well. Now that it is done, I really do love it. I have never had a single item of clothing that went together quite this perfectly, which is a relief since I really don't like gifting items that aren't perfect.
The front button bands - oh, I just want to sing about them. I don't know about you, but when I attach bands (or collars, waistbands, cuffs, etc) like this, the top and bottom aren't generally perfectly balanced. I try to get the right side to look great, but sometimes the stitching slips off the band on the wrong side, or the stitching isn't quite right on the edge. These bands are perfect. Can you see the stitching in the photo. Seriously, I'd never have believed I sewed these myself.
And then, lightening struck twice, and the binding is just as even. I'm not sure if this should be my new go to baby girl dress or if I should retire it now for fear I will never again achieve this level of perfection.
The little pants are a basic leggings pattern (from 06/2008, but Ottobre has published several, I just happened to have this one traced already). I sewed them up in denim colored knit from Joann and topstitched the waist in denim gold topstitching thread to give them a bit of a "jeggings" look. The fabric had this cute ruffled selvedge, so I just used that as my hem. It is really soft and I thought it would be more comfortable for baby, not to mention cute.
I hope Mommy and baby like the new outfit!
Saturday, May 5, 2012
Ottobre 03/2011-6, again
It seems like I often say I'm going to make a pattern again, and then get distracted by something else, but this time, I actually did make something twice!
I just love the first version of this sleeveless tee I made for Duncan, and he needed a top to match his new shorts.
This time I made the top out of a Chez Ami rib knit. The ribbing for the binding is from Joann, and my coverstitch machine did NOT want to play nice with it. In the end, it is on. That's about all I can say about it. I put a little patch at center back to coordinate with the monkey patch on his shorts. These little patches are so fun! I found them with the cloth diaper notions at Joann. They came in a pack of nine patches, so you'll see them again.
ETA: (5/7): I finally got some pictures of the outfit on the baby.
I couldn't be more thrilled with how well the colors matched! Mitch keeps calling these his storebought shorts. :) As if!
In other news, I sewed up the first muslin for the wedding dress this week, so hopefully we'll get to do our first fitting today. Woo-hoo!
Thursday, May 3, 2012
Ottobre 03/2008-7
Up until now, I haven't needed to do much Duncan sewing. Logan left a ton of hand me downs, and Duncan has been pretty well dressed. But, since their birthdays are offset by a season, we have no warm weather clothes in his current size. Even all of his pants are lined or fleece. The kid needs shorts.
So I made him Ottobre 03/2008-7, the "Aqua" shorts. I made them a size too large, since I wanted them to last him a while.
The pattern is an elastic waist short with front and back patch pockets, and a yoke both front and back. Fun times with topstitching!
I added a little patch to one of the back pockets. Duncan is definitely a little monkey!
Here is a side detail shot so you can see the pockets, yokes and topstitching. I didn't have any yellow heavyweight thread on hand, so I used the triple stitch to give it some density and make it pop. I didn't use my twin needle this time - just sewed it freehand. Sometimes I'm crazy like that.
From the back, I actually really like the way they fit, despite being a size too big. There is plenty of diaper room. You have to love that cloth diaper friendly European drafting. The fabric is a printed canvas from Mom's stash. The selvage says that it comes from Joann, but I haven't seen anything this cute and boy friendly there lately!
One more cute baby picture, just for good measure. It's so nice to have such a cooperative model for a change!
So I made him Ottobre 03/2008-7, the "Aqua" shorts. I made them a size too large, since I wanted them to last him a while.
The pattern is an elastic waist short with front and back patch pockets, and a yoke both front and back. Fun times with topstitching!
I added a little patch to one of the back pockets. Duncan is definitely a little monkey!
Here is a side detail shot so you can see the pockets, yokes and topstitching. I didn't have any yellow heavyweight thread on hand, so I used the triple stitch to give it some density and make it pop. I didn't use my twin needle this time - just sewed it freehand. Sometimes I'm crazy like that.
From the back, I actually really like the way they fit, despite being a size too big. There is plenty of diaper room. You have to love that cloth diaper friendly European drafting. The fabric is a printed canvas from Mom's stash. The selvage says that it comes from Joann, but I haven't seen anything this cute and boy friendly there lately!
Friday, March 30, 2012
Ottobre 03/06-12 &14
So, right - trench coat. On Monday, when I posted that, I realized that Easter was 2 weeks away, and I hadn't even decided what I was going to make Duncan yet. Ooops. I looked over everyone's comments about the quandry, and it was a pretty even split. So, I left the decision to Mitch.
And we have a suit. And I can't even handle how cute it is.
Both pieces are from the 03/06 issue of Ottobre. The jacket is style #14 and the pants are #12. In the magazine, they are made of linen and styled with a tee shirt. I made mine from a pinstripe cotton/poly suiting weight fabric. The pinstripes are difficult to see in the pictures. They are a light silver color.
The jacket is a basic, unlined jacket with collar and lapels. It is constructed much like a casual shirt, in that the collar is attached in one piece, rather than as part of the facings, and the front facings are applied over the collar, with the seam allowances tucked into the collar itself. Basically, constructed using the second method I talked about here. The pattern called for three buttons, but I liked it with just two.
The pant pattern is seriously adorable and I know I will be using it again. It is a 3/4 length pant, which I just love the look of on a wee guy. I think it has a sort of rakish, Tom Sawyer sort of vibe. These pants have some great details as well.
In front, there are hip pockets and a faux fly. The pattern also calls for cargo style bellows pockets on the side, but they didn't really go with the overall feel of the pinstriped suit so I left them off.
In back has a jeans-style yoke and patch pockets. I didn't match the stripe across the yoke, but the stripes match impeccably everywhere else, even across the shoulder seams and the front pocket facings.
Friday, November 18, 2011
FO: Not-Quite-A-Baby hat and mittens
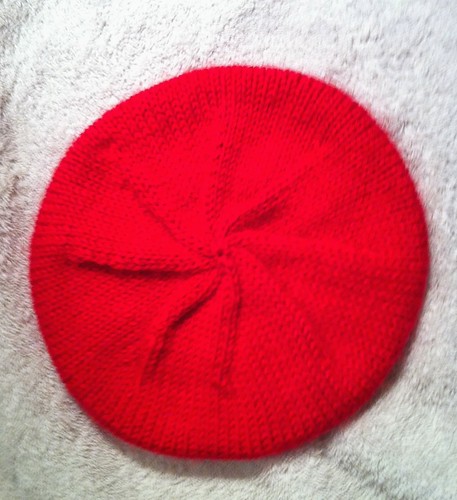
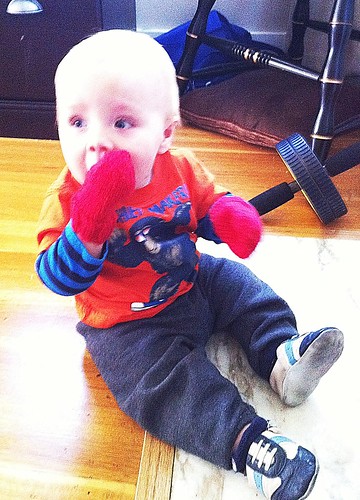
My little mannie was well equipped for the winter chill last year. My sister and I knit him many hats and mittens, but as this year started to get colder, I found myself unprepared. All of last year's gear was too small, but knitting patterns seem to be sized for newborns or toddlers, and Duncan is in between. So, I hitched up my big girl pants, and adapted a pattern for mittens. Then I got crazy and wrote one for a hat. So, lest there be other wee one year olds in need of headgear, I'd like to share my pattern with you.
The Not-Quite-A-Baby Hat
Yarn: Stitch Nation by Debbie Stoller Washable Ewe
Needles: US size 6 and 7 circular, 40 inch for Magic Loop or dpns
Gauge: 5 1/2 sts/inch & 8 rows/inch in stockinette stitch on size 7 needles.
Size: Intended for Duncan's 17 inch noggin
CO 104 stitches onto your size 6 needle and divide in half for Magic Loop or arrange evenly over your dpns. Join to knit in the round.
Knit k2 p2 ribbing for 9 rounds.
Switch to size 7 needles and knit even in stockinette stitch (knit all rounds) for 2 1/2 inches. If you want to extend the wear of your hat, knit for 3 3/4 inches and fold up the ribbed section. Then as not-quite-baby grows, you can fold down the ribbed section for more length.
For the decreases:
1) *k11, k2tog, rep from * to end (96 sts.)
2&3) knit
4) *k10, k2tog, rep from * to end (88sts)
5) knit
6) *k9, k2tog, rep from * to end (80 sts)
7) knit
8) *k8, k2tog, rep from * to end (72 sts)
9) knit
10) *k7, k2tog, rep from * to end (64 sts)
11) knit
12) *k6, k2tog, rep from * to end (56 sts)
13) *k5, k2tog, rep from * to end (48 sts)
14) *k4, k2tog, rep from * to end (40 sts)
15) *k3, k2tog, rep from * to end (32 sts)
16) *k2, k2tog, rep from * to end (24 sts)
17) *k1, k2tog, rep from * to end (16 sts)
18) *k2tog, rep from * to end
Break yarn, leaving a 6-8 inch tail. Thread your tail through remaining 8 sts and pull them tightly together. Weave in ends and lightly block.
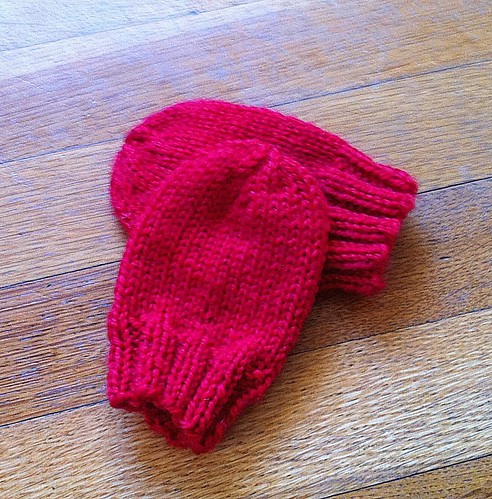
For Duncan's little mittens, I adapted the excellent Baby Mitts pattern by Susan B. Anderson. I love this pattern because it is easy to knit, cute and very useful. I knitted a few pairs of these for Duncan for his first winter and they really came in handy. This year, they were all too small, so I sized up the pattern. Here is what I did.
Not-Quite-A-Baby Mitts
Same yarn and needles as the hat
Size: Fits my 1 year old as well as my 3 year old.
CO 32 sts onto your size 6 needle and join to work in the round.
Knit k2p2 ribbing for 9 rows.
Switch to size 7 needles and work even in stockinette stitch for 2 1/2 inches.
For the decreases:
1) *k2tog, k15, rep from * to end
2) *k4, k2tog, rep from * to end
3) knit
4) *k3, k2tog, rep from * to end
5) *k2, k2tog, rep from * to end
6) *k1, k2tog, rep from * to end
7) *k2tog, rep from * to end
Break yarn, leaving a 6-8 inch tail. Thread your tail through remaining 8 sts and pull them tightly together. Weave in ends and lightly block.
I hope this keeps your little Not-Quite-A-Baby warm and cozy!
Here is the Ravelry button - Monday, October 24, 2011
Simplicity 2506
The finish line is near... This is the last costume for this year, although I still have to put together Myra's "hair", it feels like quite an accomplishment to be so close to finished!
But seriously, have you ever seen a cuter dinosaur?? That baby is ridiculously photogenic. Anyway, the pattern is Simplicity 2506. It is basically a jumpsuit, hood and booties. The pattern includes variations to make a dinosaur, angel, mouse, 2 bears and a devil, but it could be easily modified to be almost anything. I did make a few modifications, with the biggest being I made the suit out of fleece rather than felt. Really, who wants to wear felt?? I also skipped the fins along the hood and tail. They're really cute, but Duncan is supposed to be Rex from Toy Story and he doesn't have fins.
Instead of velcro as the back closure, I used a zipper. In retrospect (after wrestling Duncan into this for the pictures), I really wish I had made a snap placket across the inseam for diaper changes. It would have been really easy to do.
I also modified to hood closure. The dinosaur hood is supposed to close with a tie, but that is a strangulation hazard, so I went with velcro here, so that it just pops off it it gets pulled on. Initially, I just stitched velcro to the corners of the hood, but it isn't quite long enough to close that way, so I attached velcro to either side of a strip of bias tape to connect the two. It isn't as pretty, but it does work. If I were making this costume again, I'd have used the hood pattern for one of the other views as all the others close with velcro.
I didn't have any of that cool gripper fabric that you find on RTW sleepers, so instead I used some dimensional fabric paint to paint some dino feet on the bottom of the slippers. Since the paint has a rubber texture, it provides some grip, and since Duncan is pulling up and cruising, I didn't want him slipping around.
The pattern calls for ribbing for the wrist bands. Since the recommended fabrics are all non stretch, I thought I'd just use the fleece, but it just didn't have enough stretch when I tried. I ended up using some black sweater knit, which looks kinda cool and should help keep the cold out. The tail is stuffed with fiberfil, but if you're making this, be careful not to stuff it too full. It exits the jumpsuit right at the seat, so if it's too full, baby won't be able to sit down. Overall, this is a cute and versatile pattern that isn't particularly challenging to sew. Definitely a winner as far as I'm concerned!
Labels:
baby,
costume,
Simplicity 2506
Wednesday, October 5, 2011
New Look 6793 & Ottobre 06/2009-3
Baby showers are such a great excuse to sew up something quick and fun. This was a nice palate cleanser after my dress.
These are two of my baby favorites, New Look 6793 and Ottobre 06/2009-3. All the fabrics are from my stash, and all but the polka dot cotton are left over from other projects.
Isn't the big button fun!? After I finished it, I thought it needed something. I considered making a fabric flower out of the interlock, but then I found this great vintage button in the stash. It's nice and big (therefore not a choking hazard) and it's actually a perfect color match for the tee IRL. Love it.
As I was putting on the band, I thought the contrast between the polka dots and the stripes was a little too stark. I hit up my trim box, thinking I would try to match the top, but I found this black jumbo rick rack and I knew it had to be. I'm usually not very good at that sort of extemporaneous embellishment, but all the stars aligned this time. I hope the new Mommy likes it. I don't really know her well, but there wasn't a shred of pink on either of her registries, so I thought this color scheme would be better. And I'll be honest - I love babies in black.
Subscribe to:
Posts (Atom)