Saturday, May 25, 2013

Go To Patterns Go To Gift Bags

It's that time of year again. School is out for us next week, so it was time for me to come up with something to give the teacher's who have worked so hard all year teaching and loving my children. They both had amazing teachers this year, and truly nothing can really express how grateful I am for them.
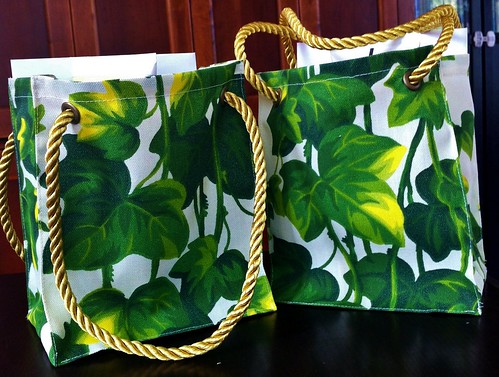
I feel like making something with my own hands in some small way expresses how important they have been to us. But without sizes and measurements, it's hard to personalize a garment, so I decided instead to make bags. I'm not at all a bag maker generally, but I think these turned out pretty darn cute.
The pattern I used is the Go To Gift Bag, from Go To Patterns. The pattern includes 3 sizes of basic gift bags, a quilted wine bag and a gift card holder. This is the "medium" sized bag, which was the perfect size for a greeting card, and a few products from Burt's Bees. The bags have a boxed bottom and bias finished top edge. For the fabric, I elected to use a heavy weight upholstery fabric, since the pattern doesn't call for any interfacing. The upholstery fabric has plenty of body on it's own, so the bags stand up nicely.
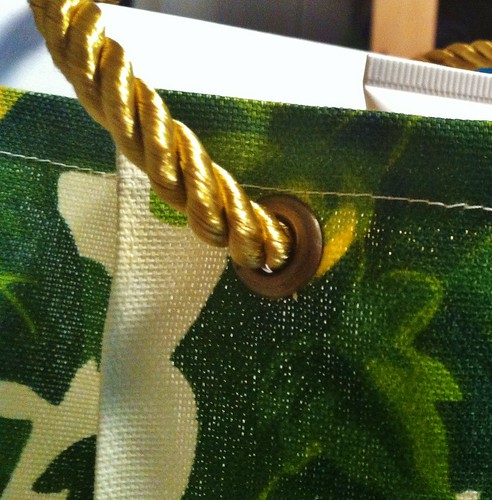
The pattern includes a couple of strap options. I decided to go with grommets, into which I threaded gold drapery cord. I really like the way this turned out. When I first pulled out the pattern, I was a little dismayed to see that the bag was unlined, since I think the inside of a bag really needs to look nice, but I needn't have worried.
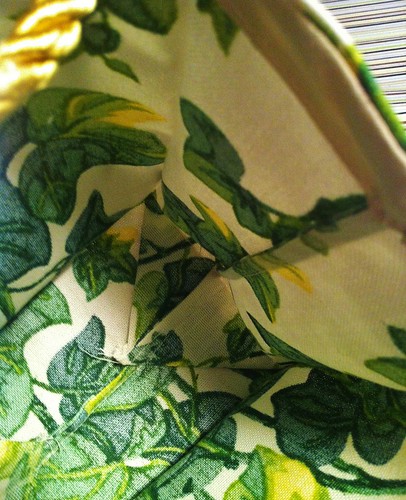
All of the seams are french seams, so the raw edges are fully enclosed. There was one thing that I changed about the construction, and that was the inner boxed corners. I am just not a very precise seamstress, so when I went to stitch down the corners, nothing lined up. It was a hot mess, and I ended up stitching the corners down in the ditch of the bottom seam, so they don't look too great in there.
For the other two bags, I stitched the corner as a french seam - stitching the first pass wrong sides together at 1/8 inch in from the seam line, then flipping the seam wrong sides out to stitch a 1/8 in seam right sides together. I'm much happier with the way it looks this way. Another feature I really loved about this pattern was the edgestitching along the corners of the bag. This keeps the bag nicely structured and helps it hold it's shape. Despite the nice seam finishes and bias binding, these bags were super quick to whip up, less than 1/2 hour each. I'll definitely be using the pattern again.

Friday, May 24, 2013

SwimAlong 2013: Swimwear construction resources and choosing a good pattern

So, you're thinking about making your first swimsuit? Or maybe you've made a few, but want to hone your skills? My goal today is to provide some resources that will help make sewing a swimsuit, whether it is your first or your 40th, a simple and pleasant experience. Swimwear sewing really isn't hard! But a few simple tricks and tips can make it really a breeze.
I personally am a big book nerd. I love to read sewing books to pick up new tips and techniques. My two favorite books about sewing swim and activewear are Kwik Sew's Swim & Action Wear and Sewing Activewear, from the Singer Sewing Reference Library. Although naturally there is some overlap between the two, I feel like they both offer solid information in an easy to understand format. The Singer book, while a little lighter on written explanation, has great full color photographs, and a fitting section that is very logical and easy to follow. The Kwik Sew book is very complete and step-by-step. It includes the patterns for several different suits and also detailed instructions for a large number of variations.
There are also a large number of online tutorials and tips. I'm going to link a few that may be helpful, but a Google search will bring up help for whatever may have you bamboozled. Of course, here at the SwimAlong, we'll be adding several tutorials and tips to help make your experience great. Stick around for that!
Creative Chicks has pulled together a collection of great Swimwear tutorials
Brown Paper Patterns gives us a collection of Swimwear resources that she found helpful, and also published a great detailed post about construction of 3416, including some awesome tips for a professional elastic strap
Heatherty Featherty extensively detailed her construction of her tankini, including her fitting process. Tons of photos and helpful tips!
Prefer video? Jalie Patterns has a YouTube channel that includes quite a few great swimwear videos, including sewing elastic
BrianSews also has an elastic application video that is excellent.
So, now you have the skills, but how to choose a pattern? Obviously, aesthetics and style play the largest role here, and hopefully our inspiration posts have been helpful, but if this is your first experience sewing swimwear, you really want a quality pattern that is well drafted (with negative ease!) and gives you the information you need to construct your suit. There are a lot of great patterns out there, but unfortunately there are a lot of bad ones as well, and it's hard to tell which is which sometimes before you buy. Here are a few that I have some experience with, in order of my personal preference.
Stretch & Sew - I put this one on the top of the list because I personally think they are the best. The suits are drafted well and the instructions are clear and complete. Unfortunately, the patterns are no longer produced, but still available on Ebay and Etsy.
Jalie Patterns - These patterns are sort of the modern equivalent to Stretch & Sew. Fantastic drafting, clear instructions and the size ranges are amazing. You can also download the instructions from the website, so you know what you're getting before you purchase.
Smaller, independant pattern companies - I hate to lump these together, but there quite a few, so I will only say that in general I find the quality to be excellent and support from the designer or producer to be top notch. That said, there are going to be variations between companies, so if you are thinking of sewing up an indie design, be sure to do your homework first, and see how it has been reviewed by other sewists.
Kwik Sew - I put this here with some reservations. I find older Kwik Sew swim patterns to be excellent quality, but since being absorbed by the Big 4, Kwik Sew quality has been hit or miss.
Vintage Swimwear patterns - These can be really interesting with great styling, but depending on the era, you may be in for a lot of alterations to make these suits work with modern fabrics, techniques and machines.
One last word about the Big 4 (that's Vogue, Butterick, McCalls and Simplicity). While I sew often from Big 4 patterns, I would definitely NOT recommend a swimwear pattern produced by them, particularly for one's first attempt at sewing swimwear. Their drafting in general tends to be oversized, which is not something you want in a garment that should have negative ease, and the instructions are ridiculous for swimwear. Recently a few new patterns have been released and I bought one in the hopes that there had been some changes, but alas. It looks dreadful.

So what about you? Have you found some great resources? We'd love to hear about them? What's your favorite swimwear pattern? Please share!

Thursday, May 23, 2013

Ottobre 03/2013-10: Sporty Pocket Shorts

Now that the weather has changed, Logan has begrudgingly given up his wardrobe of knit pants and a tee shirt for his summer wardrobe of knit shorts and a tee shirt. I know, he's taking some fashion risks here... Of course, last summer's shorts are all ridiculously too small, so it's time for a few new pair.
I'm trying to add some new elements to his wardrobe, so instead of the boring one-seam shorts he's outgrown, we're going for some more interesting details. Not too interesting, of course or he won't wear them, but a contrast pocket and some side seam trim might be acceptable...
And he actually loves them, so I'm thrilled! I love it when I take a risk and it works out.
The pattern is from the latest issue of Ottobre, and is model # 10, the Sporty Pocket shorts. In the magazine, they are modeled by a toddler and made up of four different fabrics, but the line drawing convinced me that these could be toned down for my Kindergartener. My favorite thing about the design is the front pockets. They look like complicated welt pockets, but they aren't. They are embellished side seam pockets and they were actually pretty easy to do.

On the back, there is a single patch pocket that is rounded on one side and inserts into the side seam on the other. The side seam is embellished with a contrast panel. The shorts themselves are knit (french terry from Mood), but the back pocket and side seam panel are woven fabric, in this case a broadcloth. I like how nicely the side panel breathes. It's like a little air conditioning.
The waistband is made of rib knit with elastic inserted like a casing. I had a little trouble with this part. You are supposed to stitch on the rib knit right sides together in just one layer, fold it over then topstitch it down with a decorative or flatlock stitch. I'd planned to coverstitch from the reverse side so that the looper side would show (which is what I did to attach the front pockets), but I couldn't keep my stitching straight from the wrong side, and it was so bad looking. I ripped out all the coverstitching and just sewed the outside edge of the rib knit to the seam allowance on the inside, so it made a regular casing. It's a little rough looking on the inside, but it looks good on the outside.
They passed the worn all day and got really dirty test, so I think they're a success. I'm not sure if I should go forward with another pair in the same pattern or try something else new...

Wednesday, May 22, 2013

SwimAlong 2013: Kids Swimwear, inspiration and patterns

While I'm really excited about sewing up a swimsuit for myself, I started off sewing swimwear for kids. Sewing kids swimwear is awesome. Most kids have a pretty straight up and down shape, so fitting is minimal, and their suits take so little fabric that they're almost free. It's a great way to hone your skills before tackling a suit for a curvy grown up.
Image source
Nevermind that the cuteness factor is OFF THE CHARTS. Seriously, how adorable is this little sweetheart??? You can get the pattern for her suit here and here, and one to match her 18 inch doll here.
Image source
Here is an adorable tank style suit with some fun design extras. Flutter sleeve? Cute bow in back? Check and check! Get this pattern here.
Image source
And of course, the entire Jalie swimwear line comes in children's sizes, all the way down to 2T. If you are a swim or exercise gear beginner, Jalie patterns have fabulous instructions and are full of great tips to make your sewing experience successful.
Image source
Kwik Sew also offers a line of children's swimwear for both boys and girls. Their styles are classic and the patterns are well written and well drafted.
Image source
Of course, we can't forget the accessories! How cute is this little swim cap! Get the pattern here, as well as a pattern for the matching ruched tankini here. Doesn't get any cuter than that.

Well, that gets our girls ready to hit the pool, but there is an unsurprising lack of good boy patterns for swimwear. I hunted down a few for you...
Image source
This guy looks pretty darn thrilled with his Surf's Up board shorts! We like them, too. I particularly like that they include instructions for the mesh lining you see in RTW board shorts. Nice work Peek-a-boo Pattern shop! Pick this one up here
Image source
Dana of Made also provided a great tutorial for a board shorts refashion. You can find it here. Instructions for the mesh lining are included here as well, although the diaper cover pattern she references is only up to a size 24 months. I think the Kitschy Coo Boy Cut Brief pattern would be a perfect substitution for the larger sizes - just use elastic in the legs instead of the bands. 
Image source
Looking for a more streamlined fit? How about these great Euro Swim Trunks by Running with Scissors? Get the pattern here
Image source
Of course, no discussion of kids clothing is complete without a mention of Ottobre Design.
Image source
The issues in which you'll find swimwear are 02/2002, 02/2004, 03/2009 & 03/2011. Back issues are easily purchased from Ottobre directly. Click here.

Monday, May 20, 2013

Jalie 2908 jeans: pink corduroy

These jeans have been a long time coming. I bought the fabric last year, and then moved on to other things, but this pink corduroy has been whispering from my fabric shelves, and I finally paid attention.
I used Jalie 2908, and made some alterations based on my last pair, and I'm really pleased with the fit as far as comfort goes. Seriously, between the softness and stretch of the fabric and the alterations I made, I could probably sleep in these.
The fabric is a stretch corduroy from Fashion Fabrics Club. It's nice and beefy, very much like corduroy I've seen in RTW clothing and nothing like the thin, flimsy crap you can buy at Joann. I'm very pleased with it. It sewed and pressed very nicely and it feels great to wear.
I made some new alterations for fit, mostly lengthening the front crotch hook and giving myself a bit more room in the rear, but I also altered the waistband significantly.
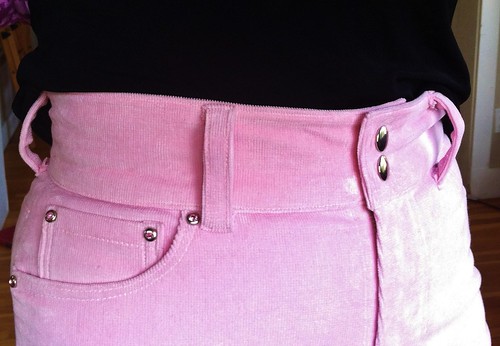
It's not very obvious with the belt in place, so here is a not-at-all flattering shot of the pants without the belt. On my last pair of jeans from this pattern, the waistband seemed really skimpy. I may have overcompensated for that but I have to say that the comfort factor of this crazy high waistband is amazing. It holds in all the fluff! Since I'm very high waisted, this isn't at all a good look when tops are tucked in, but I never do that, so I'm happy with it. This is also the only picture that shows the actual color of the fabric, as well as my AWESOME rhinestone rivets.
Here's an Instagram I took right after I set them. I'm totally in love with these rivets. They are so gorgeous and they were super easy to set. I got them from this Etsy seller, and I was very impressed with the service provided. They ship from Thailand, and they arrived far more quickly than I expected.
In back, my pocket design is pretty subtle. So much so, that in the overexposed images you can't see it at all. I wanted to pink-ness to be the star of these pants though, so I'm OK with invisible back pocket stitching. I am extremely pleased with the fit in back. I'm slightly twisted in this pic, but you can see how smoothly the pant fits on my left.
I've still got a bit of work to do on  the fit in front. I think I need to try out a full thigh adjustment, as I think that is what those radiating wrinkles are telling me. A few whiskers will not stop me from wearing these pants though! Today, I've paired them with my Ottobre tank and Tanit-Isis vintage shrug.

Today's tip

Pressing fabrics with a pile, like corduroy and velvet can be a tricky proposition. Pressure from the iron can flatten the pile and leave unsightly marks that often cannot be removed. But press we must to get a professional result! There are a few options that you can use to help protect the pile of your napped fabrics. The first is a velvet or needle board. This is a rigid pressing surface with tiny wires that hold the pile away from a firm surface. You place the fabric face down onto the wires and press as usual. The down side to this method is that these boards are quite expensive and often small.  I've also heard the tip that a fluffy towel can be used, but I find that fluffy towels aren't always fluffy enough, and they tend to shed. Instead of a needle board or a towel, I like to use a piece of self fabric to pad the pile.
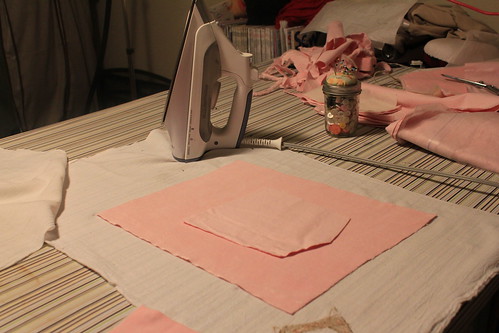
Place a scrap of fabric (the bigger the better!) on the pressing surface with the pile facing up. Then the piece to be pressed on the scrap right side down. The pile on my garment piece (in this case, I'm pressing the pocket) is cushioned by the pile on the scrap. I know it will be compatible, since the fabrics are the same.
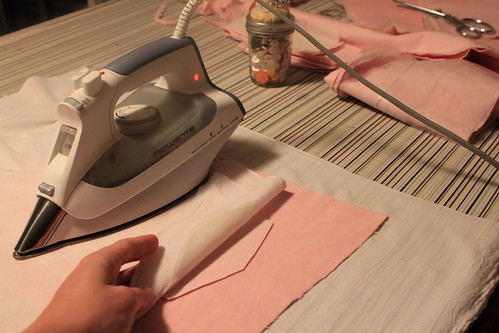
Cover with a press cloth and press without fear!
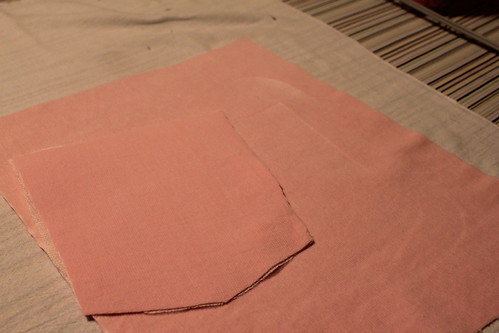
As you can see, the pile on the pocket still looks (and feels!) dense and plush. The scrap underneath took a bit of a beating. You can see the shine of the iron damage that my pocket was protected from. I've used this method successfully with many types of piled fabrics. I hope it works as well if you try it!