What? The serger's still threaded with black! There will be a lot of black knits comin' atcha.
But really that was just an excuse to make a polka dot
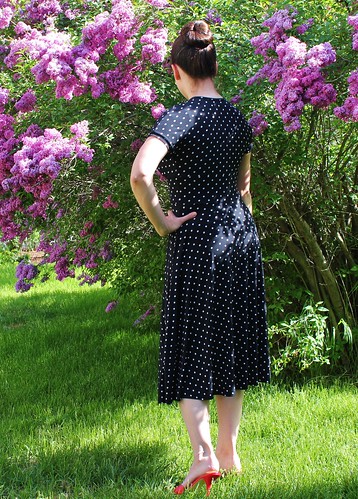
Tiramisu. I think everyone should have a polka dot Tiramisu.
The fabric is an ITY knit from FabricMart. It's a little thinner than their usual ITY, which made it a little harder to control. Fortunately, this pattern is a super easy make.
While I love
my first Tira and wear it often, I did make a few changes to this one. The biggest change was to the neckline. Instead of binding the neckline with my coverstitch machine, I used the band provided in the pattern. And it's SO MUCH BETTER. No gaping at all. The neckline stays snug and tight against my body no matter what I do.
I didn't want to fuss with pattern matching, so I cut the back and skirt panels on the fold. I love how this fits in back. Perfect right out of the envelope. Love.
I also shortened the midriff panel 1/2 inch and the skirt 3 1/2 inches from my initial make, which still leaves it a bit longer than the pattern as drafted. I like the proportions of this one a little better I think, particularly the midriff area.
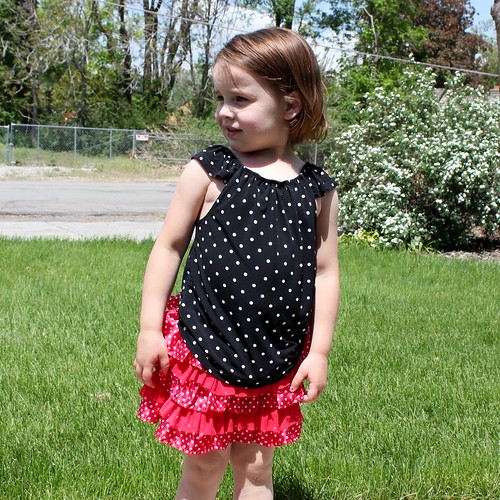
Myra freaked out at my "Minnie Mouse" dress when she saw it, so I used the little piece I had left to make her a cap sleeve peasant top. I used
Simplicity 2377, which I've used several times for her before. Naturally she styled it with more polka dots...
Today's Tip
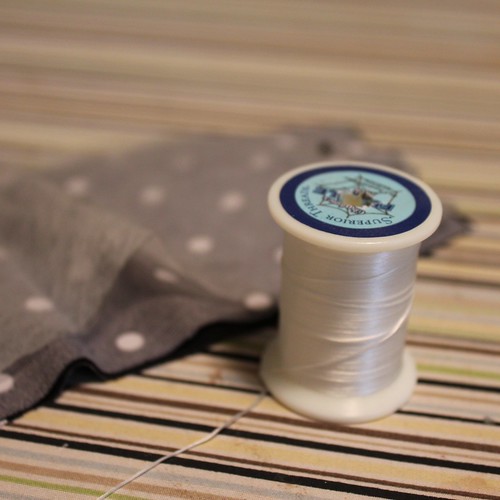
Hemming fine gauge knits can be a tricky proposition, particularly if they are slippery, as ITY tends to be. I know many sewing gurus recommend interfacing knit hems, but I've never been happy with that method. For me, it seems to stiffen the hem, even with really lightweight interfacing, as well as reducing stretch. I prefer to use
fusible thread.
I love this stuff so much! I really allows you to get a nice crisp, stable hem on unruly fabrics. Here's how.
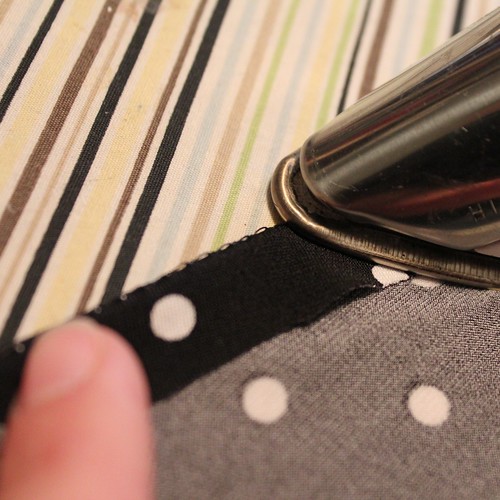
First, you need a bobbin wound with fusible thread. No special winding method - just use the winder on your machine. Then sew a line of straight stitching at the fold line of your hem. Be sure that the right side of the fabric is facing up.
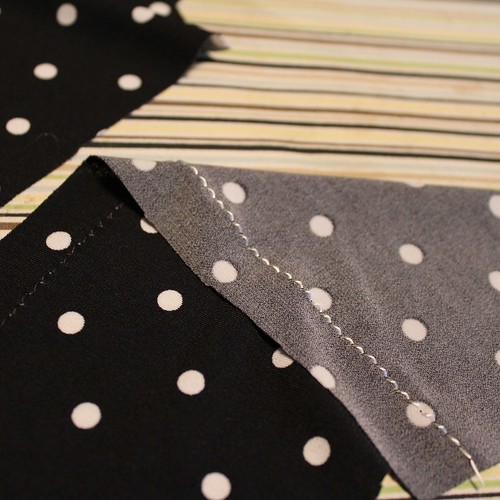
The black stitching in the above picture is regular sewing thread. The white is the fusible. Now you'll turn and press your hem, using your stitching line as your guide. Use lots of steam to melt the fusible. You may find that a bit of the fusible thread sticks to your iron, so use a press cloth if needed.
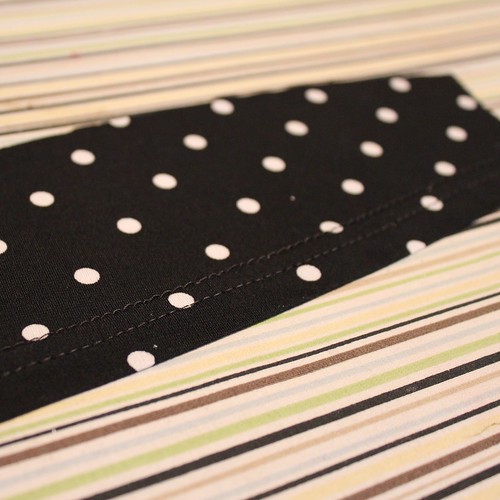
Once the entire hem is fused, you can easily pull away the top thread. You needn't be gentle - your hem isn't going anywhere! It may take a tug or two to pull it away from the fusible.
Now take your crisply pressed hem to your machine. Sew it with a stretch twin needle or a coverstitch machine. I don't use any pins for a short hem, but a might put in a few for a longer hem, like a circle skirt. For the Tiramisu, I pinned at the seams.
Once it's stitched, I like to give it a final press from the right side, to be sure that the fusible is really set. It doesn't wash out, so if your hem has rippled slightly, this is your chance to fuse it into place.
Now isn't that lovely? This technique also works well on woven fabrics that don't press well, like polyester suitings. Give it a try! I think you'll like it!


.jpg)


23 comments:
Cute dress. I want one in Navy.
Great tip on the fusible thread--I will try that, thanks.
Your dress looks fantastic and Myra's top is darling. Thanks for the hemming tip, perfect for those type of knits. One more thing, you sound just like me, I look at all possible sewing projects for the thread in my serger!
You're right. Everyone does need a polka-dot tiramisu. I'm going to be looking for a nice stretchy polka-dot fabric now. I love it, but then I just cut my third tiramisu to make.
Love both your Minnie Mouse outfits and thanks for the hemming tip.
Super cute. I would never have thought Minnie Mouse looking at your dress, leave it to the kids to make that association.
I love your black polka dot Tiramisu. Add that to the list of Tiras that I now neeeeed... The list is long. Thanks for this tip too -- I bought some fusible thread last time thread was 50 off at Joann, and then promptly couldn't remember how/when to use it! ;)
Lovely dress! I can imagine you want to twirl around in it all the time :-)
fusible thread! this is witchcraft surely! i want some!
Yeah, that's a lovely dress. My favorite done with that pattern.
Whoa! Amazing hem lesson!!! I have this pattern now and only the edging was making me tense- I'm so ready to try this one!
I love that dress. It looks fantastic. I love that hemming lesson too... I don't know if we get that in Australia but I will try and find it (when uni is done is a few long weeks!)
I need a polka dot Tiramisu
Cool! I've never used that fusible thread, but it looks worth trying! (I'm really enjoying all your tips - keep them up, please! :)
Also: It goes (almost) without saying that I have a lot of Tiramisu love... and that one looks wonderful on you!
Oh it's awesome! A great fit and you know I love polka dots! I never even heard of fusible thread, I'm totally going to investigate...
Lovely dress. Your little girl is adorable!
ooo, great tip! I've heard of fusible thread but never tried it - didn't realize you could pull the regular thread out so easily once it's fused. I think I need some to go with my wash-away thread and shrinking thread. Thanks!
And your dress and daughter's shirt are both lovely! You can't ever go wrong with polka dots! =)
Love the dress. I have never heard of the pattern before. Thanks for the tip on the hems too.
I love it in the polka dots! And great idea to cut it on the fold. I don't know if pattern matching with dots would work anyway?
Thank you for the clever tip! I'm going to have to find some fusible thread.
Love your dress! The neckline fit does look perfectly snug and gape-proof.
Great dress, and thank you for the hemming tute!
I avoid sewing knits because of the difficulty in getting a good hem finish, but now I'm keen to try your method - it seems way easier than using fusible tape.
We recently got a JoAnn's near us and I grabbed some fusible thread because I remembered reading about it on your blog. It was pretty pricey ($8, but I had a coupon), and wouldn't you know, one of my kitties knocked the spool off my sewing table and broke it! I think I can salvage it, but I can't believe I broke a spool of thread! And the most expensive one I've ever bought!
Post a Comment