No peeking, Steven!!
This picture has nothing to do with the dress. I just wanted to be sure the thumbnail didn't show up on Facebook and reveal any tidbits to the groom.
I have been working steadily on Breanna's wedding dress for the last month or so, and I wanted to show you all where we are now. I've never sewn for Bre before, so I started with some measurements, and made a very rough muslin with a small (1/2) petite adjustment right off the bat, as well as lengthening the skirt 2 inches to have it fall below the knee. I also added some fullness to the skirt at the hem.
Here is the first muslin, all pinned up. I took an additional 3/4 inch out of the bodice length above the bust, as well as 1/2 inch tucks in the neckline to eliminate some gaping there. I did a small (1/2 inch) FBA and took out another 3/4 inch below the bust, as well as raising the neckline another 1/2 inch. This baby is drafted like a Burda! The skirt was great though. I did a second muslin of the bodice only (no pictures) and took another small pinch out of the princess seam below the bust, but otherwise the fit was great.
Here is where we stand now. This will be sort of a wearable muslin that Breanna can use for trashing, rather than destroying her actual wedding dress. If you are unsure of what I am talking about, you aren't alone. Apparently there is a
new(ish) phenomenon in the photography world whereby brides wear their wedding dresses in situations in which they are destroyed or dirtied. I definitely was not a fan of this happening to the real gown, so this muslin will serve as a dress she can trash, without me going into shock. It doesn't have the fullness in the skirt that the final gown will have, and rather than a lace overlay, I have just used tulle. Otherwise, the bodice details are as they will be in the final gown.
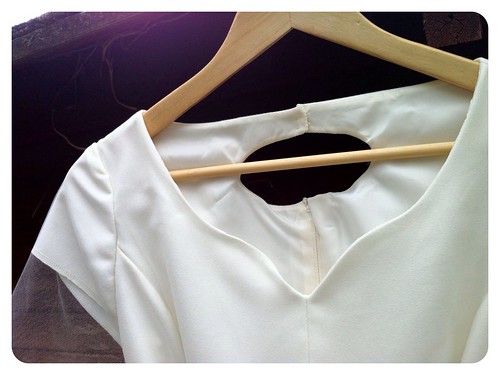
Here is the front neckline. Isn't it lovely? The final version will also have lace trim around the neckline.
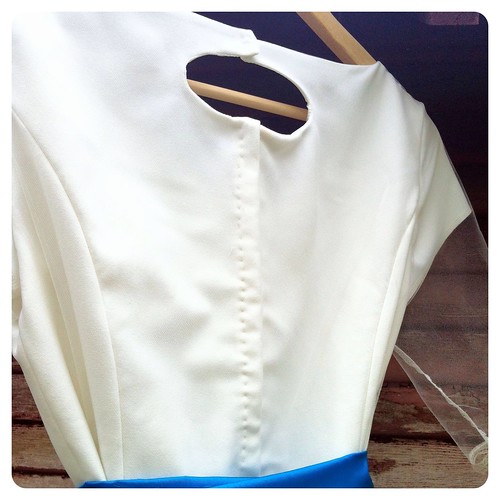
In back, there is a small keyhole, which will also be trimmed in lace in the final version. The keyhole closes with small snaps. The back is closed with a hand picked zipper, which will be covered with a button and loop overlay.
Here's a little construction tidbit for you. When I first started garment sewing again, and was whining about how much I hated setting in sleeves, my
Mother commented on a
past post that in the atelier Chanel, they didn't ease stitch sleeves, rather they pinned in the cap ease with lots of teeny pins. At the time, I thought that sounded insane, but I'm coming around to Mlle's method. I feel like I have much more control over how the sleeve eases this way. The fullness is precisely where I want it for a perfect fit.


18 comments:
The dress is so pretty and I am with you, not the real dress for "trashing". I have done that pinning method and it does really work. Pretty amazing. Good luck on the final dress.
I love hand picked zippers. I used them in all three of my daughters wedding dresses. I added pearl beads to two of them. The dress is looking wonderful. I must be old it seems crazy to ruin a good dress.
That's really interesting about the sleeves - I do it that way as well, but I thought it was just me being lazy and not wanting to fuss with gathering stitches.
Beautiful details on the dress! And also the Barbie dress...although it cracked me up that you think about seam finishes on doll clothes!
I think I'm pretty old too! The idea of trashing a wedding dress seems pretty crazy to me.
Not lazy! Couture!!
If only I could fit that teeny thing under my serger...
I pin my sleeves with a million pins, too, but I also use a carefully placed gathering stitch line as a starting point. The wedding dress will be lovely, and I'm totally against trashing any dress. It seems just so wasteful!
Love that neckline - what a lucky bride to have give this labor of love!
Really gorgeous! Very lucky bride. I can't believe people trash their wedding dresses....but to each their own. :/
I love the style, and the muslin fits really well.
I mostly taught myself to sew, and I've never put in a sleeve WITHOUT pins... seems like I've been missing out all these years!
That neckline does look delicious! I have always pinned my sleeves in with trillions of pins as I found that you can ease while pinning and the pins hold while sewing. I also kind on pull the fabric taunt to avoid any puckers (doesn't mean I don't ever get any but mostly I don't or they are so small I ignore them).
I'll have to try that next sleeve!
And I agree about dress trashing. It's like an extreme version of "disposable fashion", which I already have issues with.
Not at all - you've just been doing it the couture way! :) Go, you!
I'm definitely a fan! I find that if you have the sleeve down on the machine bed, the feed dogs do all the work of easing for you, and you don't have to tug to get a smooth sleeve.
I just love that keyhole in the back, what a nice detail. The Trash the Dress thing is a little disturbing, though some of the shots are very cool.
The neckline in this pattern is very pretty and looks great on bustier ladies. I like your sheer overlay very much, it will look gorgeous in lace. And while I think some of those wedding photos are pretty, I cringe just thinking of ruining a wedding dress.
I forgot to add, that pinning the sleeve in is my favorite method for inserting sleeves since it gives such a beautiful result.
Post a Comment