Tuesday, July 29, 2014

Cole's Creations Katy Panda dress, kitty version

Early last month, Nicole of Cole's Creations Patterns contacted me to see if I would be able to test her latest pattern, the Katy Panda dress.
Sadly, it was just at the time that I was packing up my machines and shipping them cross country. I was totally bummed, as I love to test new patterns, and this one is RIDICULOUSLY cute.
Lucky for me (and Myra!) she was willing to send me the finished pattern so that I could try it out and tell you all about it. She did provide this pattern for my review, but the opinions are all mine.
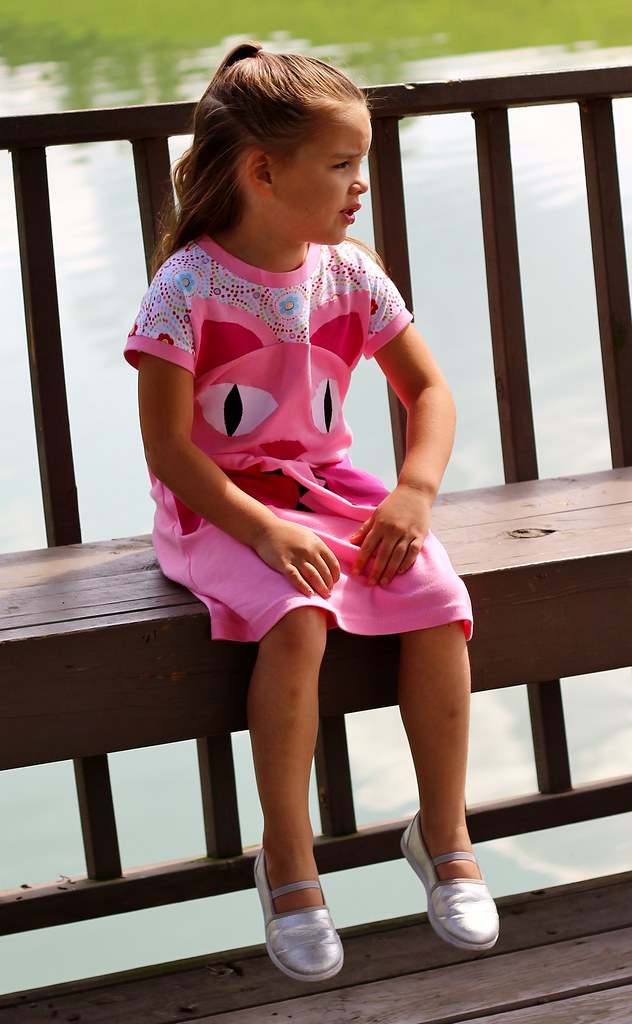
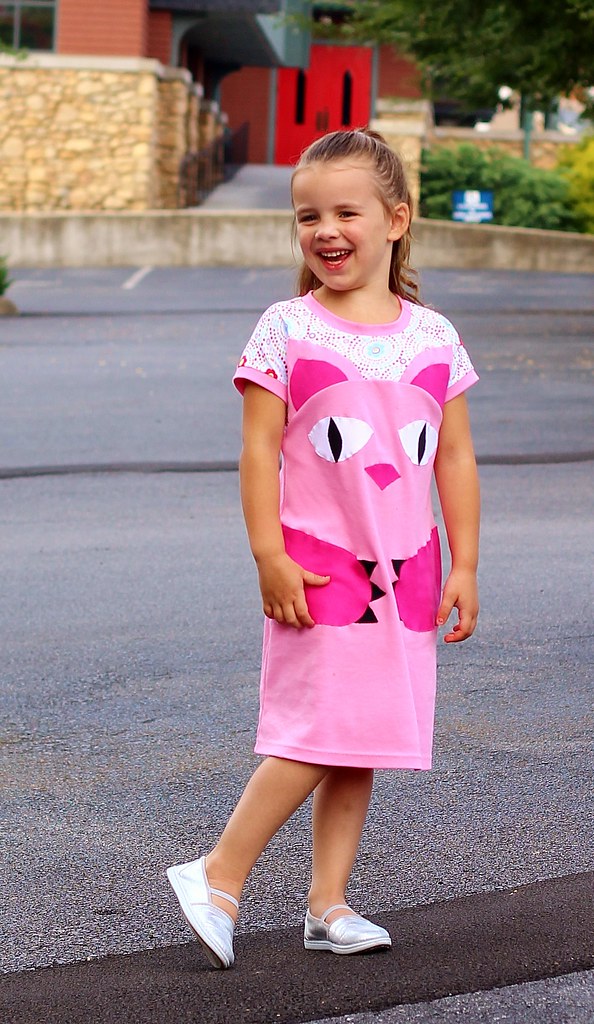
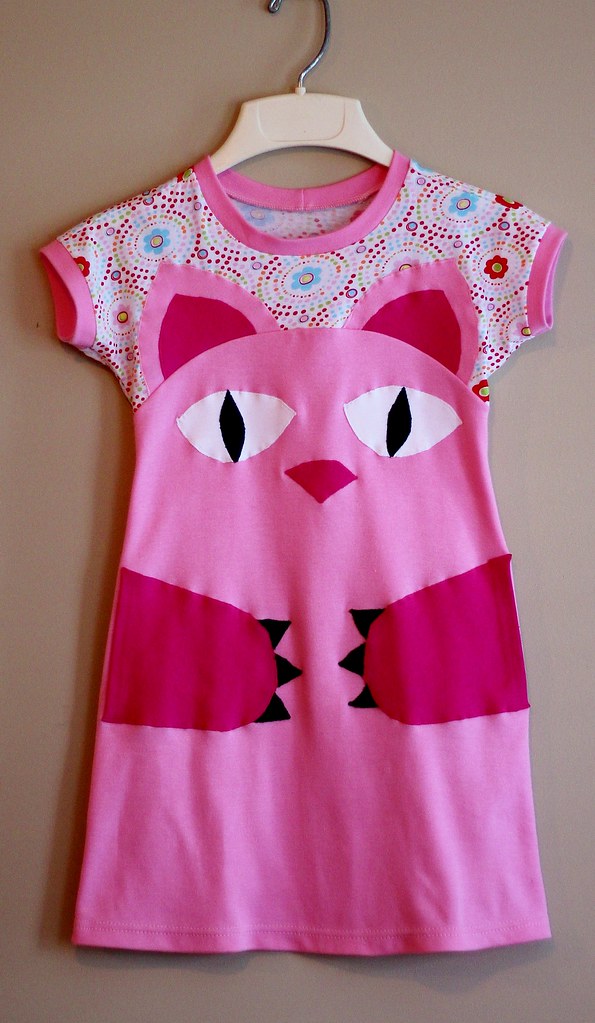
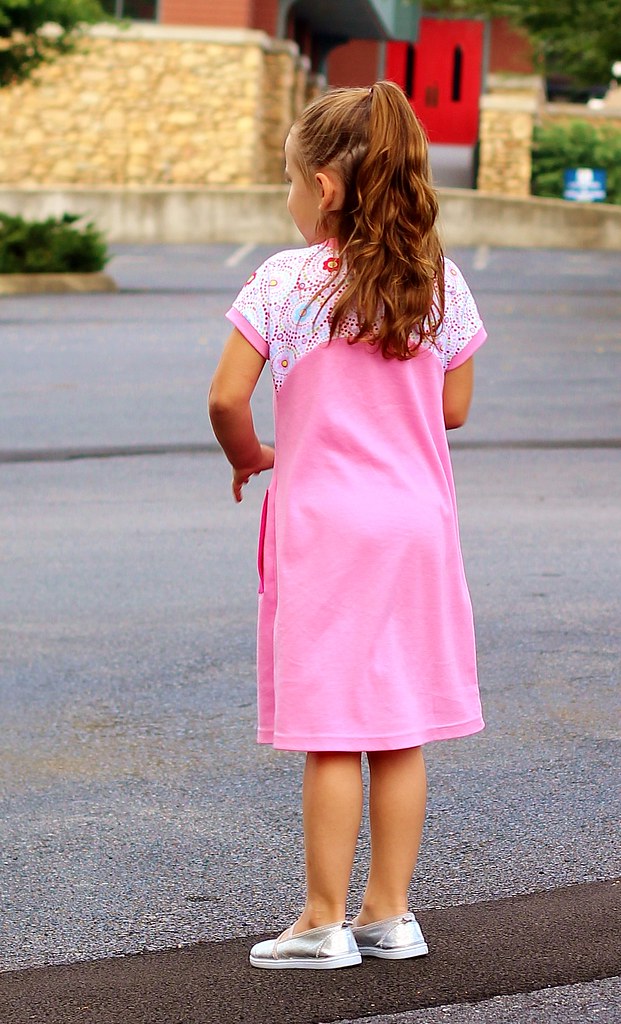
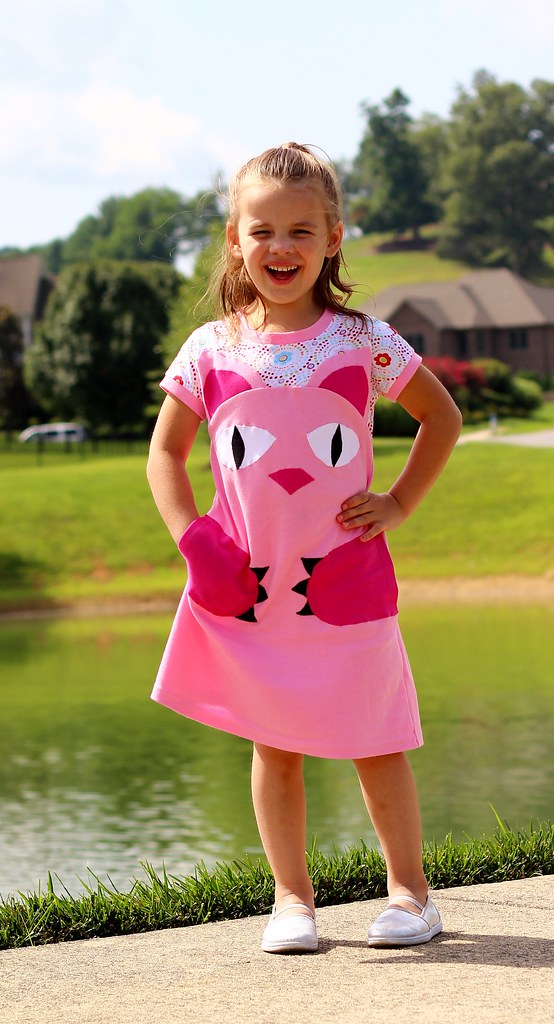
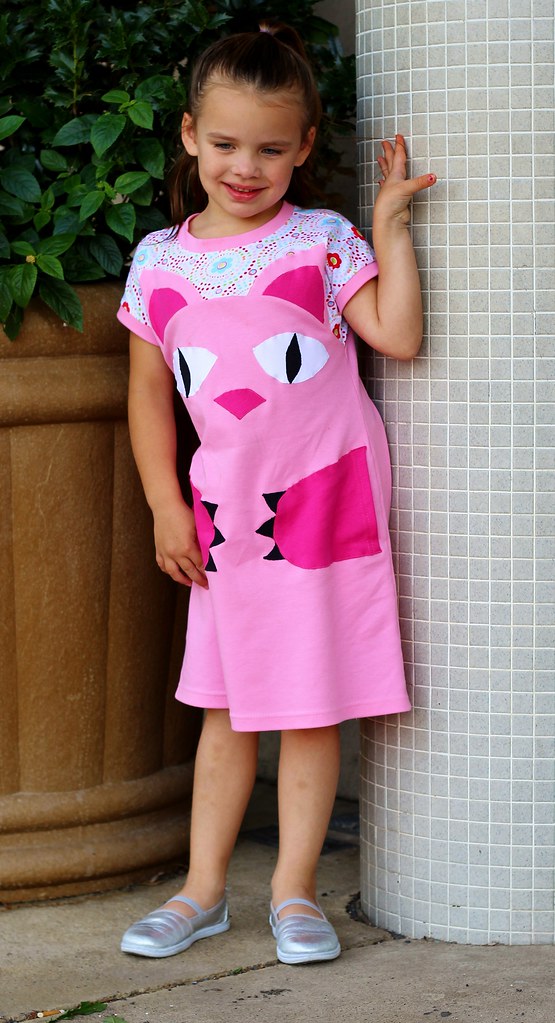
The pattern itself is actually pretty simple, but the options for applique and pockets make it outstanding. In fact, Myra loves these pockets so much, I had a hard time getting pics of her with her hands out of them.
The dress itself is a basic a-line with a cute shaped yoke. Without the applique, it will make a great wardrobe basic, and I know I'll use it a ton for Myra. And since the Katy Panda Dress pattern goes all the way up to a size 16 years, I'll be using it for a long time.
And in case you are wondering why it is the Katy Panda Dress - well... Cute!!! I love that the pattern includes a longer sleeve, and all of the applique options really make it a versatile and fun dress.
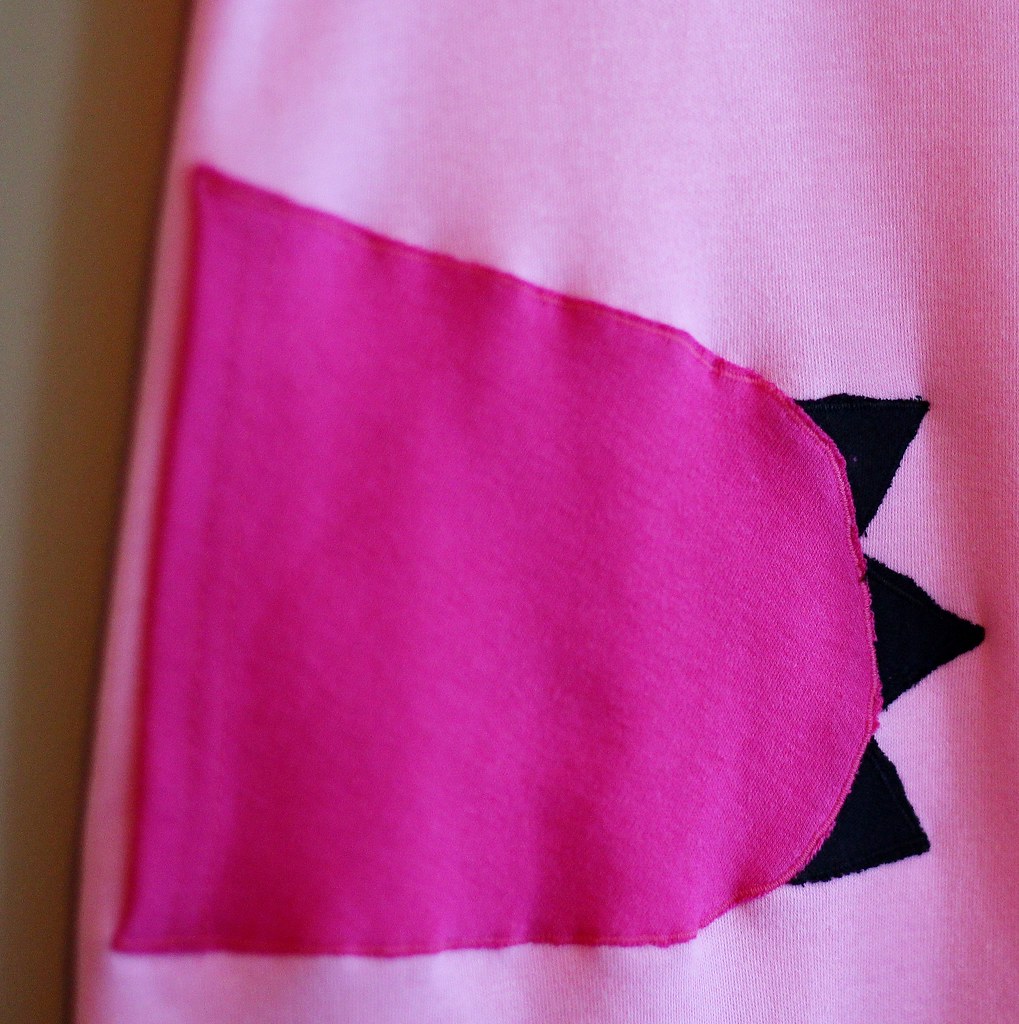
These paw pockets though. Serious stroke of genius. They are so stinking cute and original. I made mine slightly different from the pattern, but only because the pattern calls for a self lined pocket, but my fabric was a thick interlock, and I didn't think it would turn well, so I hemmed it and stitched it on with a zigzag to make it blend in with the other applique work.
The fit through the body is comfortable, but not overly large. I made a size 5 for Myra, and lengthened the dress portion to a size 6 so that she could wear it through her next growth spurt. I love that the yoke in back mirrors the front. The curve back there is cute.
The fabrics I used are mostly Chex Ami interlock, except the print on the yoke, which is from Hobby Lobby. I like how the beefy knits stand away from the body and give the dress shape, but sewing them to the thin Hobby Lobby jersey was annoying. Next time I'll do a better job matching the weights of my knits, but I really love the way this print coordinated with the pinks and Myra really loves the flowers and polka dots.
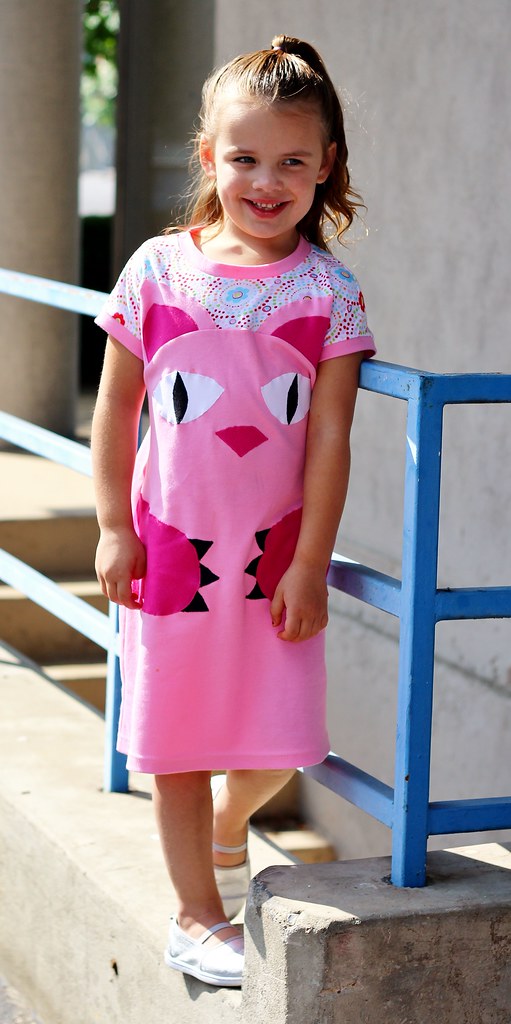
Overall, I would say this pattern is a definite winner. The pattern itself is a PDF, but is well organized and easy to assemble. The sizes are nested and color coded, so you can choose to cut your size or trace, both are easily done. The instructions are complete and include color photographs, but not hand-holding or annoyingly detailed. You may want to know that the applique placement is left up to the sewist, which I like since it gives you the freedom to fully personalize your creation. Placement lines for the pocket are included in the pattern, and you can see that they are perfect on Myra.
This is definitely Myra's new favorite dress. All day she was telling random strangers about her dress, and how much she loved it. She also insists that we call her "Myra kitty". She'll  be needing another soon. Good thing it's so fun to sew. But don't take my word for it! Go get the Katy Panda Dress pattern and sew it yourself!

Friday, July 25, 2014

Goodnight Sweetheart PJs: Dr. Suess style

Duncan has lately been busting out of his old PJs. Like, literally his toes poke out of holes in the footies.
I know.  And for some reason, there aren't any hand me down PJs in his size right now. Fortunately, it's Kids Clothes Week! Time for new ones!
They're a little large at the moment, but I know they won't be for long. He's growing up so fast. At least I can keep him in crazy printed PJs for a little longer.
The pattern I used is from the book, Sewing for Boys. It is the Goodnight Sweetheart PJs, which feature an external neckline facing with piping, button (or in this case, snap) closure and a shaped neckline. The pants are basic, but the pattern includes the option of cuffs and a fly opening.
I really LOVE the piping detail on the facing. It makes it look very professional, but it also makes edge finishing the facing super easy to do. I used white piping for this set. I originally thought red would be fun, but the red piping I had was just a touch too light, while the red snaps in stash were a perfect match. So, I went with white. It's more subtle, but I like it.
The fabric is a super soft flannel by Michael Miller. It was part of my very first Tennessee fabric purchase. I bought it at a local quilt shop, Tennessee Quilts. It is seriously fantastic quality, which is good. Dunc is hard on his clothes.
Despite the tough guy exterior, a cozy set of flannel PJs makes every guy happy.
Peek-a-boo!

Wednesday, July 23, 2014

Kids Clothes week, day 1: Ottobre Mermaid swimsuit, take 2

The kids' favorite thing about our new neighborhood is the community pool that is practically in our back yard. They've been swimming nearly every day, and while the boys' board shorts are holding on strong, Myra's suit from last year was nearly transparent from wear.
And since this is Kid's Clothes Week, I got right on it! She's been begging for a suit out of this fabric since my friend Catrin gave it to me, so she's pretty thrilled.
The sequin bow totally sealed the deal. Pink hearts and sparkles? Yes, please.
The pattern I used is the same as last year's suit - the "mermaid" suit from the 03/2011 issue of Ottobre. I added 1/2 inch of length to the midriff band, but otherwise used the same size.
Myra obviously inherited my swayback. But I LOVE the fit over her backside. She gets her ghetto booty from me too, but this suit covers it well. No pool wedgies here.
Both fabrics are 4 way stretch nylon lycra. The black is a bit shiny, but the color match is good. Once I constructed the front, it looked a little boring, so I tacked the sequin bow to the center of the midriff panel. It's just a piece of stretch sequin trim I had around, hand gathered to form a bow shape. Myra loves it.
Myra has thoroughly pool tested her new suit, and it has passed with flying colors. Hopefully the extra length will allow her to wear it some of next summer as well. At least until I can get my act together and sew her a new one...
Either way, it's a win this year! And she might just manage to wear it out before school starts in 2 weeks. Sheesh.

Saturday, July 19, 2014

My New Space

So, I'm finally settled in, and have even finished my first project in my new space! I'll share it with you as soon as I can get the weather to cooperate. In the meantime, I thought you might like a little tour around my new digs.
When I walk into my room, this is the sight that greets me first. My sewing table (which Mitch put together for me) is a hollow core door from Home Depot. I wrapped it with a few layers of wool, so that I can both press and cut here. It is held up with a couple of sawhorses that Mitch built to cutting height, so that I don't have to hunch over to work. Under the table, my thread and interfacing lives in the drawers on this side, and my yarn stash is on the other side. My dressform is near the window, where the light is best.
Opposite the windows is where all the action happens! My machines are all out and available and it is simple to switch between them in my rolling chair. Next to the machines is a bookcase with sewing books, magazines, small notions like bias tape and elastic, as well as the DVDs I like to watch as I work. Next to the bookcase is my pattern drawers. I'll probably get around to hanging that thread rack some time.
Across from the machines is my doll corner. Inside the white cabinet lives all my girls (and a couple of guys). The drawer and the two milk crates hold props and doll furniture for photos. Next to the doll cabinet are the file boxes that hold all of my pattern magazines. But what is through that door, you ask?
Yes, it is my fabric closet!! I'm so thrilled to have a nice walk-in closet to house my collection! This is the back wall of the closet, where most of the fabric is living. In the corner, behind the stool is rolls of fur, leather and tracing materials.
On the other wall of the closet is a smaller shelving unit for slippery knits like ITY, athletic knits and mesh. Barbie's fabric stash is in the upper back cubby. Other craft supplies, fiberfill and clothing for refashioning are all found in the hanging area.
I'm so happy with my new space! I know how fortunate I am to have a dedicated space that suits me so well. My sweet hubby has always made sure I had a place to sew, and I'm so grateful.

Wednesday, July 16, 2014

Back in the Country: Backwoods Barbie

I actually made this outfit some time ago, but I never took pictures of it. It suits though that I waited until I was living more in the country to post it, since it's kind of a country girl look.
I started with some jeans shorts, using the pattern I used for the jeans in this post. I planned for these shorts to be worn by a doll with a Liv body, so I used my smallest version of the pattern, but neglected to account for the decreased stretch in this denim, so it doesn't fit Liv! Fortunately, the posable older style flat foot Barbie body has quite slim hips, so these fit Teresa very well.
To turn the jeans into cut-offs, I just cut the pattern piece short, and placed the hem line on the cut edge of the denim, which had already frayed just from handling.
The top is also from Simplicity 4702, with some slight alterations. The pattern instructs you to make a casing for the sleeves, but I just stitched on the elastic and turned it under. I used clear elastic to minimize bulk.
The neckline is supposed to be finished with a facing, with a bit of lace trim sandwiched in between the neckline and the facing. I skipped the lace altogether, and gathering the neckline into a facing seemed like an exercise in futility at this scale, so I just applied elastic in the neckline, just like the sleeves.
I added some elastic shirring under the bust for some shaping, and trimmed the empire line with polka dotted ribbon and a satin rosette.
I made a halfhearted effort to match the gingham at the side seams. It came close, so I'll take it. My walking foot doesn't like these teeny seam allowances, so I need to pin more. You can see the teeny rivets I included on the shorts. Teeny rivets (actually 2mm hotfix studs) make me happy.
She also got functional back pockets on her shorts. Her top closes in back with velcro. The gingham matches well back there!

Monday, July 14, 2014

A couple of Sweater Girls

During the long drive from Utah to Tennessee, I kept myself occupied by knitting teeny sweaters.
They're pretty quick and fun to knit, and I think they turned out really cute.
The pattern is from the website Sticka Till Barbie, which is a Swedish website that offers a huge (like over 1000 patterns) library of free knitting patterns for clothing and accessories to knit for Barbie, Bratz and a few other dolls. This pattern is a basic cap sleeve shell that is knit in the round, so there is no sewing and only two ends to work in.
The patterns are fairly simple, but they are translated from Swedish, and they assume a basic understanding of knitting, so I wouldn't say these would be an ideal beginner project unless you have an experienced knitter around to fill in the gaps.
The green sweater that Diva Midge is wearing was the first I knit. There isn't any gauge information provided, and since this is so small, I wouldn't have swatched anyway. The author provides a suggested needle size (2mm) which I used and a yarn suggestion, which I didn't. This sweater is knit from thrifted crochet cotton that looks to be size 20, but isn't labelled. This weight was absolutely perfect for this project. It fits Midge beautifully and the scale looks great.
So, my next attempt wasn't so great. I used a smaller yarn (size 10 crochet cotton) and unsurprisingly ended up with a smaller sweater. Oops. I guess Skipper gets this one...
Having learned my lesson with the white one I made a few alterations for the blue version. This is knit from self-striping sock yarn, so it is fingering weight. Since it's very close to the weight of the white crochet cotton, I decided to use that as a sort of gauge swatch, and added stitches based roughly on that. I ended up casting on 36 sts, instead of 32, and then casting off 4 sts for the armhole instead of two, and casting on 10 instead of 8 for the sleeve. It's amazing the difference 4 extra stitches makes. I also did a rib knit hem band on this sweater, instead of the garter stitch ridge called for in the pattern.
I'm pretty thrilled with how these turned out. I started another in a light worsted yarn, but managed to break one of my needles. Ooops. That's on hold until I can get a metal needle. I'm a tight knitter.