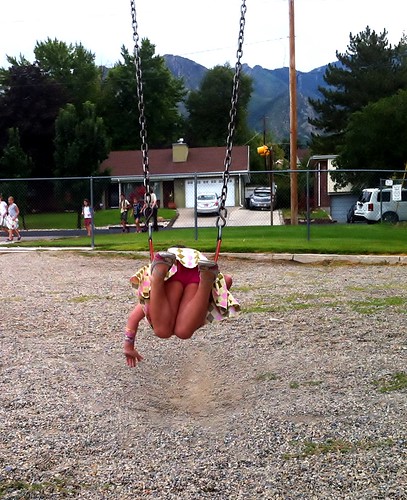
My Myra is a dress girl. She tolerates skirts, but in her heart, she knows she belongs in a dress. But she's also a bit of a tomboy on the playground, and she hasn't quite learned the trick of sitting like a lady...
And I don't know anyone who can climb monkey bars like a lady! So I made her a couple of pair of short shorts, to cover her unmentionables while she plays on the playground and sits criss-cross applesauce.
I have a ton of little knit remnants and these little shorts only take a teeny bit - about 3/8 of a yard if you are buying yardage. I had several pieces that matched dresses I had made for her, and picked out a couple of solids in colors that went with her wardrobe. This was a great stashbusting project for leftover knits!
As an aside, it was REALLY hard to get good shots of the shorts with her Skater Dresses. Those skirts are really well designed! No wardrobe malfunctions. I had to stage all the shots. Anyway, all of the fabrics I used are cotton, cotton-lycra, rayon-lycra or poly-lycra knits, and all the shorts have an elastic waistband and are hemmed with the coverstitch (although I could have saved myself some threading and used this method to hem them).
The pattern I used is for a basic legging with only one pattern piece. I cut them off to give them a finished inseam of about 2 inches, which is shorter than her shortest skirt, but still covers the topic. They are a quick sew, which is nice. I probably spend more time changing thread on all the machines than I did actually sewing these up. Darn my inability to serge with mismatched thread! It's like my Kryptonite.
These have now been worn (different pairs of course) for the last three days. They work well, are comfortable, and Myra likes them. She has fun mixing and matching them to her dresses. Works for me.
Today's tip
Since I coverstitched all the hems, I thought I'd show you the method that I use to keep the coverstitching from unravelling. I had a lot of trouble with this when I first started using my coverstitch machine, especially on children's clothing that gets a lot of wear and stretching. So, this method evolved for when I'm coverstitching in the round.
First of all, you want to be sure that your needle threads are to the back of your work. I didn't take a pic of this step (sorry!) but basically, when you start your hem, stitch nearly to the end, then stop and pull the beginning needle threads to the back with a pin, then coverstitch the rest of the way around, overlapping the beginning stitching by about an inch.
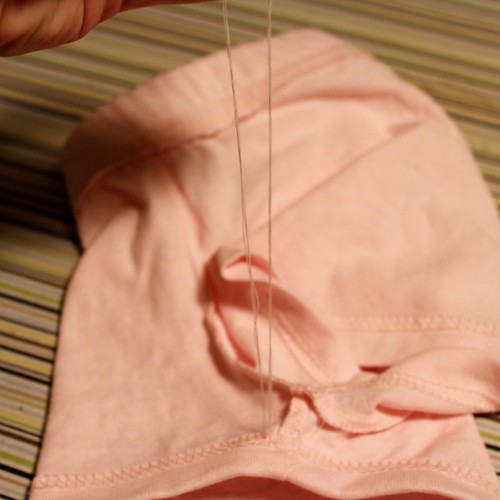
Pull your work off the machine using this method (from Debbie's blog) that pulls the threads all to the back. From the front, it should look like the above picture. Pretty, eh?
From the back though, you should have a bunch of thread tails. I have six - two needle threads and one looper from the beginning and end of the stitching. I separate them into two bunches and tie them in a secure square knot.
Here's the little knot. I trim the thread tails, leaving a bit so that if the knot slips a little it's no biggie. Next is the critical step.
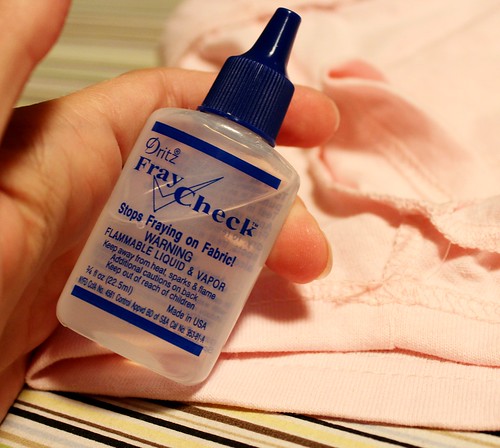
Get some fray preventer and drop a little bead right on the knot to really secure it. I like to smoosh it in with the tip of my iron to flatten the knot.
Since I've started using this method, I haven't had a single hem unravel. It may be overkill, but it doesn't take very long, and it is nice and secure. It may also work for a twin needle hem, though I've not tried it myself.
A couple of years ago, a vlog style meme made the rounds of sewing blogland. I wanted to participate then, but for technological reasons, didn't. LadyKatza has kindly revived the meme, and now I have the means to play along! Yay!
Basically, the idea is get a sense of the similarities and differences of phonology and idiom by reading a set of commonly accented words and answering a set of questions.
For reference, I grew up all over the US and Germany, but we lived for 10 years in the Pacific Northwest (Fort Lewis, WA) when I was a child and teen. When I was 16 years old, we moved to Texas, where I settled, got my education, married and had all three of my children. I consider myself a Texan. (My immediate family may laugh all they want. Oh, the fit I pitched when we moved to TX!!) I currently live in Utah and have for 2 years now, so I'm sure I've picked up a bit of linguistic contamination here.
Anyway, here I am! I have tried to speak in a typical fashion, but being on camera is bound to make me speak in an unnatural way. I think this is reasonably accurate though.
If you are in a reader, you may not be able to see the video here, pop over to your favorite browser!
I'd love to hear you as well! Here is the list of words and questions...
And these are the questions:
What is it called when you throw toilet paper on a house?
What is the bug that when you touch it, it curls into a ball?
What is the bubbly carbonated drink called?
What do you call gym shoes?
What do you say to address a group of people?
What do you call the kind of spider that has an oval-shaped body and extremely long legs?
What do you call your grandparents?
What do you call the wheeled contraption in which you carry groceries at the supermarket?
What do you call it when rain falls while the sun is shining?
What is the thing you use to change the TV channel?
I seriously do not know why it took me so long to make up this pattern.
This top is great! I think the twist had me a little intimidated, but it really was much easier than it looks.
The pattern is Jalie 2788. Y'all have probably noticed that I love Jalie patterns, and this one is no exception. The instructions and diagrams are clear and easy to follow, and I got the geometry of the twist in one try.
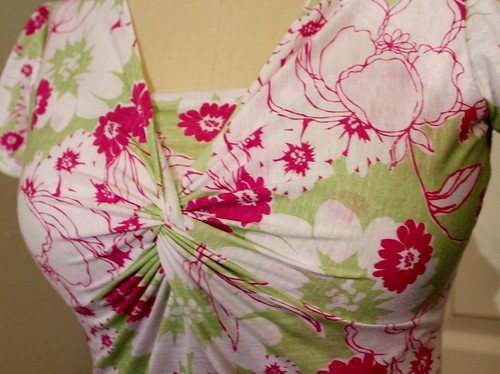
Here is a detail shot of the twist. The seam that falls under the bust creates a loop of fabric. You make one side first, leaving a small opening to pass through the other side, then sew that seam shut. It creates two interlocking loops of fabric. Pretty neat trick!
The top also features an optional modesty panel. As a full busted gal, this was NOT an option for me. The top is indecently low without it, but that's the nature of the twist. The panel is actually an underlay that covers the entire bust area. It's sewn into the side seams and front armscye, so it is very secure.
The fabric I used, a printed cotton jersey from Girl Charlee, is fairly thin. This makes the twist part lie nice and flat without bulk, but it is bit transparent. The modesty panel also serves as a bit of insurance against bra show through.
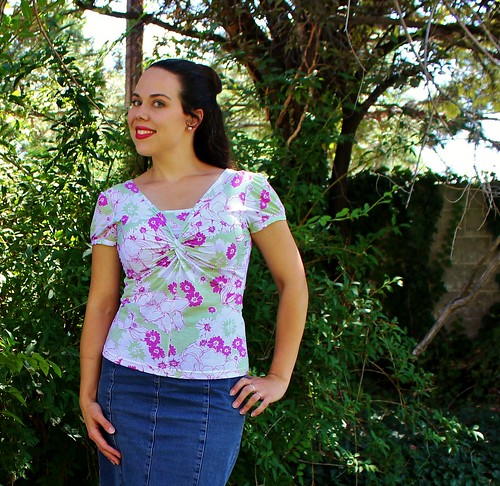
The pattern offers several styles of sleeve. I chose the short, puffed sleeve with bound hem. The sleeve is gathered at the cap as well as the hem, so it's very dainty, but in my thin knit, not at all voluminous or overwhelming. I think it works with the delicate print and soft colors of this fabric.
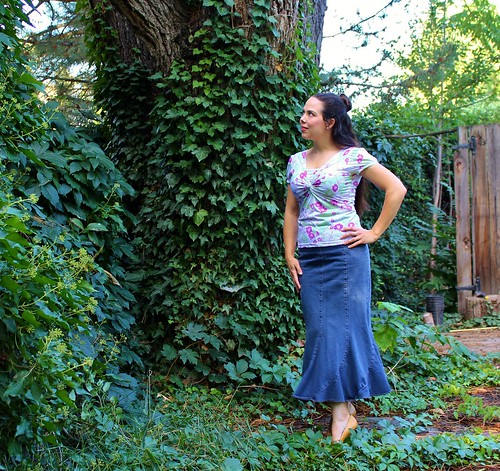
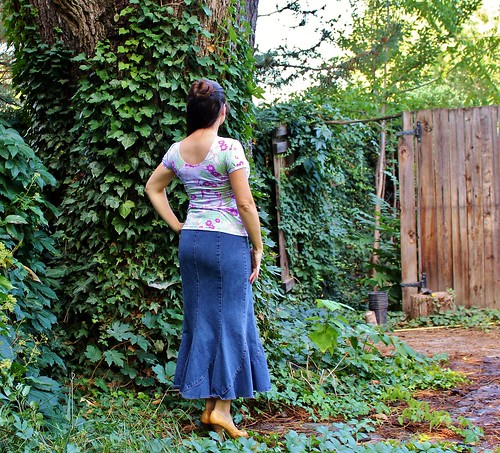
The other stand out feature of this top is the back neckline. It scoops low on the back, but not so low as to require special underwear. I love the subtle sexiness. The pattern includes ties that go across the back neck, but they weren't necessary to keep the shoulders up, so I omitted them. I like the clean line the low neckline gives back here.
For fit, I did my usual Jalie cheater FBA. It's a little tricky on this top, since the front pattern piece is split and looks very odd, but once you find the armscye, the method is the same. Don't forget to add to the modesty panel as well. I also curved the center back seam a little, but from the back picture, it looks like I need a bit more shaping. Nice to have a CB seam for that. All in all, I'm pretty thrilled with this top. I also think it'll make a fab dress... Perhaps soon to come.
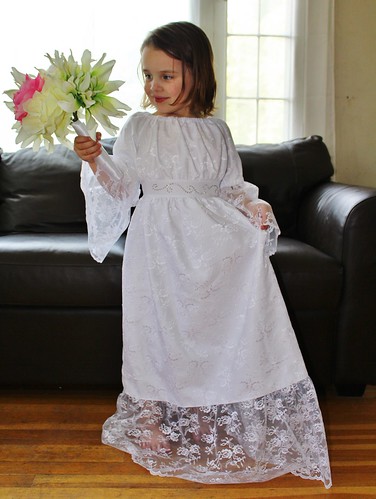
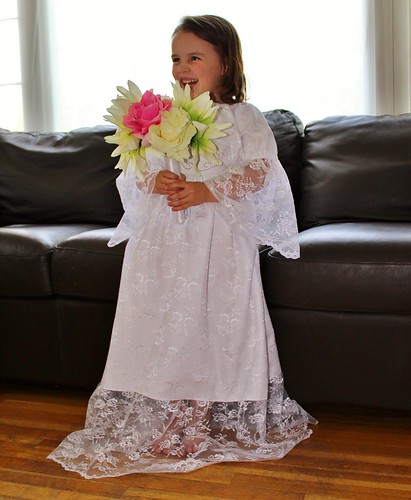
Myra asks for a different dress up dress on a near daily basis. I can't keep up with all the princesses. But one dress that she asks for consistently is a "bride" dress, so I thought her 5th birthday would be just the time for an over the top fancy gown for her dress up box.
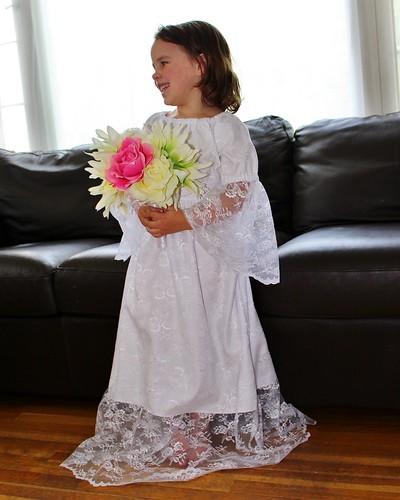
This picture makes my heart stop, a little. She's so lovely, but I am definitely not ready to face the possibility of her being an actual bride some day.
The pattern is Simplicity 1595. I was going to use my usual peasant dress, Simplicity 2377, but I had loaned it out, so since Hancock was having a Simplicity sale, I thought I'd just run over and get a spare copy. I use that pattern all the time. Naturally, they were out. So, after a little grumbling, I flipped through the pattern catalog to see what else was available.
I think it was for the best though, as this pattern was much more suited to a fancy dress! The long sleeve ruffle and the midriff band gave me more opportunities for embellishment. I added some hotfix gemstones to the midriff band, for a little extra bling.
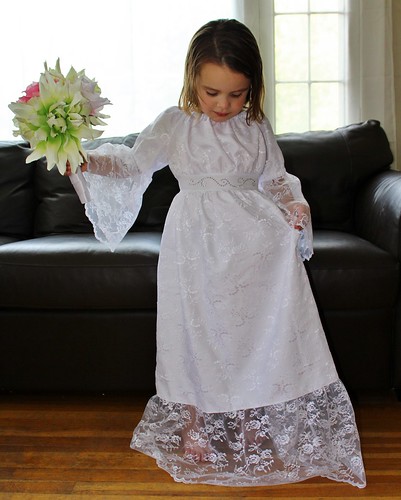
She approves of the bling.
I also really like the shape that the midriff band and sash give to the dress. The upper bodice is gathered into the midriff band, which gives the appearance of a waist. It's very shapely.
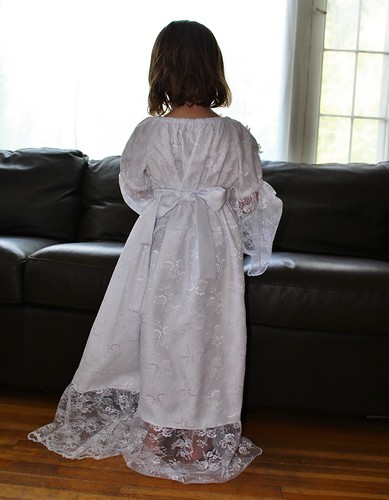
There is a tie sash in back that pulls in the waist even more. The I made it a size larger than her measurements and a bit long, so that she would be able to wear it a while, but the sash keeps it looking fitted.
The fabrics I used are a polyester satin backed shantung and nylon Chantilly lace, both from the bridal section at Joann. I used the satin side of the main fabric on the inside, so I didn't need a lining. I constructed the dress using the shantung as an underlining for the lace in the bodice, skirt and upper sleeves. I used the lace alone for the sleeve and skirt ruffles and the shantung along (with bling!) for the midriff panel and sash.
Myra loves her bride gown, and she's very happy with the bouquet we made together. Thanks to Gillian for the suggestion!
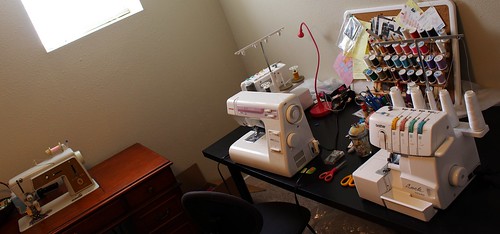
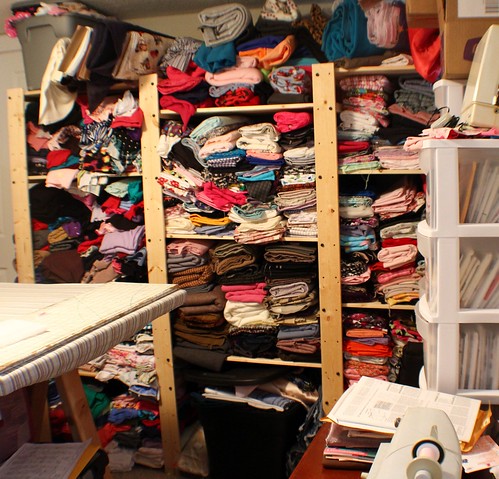
It seems like I've been chatting about my arsenal of sewing machines a lot this last week, so I thought I'd introduce them.
Here is the "aerial" view of my sewing room, which is the only angle I can get all 4 machines in. Up front are the sewing machine and serger, with my vintage machine on her own table. The coverstitch machine is tucked into the corner.
This is my main machine, a Janome 4623LE. My hubby gave her to me for Christmas, just after we were married and long before the sewing bug really hit me. He is a wise man. She's a really wonderful machine - basic, but with all the features I need. I use her every day.
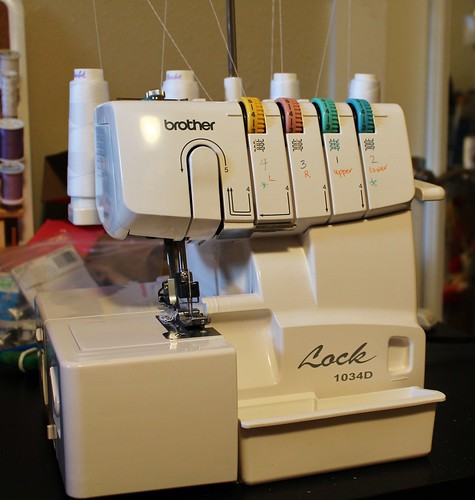
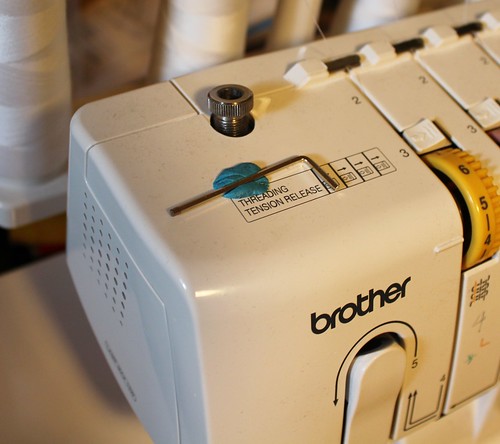
My serger also gets a workout every day. She is a Brother 1034D and was also a gift from my sweetheart. Yes, he spoils me. I really love this serger. I've had her nearly 3 years and she's never complained, despite heavy daily use. I find her easy to thread and simple to use.
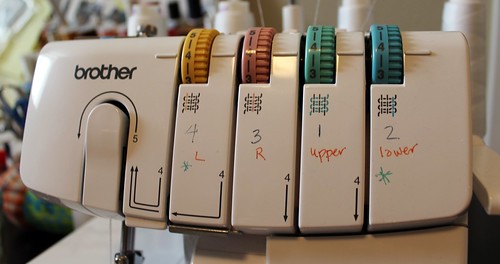
When I first got her, I did get the threading sequence confused on occasion, so I added a little crib sheet with a Sharpie. I find this insanely useful, so I thought I'd share. The numbers in blue are the threading sequence. The red annotations tell you which thread goes where - L for left needle, R for right needle, upper for the upper looper and lower for the lower looper. The two thread paths that are starred are the two threads that are visible in the seam, so those are the ones I always make sure match the garment fabric.
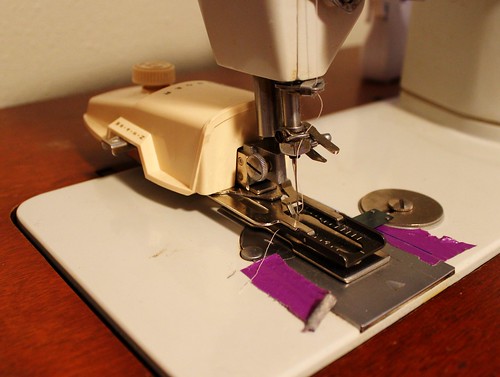
Another tip, which I use for both serger and coverstitch, is how I keep that darn hex wrench close at hand. Lose this thing and it is impossible to change your needle, and I am a neurotic needle changer, so I do it often - generally every time I change the thread, which I do with pretty much every garment. I use a little ball of putty (AKA Sticky Tack) to keep the wrench stuck to the machine. This way, it's always here when I need it.
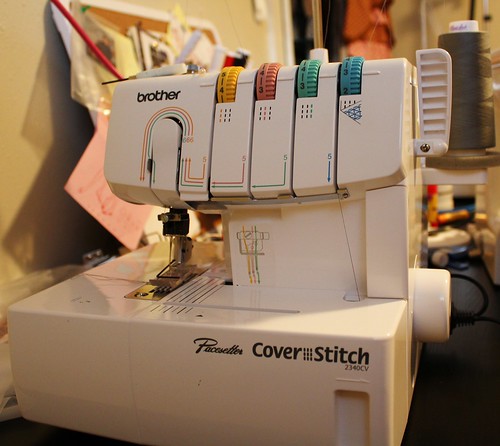
The third machine on my main table is the cover stitch machine. I have the Brother 2340CV, and I love it. When I initially was considering getting one of these, I really questioned how much I needed it. I mean, all it does is hem knits, right?? But I do sew a lot of knits and I had gotten more and more dissatisfied with the results I was getting with twin needles or other methods. But as it turns out, I use this machine all the time. At least 3 times a week, possibly more often. She hems, she binds, she attaches elastic, she makes beltloops; all effortlessly and beautifully. Seriously. She's amazing and I can't live without her.
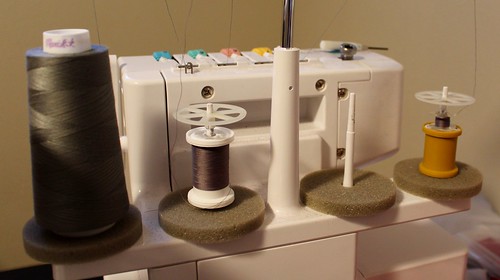
Here's one little tip for the coverstitchers out there. I like to use regular sewing thread in the needles when I coverstitch, but if I don't have 2 spools, the spool pin doesn't accommodate a bobbin well. I discovered that a bobbin actually works great if you stack it on top of an empty spool of thread. It brings it up to the height it needs to sit and feed smoothly.
Last, but definitely not least is my Singer Touch & Sew 603E. This machine was a gift from a good friend who didn't have room for her. She's an absolute powerhouse of a machine. This girl with sew through 8 layers of heavy denim like it was nothing, and come back begging for more. Her stitch is beautiful and sturdy. I use her for constructing heavy duty items (like jeans) and also for topstitching when I'm using contrasting thread, so I don't have to constantly change thread.
But what I truly can't do without is her buttonhole. Seriously, these things are so beautiful. Perfectly stitched, every single time. The vintage buttonhole attachment does have a bit of a learning curve to it, but once you've got it, you'll never go back. These buttonholes are a work of art.
So, those are my girls. Together, we make beautiful things. Although there are lots of other machines out there that I *could* happily add to my arsenal, these four ladies are what I really need for what I love to do.
So, how many machines would make you feel content? Do you think a serger is essential? What about a coverstitch? What machine(s) can you not live without?
July was a pretty crazy month around here. The trip to Tennessee took a lot of my time and energy, not to mention the week away from my sewing room. Still, it was a reasonably productive month.
That is a total of 10 items. As I look over the list I realize that all but one of the garments was sewn from a pattern I had used before. That's really not like me, but it sure made for faster and simpler sewing. I am starting to see the benefit of having a TNT or two to just whip out garments! So, I sewed up 22.5 yards, which brings my total for the year so far to 143.75 yards sewn. I brought in 31.25 yards. A large chunk of that was gifted and two of those pieces have already been sewn, but still... The yearly total in is 171.75, which puts me over for the year nearly 30 yards. I'm a stashbusting failure.
The month of August is likely to be a crazy one for me personally, so I'm not sure how much sewing I'll get done. I also have a lot of boring sewing I need to do, so it may be quiet around here. I won't inflict another set of flannel PJs or the 14th pair of knit shorts I've sewn, but I'll share when I come across something interesting and new patterns I use. I've been slacking off on my goal to share a sewing tip with each post, partly because of busy, but also because I'm never sure what y'all would find interesting and instructive, so if you have anything you've been wondering about or something you'd like me to address, please leave a comment and I'll be sure to talk about it.
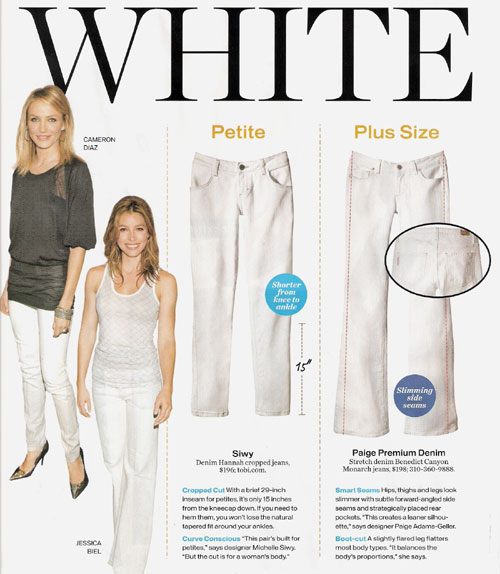
Along with the kid sewing, there are a few things I'd like to make for myself. Topping my list is a pair of white jeans as suggested by Carolyn. I ordered some white twill from Mood and once it arrives I'm going to sew those up. I'm on the fence about style though. Initially I thought I'd make skinnies, but would straight leg or a slight flare be more useful? My last pair of white jeans were wide legged and I wore them to death. Tell me what you think! Is the skinny jeans fad on the wane, or should I jump on it while it lasts?


.jpg)


.jpg)