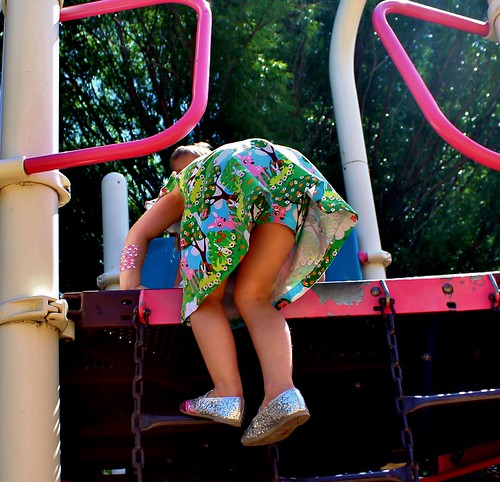
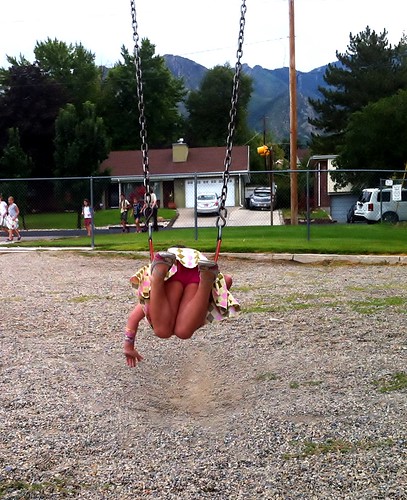
My Myra is a dress girl. She tolerates skirts, but in her heart, she knows she belongs in a dress. But she's also a bit of a tomboy on the playground, and she hasn't quite learned the trick of sitting like a lady...
And I don't know anyone who can climb monkey bars like a lady! So I made her a couple of pair of short shorts, to cover her unmentionables while she plays on the playground and sits criss-cross applesauce.
I have a ton of little knit remnants and these little shorts only take a teeny bit - about 3/8 of a yard if you are buying yardage. I had several pieces that matched dresses I had made for her, and picked out a couple of solids in colors that went with her wardrobe. This was a great stashbusting project for leftover knits!
As an aside, it was REALLY hard to get good shots of the shorts with her
Skater Dresses. Those skirts are really well designed! No wardrobe malfunctions. I had to stage all the shots. Anyway, all of the fabrics I used are cotton, cotton-lycra, rayon-lycra or poly-lycra knits, and all the shorts have an elastic waistband and are hemmed with the coverstitch (although I could have saved myself some threading and used
this method to hem them).
The pattern I used is for a basic legging with only one pattern piece. I cut them off to give them a finished inseam of about 2 inches, which is shorter than her shortest skirt, but still covers the topic. They are a quick sew, which is nice. I probably spend more time changing thread on all the machines than I did actually sewing these up. Darn my inability to serge with mismatched thread! It's like my Kryptonite.
These have now been worn (different pairs of course) for the last three days. They work well, are comfortable, and Myra likes them. She has fun mixing and matching them to her dresses. Works for me.
Today's tip
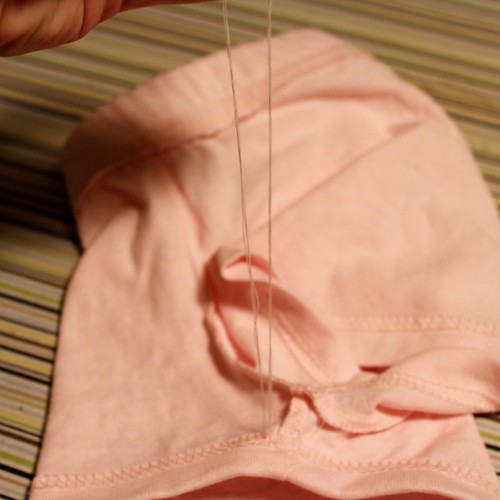
Since I coverstitched all the hems, I thought I'd show you the method that I use to keep the coverstitching from unravelling. I had a lot of trouble with this when I first started using my coverstitch machine, especially on children's clothing that gets a lot of wear and stretching. So, this method evolved for when I'm coverstitching in the round.
First of all, you want to be sure that your needle threads are to the back of your work. I didn't take a pic of this step (sorry!) but basically, when you start your hem, stitch nearly to the end, then stop and pull the beginning needle threads to the back with a pin, then coverstitch the rest of the way around, overlapping the beginning stitching by about an inch.
Pull your work off the machine using
this method (from Debbie's blog) that pulls the threads all to the back. From the front, it should look like the above picture. Pretty, eh?
From the back though, you should have a bunch of thread tails. I have six - two needle threads and one looper from the beginning and end of the stitching. I separate them into two bunches and tie them in a secure square knot.
Here's the little knot. I trim the thread tails, leaving a bit so that if the knot slips a little it's no biggie. Next is the critical step.
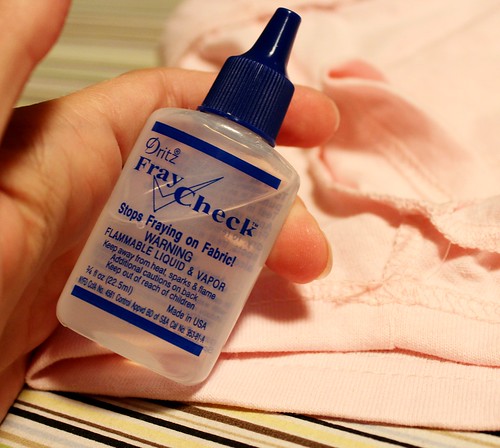
Get some fray preventer and drop a little bead right on the knot to really secure it. I like to smoosh it in with the tip of my iron to flatten the knot.
Since I've started using this method, I haven't had a single hem unravel. It may be overkill, but it doesn't take very long, and it is nice and secure. It may also work for a twin needle hem, though I've not tried it myself.


12 comments:
Yes, it works for a twin needle because this is how I do it for the twin needle. :-) I came up with the idea because my first few projects using it unraveled quickly and made me SO mad!!
Anyway, the bloomers are a fabulous idea, they'll be worn out before you know it! :-)
You are a good mom. I've worked with K thru 2/3 graders. Sitting like a lady isn't always automatic with these little ones. Love the color assortment.
I have never figured out how to do that on my serger- the hemming of knits. I know it can but... I can't. I need to figure out how because it sure finishes up the knits nicely. Great shorts! I used to make matching shorts for my girls when they were little. But mine were just zig zag hemmed. Yours like professional! ~Laurie
Hmm, cute shorts. What a brilliant idea.
Thanks for the coverstitch tips. I'll have to give them a try with my twin needle next time and see if this makes them behave.
A great and stylish solution. I no longer fear the monkee bars!
These little shorts are necessary! I have dress girls as well and I understand the need. I have seen something like these in stores, (made by Hanes maybe) but it's much more economical to make them yourself--and they match!
What a great idea and these work so well with the dresses!
Covers the topic - ha! Those are awesome, and thanks for posting your technique. My friend showed me how to do that with the threads, but I didn't think about the Fray Check - will pull my bottle out!
I remember wearing a pair of granny style bloomers over my knickers as a young girl too - they went by the charmless name of scungies which I think was the brand! It is a great idea though to make some - my Anna sounds just like your Myra.
Brilliant! Every time I see girls once they start crawling, I always wonder what Moms of girls do... the fabrics are great--where is the princess/knight/dragon one from?
I love this idea! Felicity's pretty good at being conscious of how she sits now (after a few notes from school... *sigh*). But you are right, skater dresses are made for play in mind!
Shorts for under the dress is a great idea! My girls used to wear split skirts when they were little, so they looked feminine while still having coverage.
Post a Comment