I am taking a page out of Sarah's book for this one. I have decided that it will help me to review monthly what has come from my sewing room and then make some goals for the next month. In doing this, I do have a few overarching goals. Mostly, I'd like to make sure that my sewing is fulfilling a purpose and that I am not making a bunch of orphan items that I or my family is unlikely to wear. So, if this bores you, feel free to stop reading and click somewhere else. There are a ton of cool blogs on my side bar.
For those who are still here, September has been a very unusual month for me sewing-wise. It isn't every day that I endeavor to make a wedding dress. The components of the dress have been the major product of my sewing room this month - and it isn't even done yet!
I have completed:
- A petticoat for the wedding dress
- A veil, also for the wedding dress
- A tote bag for Logan's Joy School
- A backpack for Logan
- A couple of pirate costumes in their entirety
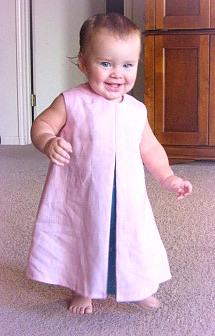
- A Mini Mod dress for Myra
For October, I am focusing on finishing the sewing for the wedding, and then beginning fall sewing in earnest. My goals for this month are:
1. Finish Kali's wedding ensemble: We are planning the final fitting and sewing this weekend!
2. Simplicity 3775 in a red and white floral knit from Fashion Fabrics club. I've already completed the bodice, so I am off to a good start. I am hoping to get this done in time to wear it to the wedding...
3. Dress pants and shirt for Logan from Ottobre 04/2004.

The pants will be repurposed from some linen slacks that Mitch has worn out, but still have plenty of usable fabric for a small tot! The shirt will be from a soccer ball print that he picked out. I'd love it if I could get the pants done in time for the wedding, but that may be a stretch.
4. PJ's from Logan's TNT PJ pattern, Butterick 4222. He selected this fabric himself as well. Anyone see a theme here?

5. This is the skirt that I am working on for my sewing group. I suspect that I will finish it when we meet next week. We'll see.
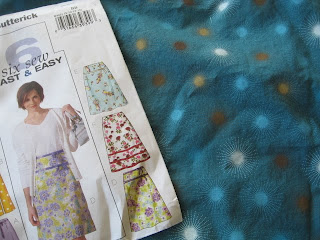
6. My skirt needs a top! I'm planning to make BWOF 08/2009-114 out of this cream sweater knit. It will be my next sewing group project, so it probably won't get finished this month.

7. Finally, my personal piece de resistance - I have been completely inspired by the Chanel SAL, and am now lusting for a Chanel inspired jacket of my own. I am planning to make it from New Look 6853. I don't have the sewing guns to do the couture techniques whole hog, but I am planning to underline and hand sew the trim. The sleeves are one piece, which will make this a little easier for me. This will be my first lined jacket. I am NOT expecting this to be finished by the end of the month.

8. I have also been thinking about giving jeans a try, once the jacket is done. I went shopping for jeans last week and noticed that trouser styles seem to be all that are on the shelves. That is fine with me! I have avoided sewing jeans for myself because I can't replicate the distressing that RTW jeans get, but these aren't supposed to be distressed. This pattern has very good reviews on PR, so I think it will make a good jumping off point.

Whew! That looks like a lot! We'll see how this goes...


 The pattern is superb. It was unbelievably well drafted. Everything fit together exactly. The instructions were phenomenal. Full color picture tutorials printed on
  I love this fabric!
 Instead, I
  I think this little mushroom button on the back is my favorite part.

 To complete the "look" I made a couple of fringed sashes. They are just big rectangles, sewn and turned with fringe stuck in the ends. Easy, but effective.


 Anyway, here it is! Kali went for a waist length veil, so as to obscure as little of the back of the dress as possible, which I think will be perfect.
 Isn't is pretty? All that sparkly organza and shiny satin.
 The organza is so sheer! I know it isn't a very traditional veiling fabric, but I think it will be stunning. It will look like a glistening halo around her.
 I bound it at the top with more bias tape (I do have 50 yards!). Kali is wearing a tiara, so I plan to hand sew a comb or two to the inside of the binding and she can slide it in behind the tiara.
 I was right about that waistband. It was too bulky. It was also too big, despite the fact that I cut it a size smaller than the rest on the petticoat. This pattern was terrible! I replaced the knit with a 1 inch wide grosgrain ribbon waistband that I just
  For the closure, I used a hook and eye sewn to the inside. Functional and streamlined.
 Even though it is just the petticoat, I am excited to have a little piece of this project all finished!


 Mom is marking the neckline in this picture. The original pattern for the bodice is actually a corset pattern, so there were no sleeves and a low back and neckline. Mom had the job of raising the necklines and adding sleeves. She did an awesome job!
 Here is the back. The
  So we fit, then we went back to our machines to refine and get it just right!
 Dan and Kali had a rough night last night unloading her U-haul, so they took a nap. She was a serious trooper during all the pinning, marking and squeezing.
 I have to say that this is definitely NOT my favorite pattern right now. It is not very well drafted. The notches didn't match up (or weren't even there) in a few spots. The skirt panels weren't all the same length. Worse than that, the pattern directions were terrible. The petticoat is essentially three layers. The top layer is taffeta. It is lined with lining material onto which tiers of net are sewn. The waistband is a knit (I used rib knit), which I like, in theory. Here's where it starts to get wonky. The pattern calls for a centered zip at center back. Most wedding gowns fastens at center back, generally with a zipper. Two layers of zipper seems like a bad plan. I elected to leave the back open (who's going to see it?) and put a hook and eye (or button and loop) at the waistline where the skirt portion joins the knit waistband.
 Here is that. The other thing that killed me about this pattern was the method of assembling the net tiers. Let me begin by saying that net is not the easiest fabric to work with. It slips and catches on things - totally not fun. Add to this the complexity of gathering yards and yards of this nasty stuff. Again not fun. The pattern instructed you to gather the sections beginning at the top and working down. I so know better, but I don't know what was wrong with me; I did it their way.
  At least it gives the skirt the proper pouf.
 I am a little worried about the bulkiness of the knit waistband, though. The skirt portion fit on my dress form without the petticoat, but it misses meeting by a little more than 2 inches. I'm glad we have a fitting today, so that I can see what needs to happen with this.

 Here it is! (Aside, I'm tickled that it fits on my
 Look, I got all sparkly! That satin leaves a trail when you pink it!
 I went over and over in my head what I wanted to do to finish the seams. I thought that french seams and bound seams might be bulky, but this stuff ravels like the devil, so I had to do something! After discussing it with mom, I elected to
  I checked out every book they had on bridal sewing. Both of them.


