
Saturday, February 26, 2011
Help! What am I?
Well fellow fabric fiends, I got another haul from FabricMart, and got another amazing mystery bundle. In it were a couple of fab knits, some khaki twill, an amazing piece of Italian linen, and a yard and a half of suiting weight twill. I'm not sure what it is though, so I thought I'd see if any of y'all can help.
 This is an unedited photo taken in natural light. It's a bit overcast today, so the colors IRL are more vibrant. What appear to be the warp threads are olive green. The weft threads vary from light cream to dark beige. It does feel a tiny bit itchy, but has a sheen. The yardage is only 46 inches wide. I burn tested it (my first time!) and it smelled like hair, was difficult to light and extinguished when the flame was removed. It burned orange and left a crumbly ash. My initial thought was that it was wool, but it isn't all that itchy, and it has a silk-like sheen. Perhaps it is a wool-silk blend? Or do I just need to buy more high quality wools so that I recognize one when it crosses my cutting table? What do you think?
Wednesday, February 23, 2011
Simplicity 2659
Danye's wedding bolero is finished!
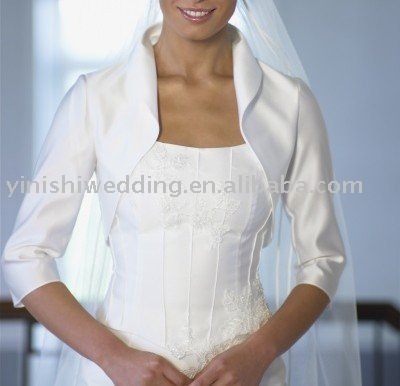
 Her inspiration garment was this one
 but she wanted cap sleeves and more coverage in front. I think we came pretty darn close!
 You can see the lines a little better from the back. We used Simplicity 2659 as our starting point, but eliminated the pleats on the collar, shortened the sleeves a little and reshaped the back hemline to reveal the buttons at the back of the dress. I also omitted all the topstitching and fully lined it. The sleeves are kimono style and the collar is in one piece with the front pieces, which was the trickiest part of the assembly. It was actually quite easy to sew. My walking foot made this slippery fabric much more manageable.
 I was a little worried that I wouldn't be able to get the structure of the collar, but all it took was some Pro-Weft interfacing! The fashion fabric is taffeta, which is crisp on it's own, and the Pro-Weft adds just enough body to give it structure without losing softness.
Danye will be able to pick it up Friday, and I hope she's as pleased with it as I am!


Danye will be able to pick it up Friday, and I hope she's as pleased with it as I am!
Monday, February 21, 2011
Simplicity 5695, ahem, again
I don't tend to collect UFOs, but this dress has been hanging out in my sewing bag for months, so I decided it was time to finish it.
 I've made this pattern and variations of it quite a few times, so no surprises. You can see the entire collection here. I actually started this one as a demo dress for my sewing group, so whenever we'd get together, I'd use it to demonstrate the next steps in the pattern. The other ladies both finished their dresses long ago, but this poor thing was forgotten!
 Since I used this dress to demonstrate, I did pretty much stick to the pattern, except for a tiny bit of ribbon trim on the bodice. The flowers are so busy you can barely see it!
 Myra loves it! She's a sucker for a new dress, especially a twirly one. The part of Prince Charming will be played by Curious George.


Sunday, February 20, 2011
Easter plans
Now that I have 3 kids to sew for, I have to get on the ball for holiday sewing! Easter is coming up, and I'd like to make new outfits for the kids (and maybe slip a dress for myself in there!) When I was a kid, Mom sewed for us, so instead of doing big "Back to School" shopping, our school clothes trickled in over the course of the year, but we could always count on new outfits for Easter! Since my kids are still too young to object, I can even coordinate them.


So, here is my current plan. I started out thinking I'd make matching gingham check shirts for the boys, so I was looking through my Ottobres for shirt patterns in both boys sizes. Of course, I did. Duncan's is from the 03/2008 issue, and Logan's is from the 6/2010 issue. They are your basic long sleeved shirt, but with a mandarin style collar. While I was flipping through 06/21010, I came across this dress,

which I have wanted to make for Myra. I realized that this would be the perfect design to coordinate with their shirts. Amazingly, I even have a big piece of blue cotton in the stash - enough for the body of the dress, as well as matching pants for the boys! So, the plan is to make gingham shirts and blue pants for the boys, and the dress for Myra, with the main body in blue and the pintucked inset in gingham. Maybe on the bias? This is going to be so fun!
Friday, February 18, 2011
Bridesmaid dress restructured
My friend Emily is in a wedding this month, but she also happens to be seven months pregnant, and the only maternity dress made by the company the bride chose for the dresses was a bit unsuitable and quite immodest.
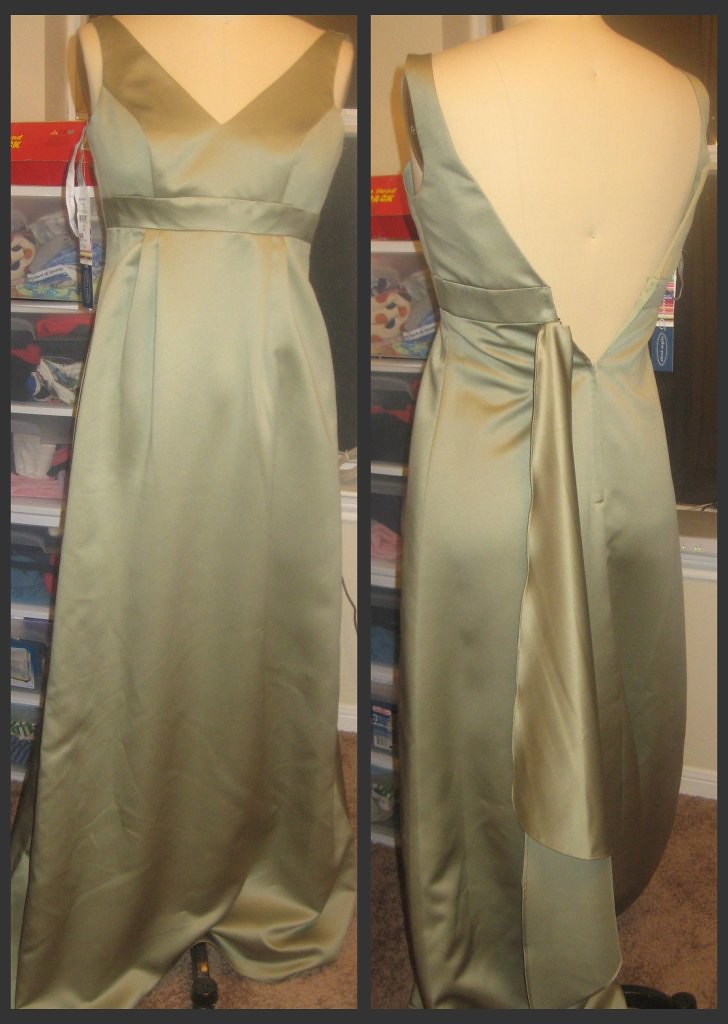
 Here is the before. Em is much smaller than I am, so it doesn't zip on my dressform, but the back really does come down in a vee all the way to the midriff band. The dress that the other girls are wearing is knee length and don't have the train/scarf thing in back, so there was quite a bit of fabric to scavenge.
 And here is the finished product! I took the length up to her knees, so that she'll at least match the other bridesmaids in that regard. I was a bit worried about setting a sleeve into a sleeveless armscye and still having room for Emily to move. Fortunately, she is quite petite, so I had to remove about a 1/2 inch from the armscye at the shoulder, which did a nice job tightening up the scye as well, so she can raise her arms without the dress coming up with it. It helps that she wanted a cap sleeve.
 In back, I added a panel to cover the open vee. It is cut on the bias to allow for movement there as well.
 So that Emily will be able to get in and out of the dress, only one side of the panel is sewn in. The other side attaches with tiny snaps along the edge.
This was a pretty interesting project and taxed my ingenuity at quite a few points! It was fun, but I'm glad to get back to patterns! Up next will be the bridal bolero, then I'll need to get busy with Easter sewing. Where has this month gone?


This was a pretty interesting project and taxed my ingenuity at quite a few points! It was fun, but I'm glad to get back to patterns! Up next will be the bridal bolero, then I'll need to get busy with Easter sewing. Where has this month gone?
Subscribe to:
Posts (Atom)