I wish I had posted a few "in progress" posts, as I have a lot to say about construction. Feel free to skip to the cute pictures and ignore the words. :)

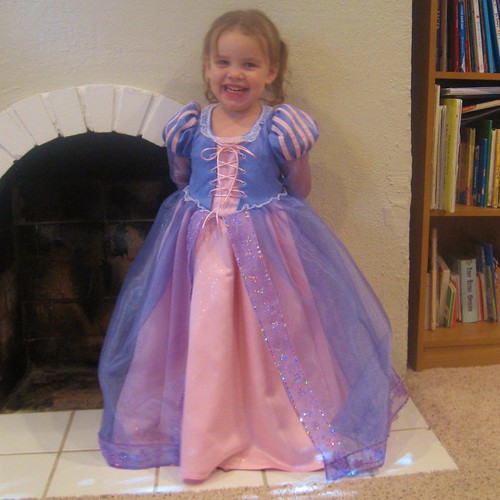
The pattern I used I Simplicity 2065, which is a licensed Disney Tangled pattern for Rapunzel's dress. As with the last Disney Princess pattern I've made, I found this one to be quite low cut, overly long and large in the shoulders and upper chest. At least they are consistent. I did a bit of a cheater fix. Rather than re-draft the neckline and do a narrow shoulder alteration, I just pinched out an inch from the shoulder seams. This raised the neckline and tightened up the shoulders nicely. If only fitting patterns for me was so easy...
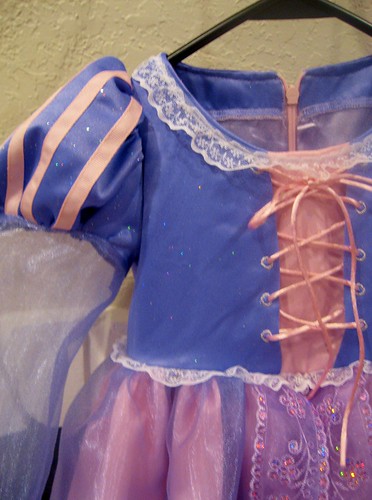
Here is the neckline closer up. In retrospect, I think I should have lowered the placement of the eyelets a little. There is a gap between the bottom of the eyelets and the waist, but the top eyelet is hidden under the lace trim. You can also see the glitter finish on the satin in this picture. I let Myra choose the fabric and trim for the dress. The purple and pink satin (both from Joann's "Special Occasion" line) have a glitter finish. I wasn't sure how this would survive in the wash, so I didn't prewash the satin. At least it will still be there for Halloween. I steered Myra toward the heavier weights of satin rather than the "costume" satin. I hate sewing that thin slippery stuff, and the special occasion fabrics have more heft.

The dress is fully lined. I used stash fabrics here, so it's a bit of a mish mash. The bodice is lilac satin left over from this dress, and the skirt is a rayon lining that I had hanging around. There is a 7 yard long strip of tulle stitched to the lining to give the skirt body, since three layers of gathered skirt weren't enough. The neckline is faced, which I went back and forth about. It probably wasn't necessary, since the trim is topstitched to the neckline, which provided stability and prevents the lining from rolling out.

Here is the back view. I debated about how to close this. The pattern calls for a lapped zipper, which I think is reasonable, although I find it a bit more difficult to install with the overskirt in the way. I considered velcro, but velcro in the wash with organza and tulle is a recipe for disaster.

In the end, I went with my standby, the invisible zip. Naturally, I had a pink one in stash. It went in perfectly on the first attempt, and I love that I can attach the lining to the zipper by machine, so it looks good on the inside and encloses all the zipper seam allowances nicely.

Construction-wise I thought this pattern was fairly good. The instructions were logical and complete, and went in an order that made reasonable sense, with the exception of just a few things.

After constructing the bodice shell (for which the instructions were great), you construct the overskirt, narrow hem the front edges, do a 1 inch hem on the lower edge, then apply the trim. Once all that is done, you gather the overskirt onto the bodice and baste it in place. For the construction seams, Simplicity (in the "General Instructions" part of the pattern instructions) suggests that you either double stitch and trim closely or serge finish the seams. I'm not sure how well the double stitch and trim would work with this ravelly organza. Typically for sheer fabrics, I would do a french seam. For this, I serged with a narrow 3 thread stitch. For the front edges, rather than a narrow hem, I elected to serge finish, then apply the trim to cover the serged sedge.

Here is how it looks on the underside. I actually think this is a nicer finish than a hem, which would have added bulk and weight. This way, the overskirt is very light and floaty. I did not finish the lower edge at this time, as I wanted to check the final length of all the layers on Myra prior to hemming. Once I had finished the dress and was ready to hem, I serged off the hem allowance (I ended up taking off only 1/2 inch, so I'm glad I waited!), then applied the trim in the same way as the front edges, mitering the corners at the front.

Isn't that lovely trim? I think is is Myra's favorite part of the dress.

For the underskirt hem, Simplicity allowed 2 inches, which they wanted you to double fold and hand sew. I've never had good luck invisibly sewing satin - it shows every teeny stitch. Instead, after measuring my hem on Myra, I lightly pressed it. Then I used the pressed edge to sew a line of fusible thread at the hemline. I serged off all but a 1/2 inch hem allowance, then fused the fusible thread to give a sharp crease. I then fused the hem down with steam-a-seam lite, rather than sewing it.

And here is the finished hem. It looks nice and crisp and the Steam-a-seam is quite sturdy. If she does manage to pull it out, repair is quite easy.
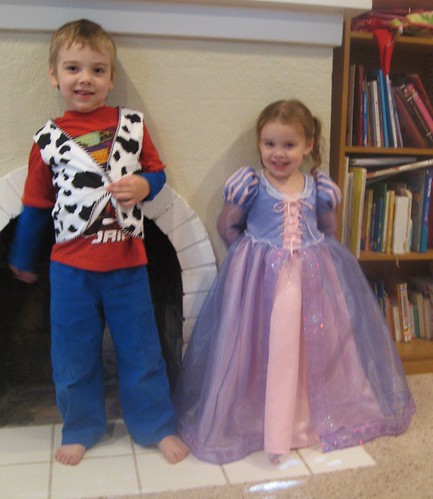 |
| Logan wanted to get into the action with his Woody vest. I'll tell you about that once I make his shirt! |
My only other piece of advice to those who are making this dress is this - Baste, baste, baste! I am typically not a baster. I like to just sew and let the seams fall where they may, but all these layers of slippery fabrics will bite you if you do not baste. Other than that, I really think that despite the many yards of annoying to sew fabrics, this is not a difficult pattern, but it does turn out a phenomenal princess dress. I suspect I'll be using it again, although perhaps with less fullness for dress up. It's perfect for a Halloween costume, but perhaps a bit too tulle-normous for everyday dress-up. (Credit to Ginnie for coining the word "tulle-normous" - Love it!)
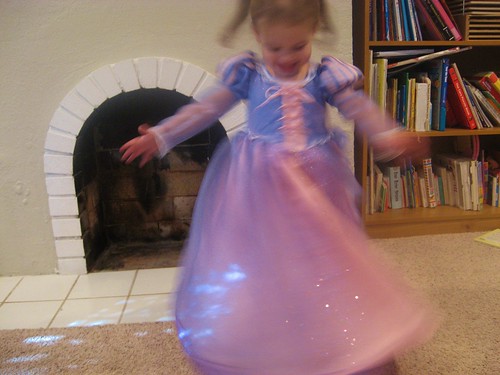
Sparkles and twirls! What else could a little princess ask for?
40 comments:
Oh!!
So beautiful!!!
It's lovely! And I think the trim is my personal favorite, too. :)
A fabulous princess dress. She's going to love it. What a lot of work... well done... congrats.
Oh she's too cute for word! What an adorable Rapunzel. She's my DD's favorite princess right now, too, and this costume really does look just like it!
The trim looks great, the whole outfit is perfect,and she looks thrilled!! :D
No I understand why the darn Princess Aurora dress we bought for Luca at Disneyland when she was four was so expensive! That is so much work. All that slippery fabric would have had me running for the hills. Or in the least running to the Halloween store for a ready made option!
It is wonderful. Congrats, Katie. Do you think she will wear it every day until Christmas? Good work. I love the trim and the sleeve detail with ribbons. Do you have sparkles all over your house?
Oh my, this is beyond cute!! I think you made a little girl's dream come true in the best way possible.
Love it. She is a pretty pretty princess. My daughter is making that dress for my granddaughter.
SOOOooooo cute I mean regal!!! What a great job!
Beautiful finished product! And now that you've posted all your tips I have no more excuses but to finish it. I think I'm going to hem mine a little shorter for trick-or-treating, though.
Adorable! DS, 7yo, looked over my shoulder and said "What a beautiful dress... She must be a professional seamstress for sure!" Who knows, Myra might just meet an appreciative prince ;-)
Beautiful - you have created a gorgeous costume with lots of delightful details.
that is ADORABLE. once again you have proven that you are a way better mom than me. look at that big grin too! obviously a keeper.
Adorable! I love the colors. Girlie, without being over the top in pink, pink, pink. :-) It looks like Myra is thrilled, and very cute too.
What a beautiful princess. She looks so happy with her dress, and so she should!
I made a princess dress for my niece from a Disney costume, and recall it as one of my most nightmarish sewing projects. You have my utmost admiration.
Oh it's absolutely lovely and she looks thrilled. She will have many, many hours of happy play in that beautiful dress. g
Well done! The trim is fantastic!
And I'm so gonna be using the word "tulle-normous" in everyday conversations now (with strange looks from the people I'm talking to I'm sure).
Wow, just stunning. And an amazingly useful review as well, and I have my own princess who is likely to want one of her own (must stop checking blogs on my phone. then she won't get the idea)
What a lovely little princess! Her Majesty should really have footmen to attend her, but Woody's looking like he torpedoed that idea!
Oof, lots of details (reminds me of the Tinkerbell costume I made. I took me 3 years to look at satin again (:)
It turned out adorable! Time to make some pajamas now, ha!
7 yards of tulle???!!! Oh my. This was obviously a labour of love. I can tell how much work you put into this. This is a keeper for Myra's hope chest someday! Great job!
Gorgeous!! If you don't mind me asking, where did you purchase the trim for the dress? I have this pattern and most of the materials waiting for me this weekend to try my own hand at creating this dress :) You did a great job!!
That is so gorgeous! I have the same pattern with most of the supplies purchased... this will be my weekend project :) If you don't mind me asking, where did you buy the sequin/floral trim? that is awesome! Great job!
It is so pretty that I want a dress just like it and a party to wear it to! Myra looks so cute and happy. Logan will look great as Woody. It reminds me of the Power Ranger and Mario (video game character) costumes I sewed for my sons.
Thanks everyone for the lovely comments! Myra does love her dress, and I'm glad that all of you do, too.
For IRWSMom, the sequin trim on the overskirt came from Hobby Lobby. It is a prepackaged trim in their fabric department and I used two spools. All of the other trim on the dress came from Joann.
That is absolutely beautiful! I read that you attach the lining to the zipper by machine, how do you do this? I always do it by hand and it is my worst nightmare.. not my worst haha but I do not really enjoy it!
@Wildirishrose - I think you can really only do it with a zipper that hasn't been topstitched. Essentially, you flip back the zipper tape into the seam allowance and stitch lining to FF right sides together. There is a good tutorial here - http://www.craftstylish.com/item/1632/rtw-style-zipper-facings
WOW! Gorgeous, gorgeous dress. Did I mention that it's gorgeous???
Adorably cute princess! How wonderful! Congratulations on a fantastic result (and glad you had fun at the conference!!).
You did a beautiful job on this dress. I just finished making the Queen of Hearts costume myself. So believe me when I say, I know that was a lot of work, but that is one very happy little girl. I know it was worth it.
I'm very experienced seamstress...but that word should be a clue "Seems=stress!" I've 2 torn rotator cuffs,and bout of C'diff..long story! I'm in tears frustrated with sewing and with my pain, drugs don't help much, just makes me stupid! But I want to finish this dress for my grandaughter Karlina. She'll be disappointed if gramma doesn't come thru...she wants to wear it tonights function...but, ain't gonna happen!
The instructions...egads...the top/bodice...pink inset and blue sides/top...WHY didn't they at least illustrate fact is 2 different colors! AND istruction #4 shows the eyelets on the inset and NOT on outside/blue top part! Or am I just stupid? Don't answer that LoL! I'm struggling, holding back tears...this gramma is frustrated!
Oh, CryTears! I want to give you a hug! I know we all have felt your pain at one time or another. I'd love to help you more directly, but I don't have your contact info - if you check back here, please send my an email at katiedeshazer (at)gmail(dot)com.
Those instructions did have some fussy parts - the eyelets actually go on the blue (outside) sections, right along the fold. You don't apply them until after you've stitched the bodice sections together though, which is why that diagram looks so wacky.
Just finished this dress, and I'm not a terrific seamstress so it was definitely the most challenging sewing project I've ever undertaken! It was doable but very time consuming and I made a few costly (and stupid) mistakes, like when I tried to "simplify" the pattern by omitting the organza lower sleeve, hemmed and attached the lace with no less than 3 sets of stitching, then OOPS -- realized I forgot to gather the lower sleeve! Then I decided I had better leave the sleeve "as designed," re-cut and re-made both upper sleeves (including all those pesky ribbons!) and just about lost my cookies when I went to iron the seam on the lower sleeve and MELTED my organza fabric!! (Decided to put the iron away after that point!!) After more than a few curse words, I was able to salvage the sleeve with a careful cutaway and re-work of just the lower part of one of the sleeves. Oh, and if anyone makes the yarn wig, be sure to MEASURE your little girl's head beforehand because I think my pattern had a mistake in the instructions for the length of yarn to cut for the headpiece...18 inches was MUCH too small after the yarn was braided and my husband (who was in charge of the wig) had to completely re-cut another 180 yarns at 28 inches instead. But all in all, the pattern was relatively straightforward for this intermediate sewer, and oh my goodness, was my little 4 year old princess delighted with the end result!
Thanks! I am making this for my youngest and was unable to visualize the bodice. Seeing a real dress and not a drawing really helped. Your dress looks amazing!
WOW. That princess is dress is fit for a princess!
I'm trying to get started on this for my GD, problem is she's a very slim almost 4 year old. The last Simplicity I used for her last fall was a size 1 and it fit perfectly. I don't need this to fit so perfectly, after all it's just for play, but I also don't want it to fall off her shoulders. When you say you pinched an inch out of the shoulders, do you mean you sewed the shoulder seam with a 5/8+1/2" seam? If so, how did you adjust the sleeve? Sorry, experienced sewer but not at altering patters. By the way, her mommy is also a kidsdr (her license plate). I meant patterns but iPad is not letting me fix the spelling!
Cathi, that is exactly what I did! It worked well for Myra, as she has narrow shoulders, but otherwise isn't particularly a slim child, just average. The neckline on this (and other Simplicity costume patterns I've sewn for Myra) is VERY wide, so pinching in the shoulders helped bring in the width as well, but if your DGD is particularly slim, you may want to widen the shoulder a little more at the neckline to be sure it doesn't slip off. The sleeves are kind of heavy!
Oh, and for the sleeves, I just left them alone. Since the sleeve is puffed, the extra volume just made it puffier and I didn't have to figure out how to re-space the ribbon trim. :)
I am trying to find a way to get page 1 of the directions for this pattern. I am having the worse luck. First the pink material I bought had cuts every 12 in or so on the fold line. I had no time to return to that Joanne Fab. as I had to be out of town today. So I went to a hobby Lobby as i still needed the lace and I rebought the pink satin. Will return the other next week. Now I am back home and I am missing the page 1 of 2...I am so frustrated. I need to have it done by Sat. How many hours do you think it took you to complete yours? I have a ben Franklin near and maybe if I plead my case tomorrow they will let me photocopy theirs..assuming they still have one. The closer to me Joannes was out of them when I tried to borrow it instore for the lace info I needed. I really want to get this done for my Granddaughter by Sat...BTW yours is adorable. I am changing the overskirt trims as they dont have what i need of course. I found another site where many people said the pattern runs small, but very long. I have found adult patterns to run large. My Granddaughter is normal waisted but a shorty. Thanks for any feedback you may have.
I'd be happy to scan and email the page you need to you, just email me at katiedeshazer (at) gmail (dot) com. As for the fit, I found it pretty consistent with other Simplicity patterns that I have sewn for Myra, but the neckline is quite low cut. I'm not sure how long the dress took to sew, but it was definitely one of the more complicated things I've sewn. I will say it took about a week of mornings, so maybe 12-14 hours total? I hope you can get it finished for your Granddaughter! Please email me at the above address if I can help in any other way.
Post a Comment