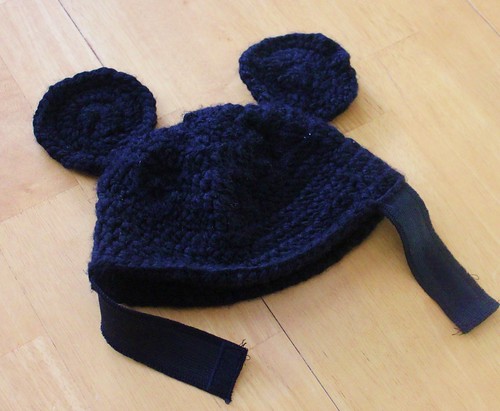
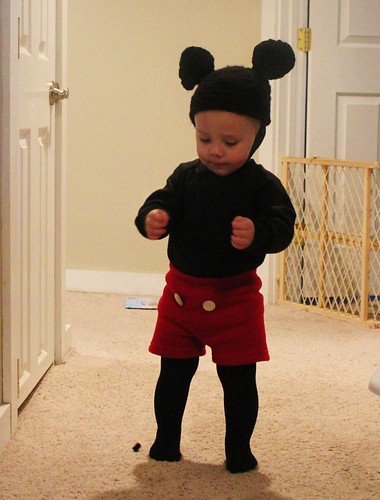
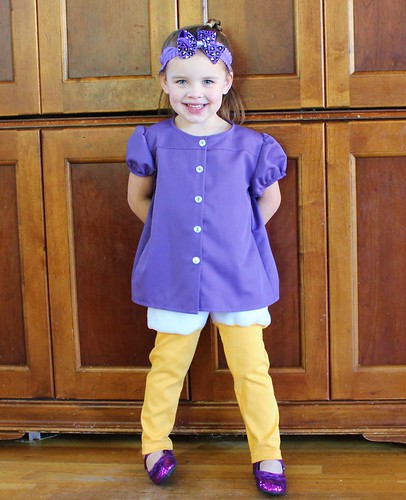
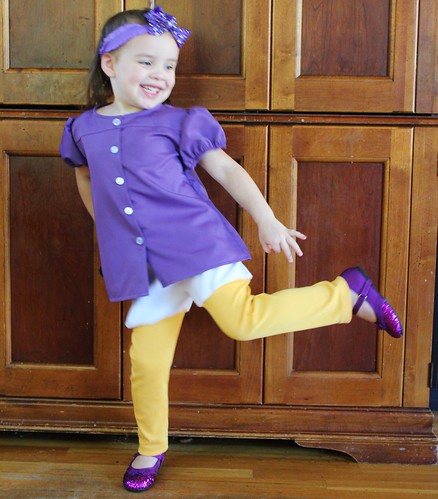
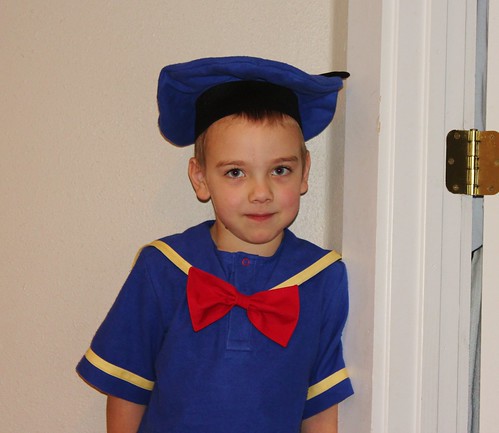
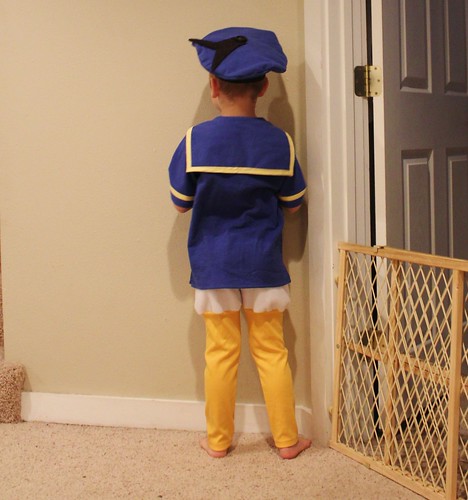
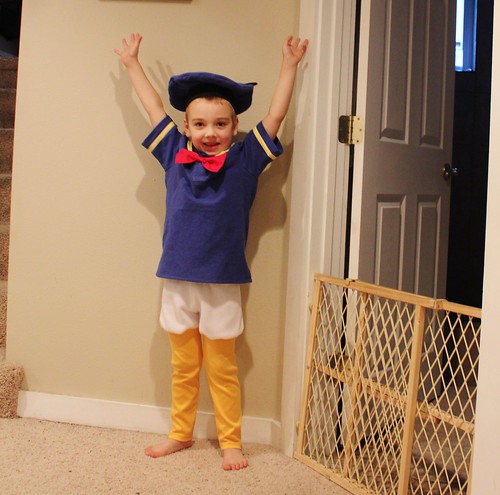
Monday, October 29, 2012

Sewaholic Renfrew, with the cowl

Yeah, so this is definitely one of those patterns you'll make more than once. It's fast, easy and fabulous. What's not to like?
This time, I made the cowl neck version, which has the same bodice as the scoop neck version, that I made last time. So by just switching a single pattern piece, you get a completely different look.
The fabric I used is a rayon jersey with lurex pinstripes. It was thin and curly and totally impossible to tame, so this was the perfect pattern for it, since it is simple and easy to sew. The 5/8 seam allowances were great here, since I was seaming away from all the curling. Generally, I prefer 3/8 or 1/4 seam allowances on a knit, but I may change my practice for extra curly knits, since this was so much easier.
The star of this view is the cowl. This is a detached cowl, as opposed to cut on, which is what I mostly have sewn. It is also cut in two pieces and seamed at the upper edge, which allows for shaping. These two factors make it lie very nicely against the neck, while still draping around the neckline in a graceful way.
It looks awesome with my new favorite jeans (Vogue 1059). I need a few more, I think. 

Friday, October 26, 2012

Jalie 2792 leotard, but with legs

Last week at gymnastics, Myra managed to put a hole in her old leo (which was also getting small). I am darn pleased we actually got an entire year's worth of wear out of it actually, but it was time for a new one.
Despite the fact that it is actively snowing outside, Myra had to try it out immediately.
I blended two Jalie patterns to get the final look that I wanted. The bodice (above the waist) is from Jalie 2792 and the legs (below the waist) is from Jalie 2105 (OOP). Both patterns had the waistline marked, which made blending them very easy.
I really like the upper bodice of 2792, particularly the option of the keyhole in back. It's so pretty! 2105 is a great basic leotard, but the neckline is wide and a bit low in back and tended to slip down Myra's shoulders. This one seems more secure.
Up close, you can see that the back keyhole actually has a closure at the neckline that allows for ease of dressing. I elected to use my coverstitch binder on the openings, rather than the stitched on bands from the pattern. In retrospect, I should have cut off the seam allowances of the neckline and keyhole, at least right at the area where they insert into the clasp. As you can see, they are all bunched up in there, and getting them in was a bit challenging. 
Since Myra chose a solid pink for her fabric, I added a little stretch piping (from Sew Sassy) to make it a little more interesting. I sewed it between the yoke seams on front and back, then sewed up the side seams. The piping matched up beautifully with just a little basting. I am very pleased.
Myra gave it a workout in the living room and says she likes it. We'll see how it performs on Monday at the gym, but for now I think we have a winner!
Linked up!

Thursday, October 25, 2012

Ottobre 03/2004-13 top and 03/2011-20 patchwork skirt

At Sewing Summit, there was a whole lot of quilting going on. As you all know, I am more emphatically NOT a quilter. While I admire the beauty of a well pieced top, I do not have the patience for perfect corners. But last year, we got these cute charm packs from Oliver & S. So this year, I took advantage of some of the open sewing time at Sewing Summit (where I was surrounded by amazing quilters) to attempt a little simple strip piecing.
Which I made into a skirt, because that is what I do.
I pieced the strips totally randomly, interspersing the Oliver & S charm squares with some Kona cotton solid squares that were also part of our swag last year. Then I gathered the strips like tiers into a twirly ruffled skirt.I used the "Funky Stripes" skirted leggings pattern from the 03/2011 issue of Ottobre to make a pair of little shorts for under the skirt (just like this one) and attached the skirt and shorts to the elastic waistband per the pattern. I bound the hem rather than turning it under, partly to preserve the length, but also because I thought it gave it a quilt-y sort of look that was fun with the patchwork.
Naturally, a new skirt needs a new top. And I had a couple of charm squares left. The top pattern is from the 03/2004 issue of Ottobre. I really love my older issues for great basic shapes. This top has a slight a-line and the sleeves have a bit of a flare that is accentuated with a tiny bit of shirring below the elbow. For the applique, I just turned the three squares on the bias. They came already pinked, so I just left them raw and stitched around them just inside the pinking with a narrow zigzag.
Myra was not in the mood for pictures today, but a little help from Duncan and at least she didn't scowl at me. As I have noted with prior early Otto patterns, the top did run a little wide. I just used a wider seam allowance in the body, but left the extra volume in the sleeves. It still has a pretty loose fit.
Linked up over at The Train to Crazy, Make it Wear it blog party!

Tuesday, October 23, 2012

Mickey Mouse Costume

Naturally, since we have a Daisy and Donald Duck, we needed a Mickey Mouse.
Duncan's costume should have been the most simple, and the basic pieces were. The shirt is a raglan tee from the 04/2010 issue of Ottobre, and the shorts are from the 03/2011 issue, but really any basic tee and shorts would do. For warmth, I made both pieces out of fleece. The tights are purchased.
But Mickey's ears gave me the most trouble! My initial plan was to add a hood (Ottobre conveniently provided one with this tee pattern), and put ears into the hood. Unfortunately, the fleece was too stretchy and soft and my poor ears were limp. I tried everything to make them stand up - hair canvas, fusibles, batting, even popsicle sticks - but nothing worked.
Finally, I gave up on the hood idea, and decided to see what knitting patterns were available on Ravelry for a Mickey Mouse hat. There weren't any knit patterns I liked, but this crochet pattern immediately caught my eye. Of course, I've never crocheted a hat, but there's no time like the present to learn!
Then we tried the hat on the boy. And this happened. Every time. The other two kids love the hat, so I know it isn't uncomfortable. Duncan is just ornery.
I added some elastic bands with a velcro closure under the chin. (Safety note: If you are adding a chin strap to a hat for a small child, you must be sure that the closure is easy to open in an emergency. This is a major strangulation hazard. Velcro or snaps are a good choice. Ties are not.)
Fortunately, the strap seems to keep it nicely on his head, and his ears are nice and perky. Come on, Halloween! We are ready!!

Sunday, October 21, 2012

Donald Duck Costume: Hat Tutorial

I mentioned in the main costume post that I couldn't find a tutorial for a Donald Duck hat, and the offerings available for sale just weren't what I was looking for. I decided to attempt to make one myself, and I was surprised at how easy it actually was.
I'm going to go over how I put it together. I was sort of winging it, so hopefully this all makes sense.
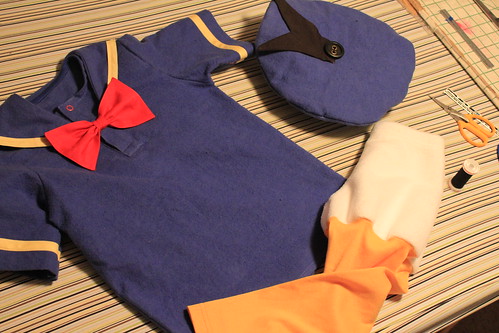
For your Donald Duck hat, you will need:
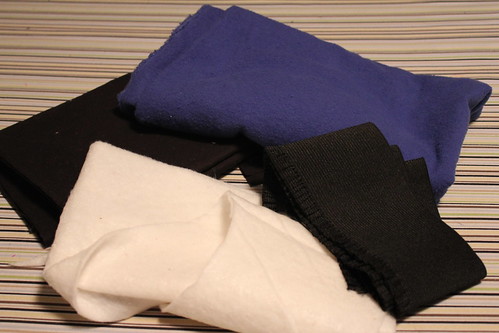
Fabric: Mid-weight cotton or flannel for the main hat. Heavier would be better than too light. Your hat needs some structure. I used about 1/2 yard, but I had a bit left over, and this will vary depending on how big you want your hat to be. Mine is on the large size.
You'll also need a small piece for the "tail" at the top of the hat. I used scraps of quilt weight cotton; you really only need a little bit
Batting or Needlepunch: the same amount as your fabric. Not too lofty, as you aren't looking to pad the hat, just stabilize it.
Wide elastic: Black, at least 3 inches wide and long enough to go around the top of the recipient's head
A large button (optional)
Thread and your sewing machine
The first step is to measure the head of your recipient. Donald's hat sits at the top of his head, and you want the elastic to be snug. Ideally, you should try it on your recipient to be sure it fits. If you just have a measurement, I would use 1/2 to 1 inch less than the recipient's head.
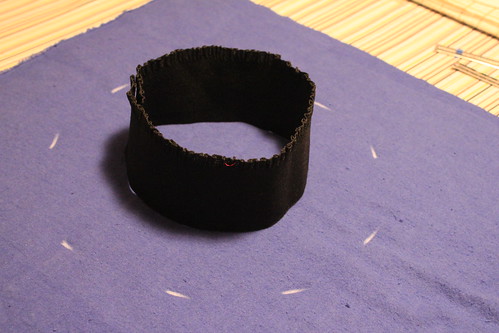
Lap your elastic ends over one another and zigzag with a wide stitch over the seam, catching the raw edge in your stitching. 
Elastic with ends joined to form a ring
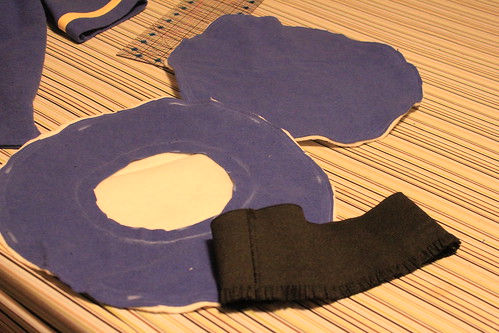
It should look like this. Now we are going to make the pattern pieces for the main hat. You will need two large circles of both your main fabric and the batting.
Measuring the larger circle
I used the circle formed by my elastic as a basis for my pattern, roughly drawing a circle 3 1/2 inches around the circumference of the elastic, as shown.
Your pattern, chalked onto main fabric
I also chalked the circumference of the elastic ring onto one piece of my main fabric and added a 1/2 inch seam allowance INSIDE the inner circle. You'll cut this smallest circle out of only one of your main pieces and this will be where you attach your elastic. Don't cut the smaller circle out of the batting/needlepunch. Leaving this circle intact helps to stabilize the shape of the hat.
Once you've cut out your circles (two of the main fabric and two of the batting), baste the main fabric circles to their corresponding pieces of batting around the outside edge.
Circle basted and elastic joined
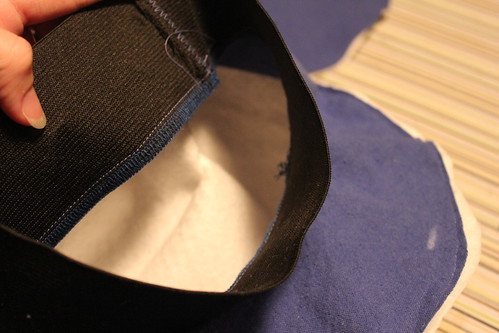
Now you're ready to attach the elastic to the lower part of the hat. This is a little tricky.
Main fabric tucked into inside out elastic ring
I flipped the elastic inside out at pulled it over the edge of the main fabric ring and align the cut edge of the fabric with the edge of the elastic. Sew around this circle using your 1/2 inch seam allowance. Don't include the batting in your stitching at this point.
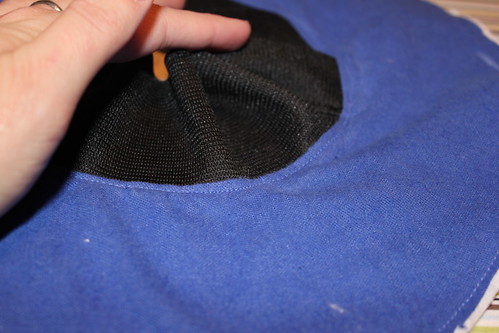
Batting still loose, elastic stitched to main fabric
Now you want to topstitch the elastic to the batting layer around the seam. Tuck the seam allowances between the main fabric and the batting to hide them and edgestitch onto the main fabric, through the seam allowances and the batting.
Edgestitching around the elastic
Your bottom half of your hat should now look like this.
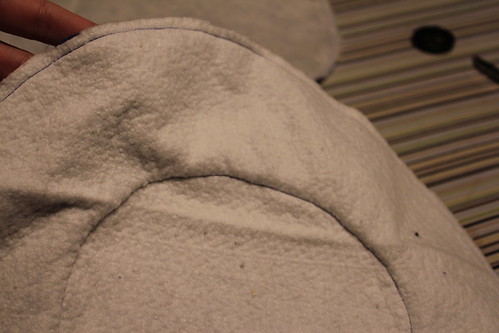
Batting side, with the ring of edgestitching visible
Now we'll make and attach the tail to the top of the hat.
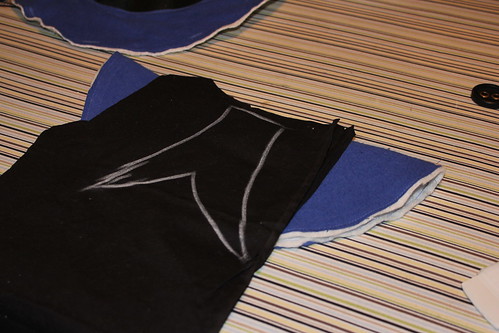
Drawing the tail
I folded the top piece in half to give me a rough dimension and drew the shape of the tail onto my fabric with chalk. I know, it ain't rocket science, y'all. Cut two of this shape and seam them together, leaving the top edge open for turning. Turn it and push out the points of the tail with a turner or other blunt instrument. Press it flat, tucking under the open edge and seam it to the center of your top piece.
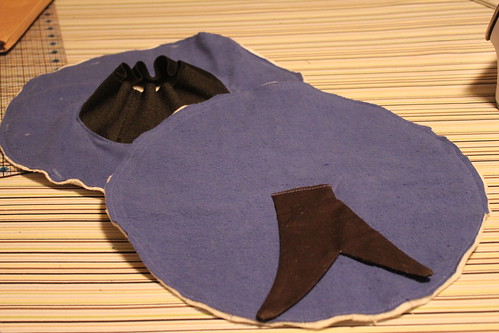
The two pieces, ready to seam together
Now you are ready to attach the pieces of the hat together! Put the two circles right sides together, and seam them all the way around, being sure to catch all four layers.
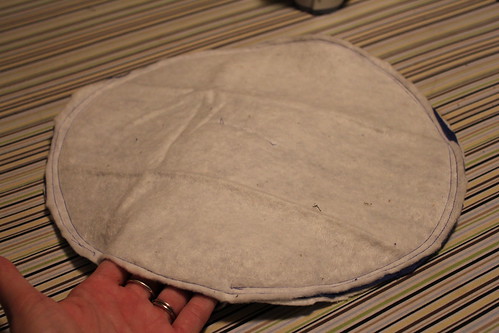
Seamed together, before turning
Leave an opening a few inches long to turn the hat out.
Ready for hand sewing
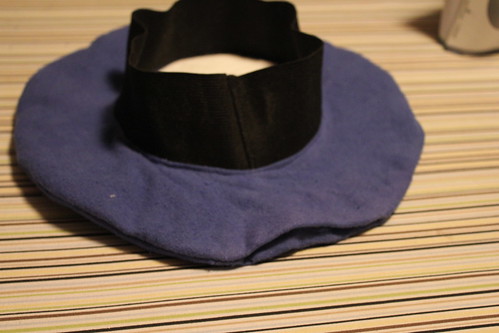
Turn it right sides out, press lightly and close your opening with a few handstitches.
Sew on your button through the main fabric and both layers of batting. This will help further stabilize that shape of the hat.
Put in on your kid or yourself!

Saturday, October 20, 2012

Daisy Duck costume

Our sweet Donald needed his Daisy, and Myra (for once) was happy to oblige.
Daisy's costume was even simpler than Donald's. I let Myra choose the fabric for her blouse, and she picked a poly-rayon gabardine from my stash. It was a pretty small piece, and apparently had been used by someone else to make binding, as there was a giant bias slash through the middle of the yardage. I worked around it, but there was just enough. We did have a brief hairy moment when Myra insisted that Daisy wear a skirt, which wasn't a possibility since I had already cut the blouse and there was just shreds of fabric left.
After perusing some pictures of Daisy online, Myra was convinced that there was no skirt. That's so silly!!
Myra's duck pants are the same as Logan's (although a couple sizes smaller). I sewed them at the same time, and somehow managed to switch them around, so Myra's pants actually were made with the lengths of elastic I should have used for Logan's. It didn't make a huge difference, but her bloomers are gathered a little bit less and her waistline is a little loose. The blouse is the Summer Blouse for Girls by Lily Bird Studios. I've made it before here, so it was already traced in her size. I omitted the ruffle collar and gathered the sleeves just at the cap to give them more upward pouf. Hopefully, she can still wear the blouse after Halloween. I love dual duty costumes!
Once she was all decked out, she had to practice her Hot Dog dance. I had to wrestle the costume off her, so I think it's a win.

Friday, October 19, 2012

Donald Duck costume

Now that my kids are a little older, they have decided opinions about how they want to dress for Halloween, and I was afraid that my days of a cute coordinating family were over, but this year Logan and Myra want to dress as Donald and Daisy Duck!! I'm all over it.
Donald came first. This is one of those costumes that looks a lot harder than it is. It actually came together pretty easily, once I figured it out. When Logan asked to be Donald Duck, I wasn't sure how I was going to make it work. There are a couple of commercial patterns out there, but they are all full body suits, stuffed with batting and made of fur. I knew that wouldn't work for my guy. Since Logan has some sensory integration issues, the costume had to be soft and simple. I actually started with the pants.
Believe it or not, this is an actual pattern, meant to be worn as daywear. I know. When this issue of Ottobre came out (it's the 04/2011 issue), I actually laughed out loud when I got to the page these pants are on. As ridiculous as they are, they make the perfect duck pants. The upper section is basically bloomers that are gathered into the legs with clear elastic. I used a soft anti-pill fleece from Joann for the "duck butt" section and yellow interlock, also from Joann, for the legs. Soft and simple, with no scratchy fur or heavy batting.
The top is the "Art Camp" shirt from the 03/2011 of Ottobre. It is made of flannel (again, Joann.) so that it would be warm and comfortable. I lengthened the sleeves and trimmed them with yellow bias tape, as well as drafting a sailor collar which I inserted into the back neckline and the front placket. The placket closes with red ring snaps, and the bow tie is just quilting cotton with stiff interfacing, hand stitched over the lower snap on the placket.
From the back, you can see the sailor collar, which I bound around the outer edges with bias tape. I even mitered the corners y'all. They look awesome. You can also see the hat in a little more detail. I'm pretty darn proud of that hat, actually. For some reason, there just aren't many Donald Duck hats available out there. All I could find were cheesy baseball caps or headbands with fascinators and feathers. That was so not going to work. I was a little surprised that Mr. Google didn't turn up any online tutorials for making your own Donald hat. We'll be taking care of that oversight in the near future.
He's pretty thrilled with his Donald Duck costume, and so am I. Up next, Daisy. She's actually even easier, so hopefully I'll have something to show you tomorrow or the next day. Then I'll get on that tutorial. Halloween is just around the corner!!

Thursday, October 18, 2012

Sewaholic Renfrew Tee

One of the classes at Sewing Summit that I was very excited about was the Make and Take Knit top, taught by Sunni Standing and featuring the Sewaholic Renfrew top to learn on.
If you've been hanging out here for long, you know that I am pretty experienced at sewing knits, but the point of the class was to learn to sew them on a regular sewing machine, and since I got my serger, I haven't used my machine much at all for knits, and I really was looking forward to learning some new techniques for that.
I was also pretty excited about the Renfrew pattern. There has been all sorts of buzz about it around blogland, and I have yet to hear anything negative. You won't get any here either. Love this pattern! The only change I made for fit was to do my usual cheater FBA on the front pattern piece, grading out from a Sewaholic 6 to a 10. I was a little worried that grading out 3 sizes was going to get me in trouble, since I only need 2 sizes in Jalie. No problems though - it eased in beautifully.
Here is a fun touch I added, since I was using a regular sewing machine, rather than the usual coverstitch for topstitching. The instructions had the neckband topstitched with a zigzag, which I think always has a "Becky Home Ec-y" look. I used a decorative stitch and I think it looks pretty fun, and has a ton of stretch as well. Of course, a twin needle would have also been an option here, and would have given a nice professional look.
The fabric I used is a cotton-lycra from Girl Charlee, and is it ever lovely; soft and stretchy with great recovery and beautiful drape. I do love their cotton-lycra knits. I am very glad that I took this class! Sunni did a great job helping those who were nervous feel comfortable with knits and I think the pattern she chose was perfect, easy fit with minimal hemming. I know I'll be using it again! I already traced the cowl neck version...
I linked up to Make It, Wear it on The Train to Crazy today. Be sure to go check out all of the other awesome projects!