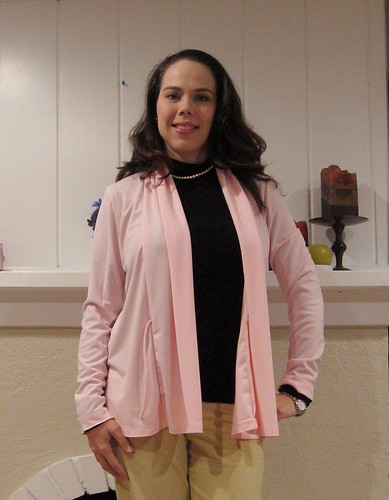
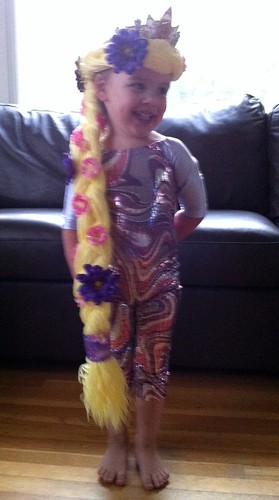
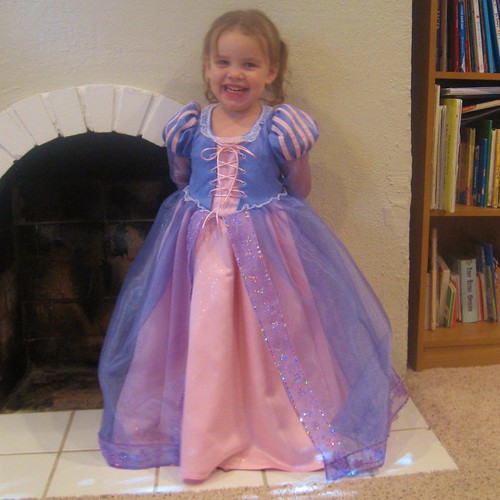
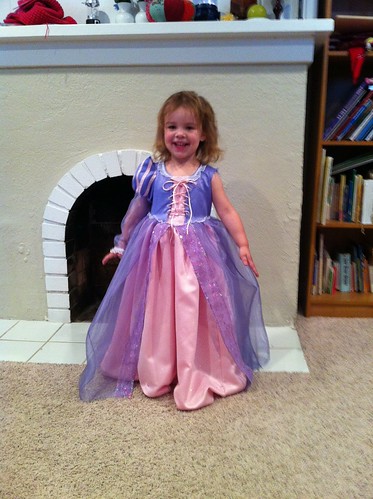
Monday, October 31, 2011

Open

I had a few inquiries about wearing the Vogue 1020 cardigan, so I thought I'd show y'all how it looks today.
I'm wearing it with the 09/2010 Burdastyle turtleneck and the 04/2009 Burdastyle pants. Here I have it fastened, and I like how it elevates what is otherwise a very simple outfit.
Here it is unfastened with the same outfit. Definitely a more casual look, but still nice and very wearable. Lose the pearls and put on jeans and it is perfect for hanging out. I thought the ties would bother me (you can see one of them hanging out in the picture.) but they mostly are hidden in the folds of the collar.

Sunday, October 30, 2011

Vogue 1020

Finally, some selfish sewing!!
This is the cardigan from Vogue 1020, an OOP wardrobe pattern. I originally purchased this pattern for the ruched top and dress, but all of the pieces are actually quite lovely, and while I have several knit tops in my wardrobe, with the change in weather, I've been wanting more jackets and cardigans to layer. The fabric is a matte jersey from fabric.com. It's somewhat thin, but good for layering. The pattern is a nice one, simple but with an interesting shawl collar, and shapely while not form fitting. It has enough ease that I skipped my usual FBA and in fact, made no pattern alterations at all. Whee! The pattern instructions were basically good. They even included stabilizing the shoulder seams. The only part I thought was unnecessarily fussy was the collar construction.
Here is the inside of my jacket, showing the collar. It is interesting. It's basically a big rectangle, that is folded into a tube, but only sewn down along the back neckline, so that the fronts can drape freely. Simple and effective, I thought.
Here are the Vogue instructions. (Click on the picture to enlarge.) All that stabilizing, pressing, slipstitching seemed like a lot of nonsense to me. Instead, I hemmed the outer edge the entire way across with my coverstitch machine - narrow hems on knits are crazy talk - and then just stitched the hem to the neckline seam allowance along the back neckline only, matching shoulder markings and center back. As you can see from the above picture, it worked well and looks good from the inside.
The other bit of the instructions I debated was the button loop. Vogue has you stitch a button and loop to the inside of the jacket, in the same spot as the ties are stitched to the outside. (I used a hair elastic for my loop.) I thought this sounded superfluous. I mean, that's what the ties are for, right? Previous reviewers on PR had gone both ways. I decided to just put it in. I could always remove it after the fact.
Here is how it looks with the button in place and buttoned. I like the shape and the way that the collar nips in at the waist. It's visually slimming and sleek.
Unbuttoned, it's still a cute cardigan, but it loses the sleekness and I think it even makes Sandra Dee look a little dumpy. Amazing what a difference a little button makes!

Saturday, October 29, 2011

Baby, it's cold outside!

After all of the Halloween sewing, I was so ready to do some selfish, easy sewing! I pulled out some pink jersey and an easy, but new to me cardigan pattern and had it (and a cardi for Myra) all cut out, when Logan blew the knee out of his favorite pair of pants. Y'all, I'm not gonna lie, I've been turning a blind eye to the desperate need that sweet boy has for new pants. He wears shorts as much as possible, but it really is getting cold, and his pants are veering dangerously close to the "high waters" territory. Naturally, he refuses to wear all RTW pants. So I traced out the next size of our favorite Ottobre pants from the 01/2009 issue.
I made them out of fleece. Logan loves fleece pants, and who can blame him? They're warm, soft and comfy. This pattern is basic, although Ottobre includes a ton of fun pockets and patches so that you can dress them up. For these two pairs, I only added a cargo pocket to one pair, inspired by a pair I saw in the mini Boden catalog.
I oversaturated the image so hopefully it would show the pocket. I used the coverstitch to hem and attach the pocket and left the edges raw. Hopefully, this makes them look less like PJ pants and more like daywear.

While I was cutting out the grey pair, Mitch wandered in to the sewing room. He petted the fleece and commented that it was quite nice, then in a subtle for him move, mentioned that his very favorite thing that I've sewed him is his fleece Kwik Sew pullover (which he was actually wearing at the time). Mitch doesn't ask for much, and I had plenty of that grey fleece, which was quite nice indeed.
I've made this pullover (Kwik Sew 3570) quite a few times as well, twice for Mitch and twice as gifts. I have to say that it is one of my favorite patterns, too. It is quite easy to sew, looks nice and fits Mitch's athletic figure well. If you sew for men or teenage boys, you really ought to have this pattern in your arsenal. It works just as well in jersey or interlock for a casual top as it does in fleece for a snug pullover.
This time around, I tried something new with the neckband that I really liked.
I know this picture isn't that helpful. Here's the skinny. The instructions have you sew the neckband on right sides together to the neckline, insert the zipper, then fold over the upper half of the neckline (basically a fold over facing) and stitch in the ditch around the neckline to secure it. Now this is fine, since the zipper eliminates any need for the neckline to stretch, but I always thought it looked sloppy on the inside. This time, instead of stitching in the ditch, I simply stitched the two seam allowances together using an overedge stretch stitch on my sewing machine. What the picture is trying to show you is the black serged seam (which was the first neckline to neckband seam) and on top, the overedge stitch to secure the facing. It's a bit hard to see since the thread from the second pass matches the fabric so it sort of disappears. Anyway, I really like the way this turned out - no floppy seam allowances around the neck - so I'll be doing it this way going forward.

Now, back to my pink cardigans!

Wednesday, October 26, 2011

Magic Hair! Simplicity 2065

The final piece of the Rapunzel ensemble is ready, so Halloween can commence. The pattern (Simplicity 2065) also included instructions for a yarn "hair" piece, which Myra has been calling her Magic Hair.
While I really thought the pattern had generally good instructions for the dress, those for the hairpiece left much to be desired. I actually wish I had taken pictures of the process so I could do a little tutorial, because anyone attempting this thing will want to pull their own hair out.
Here is the finished hairpiece. It is basically a braided loop that has been attached to a long braid. It sounds simple, and really it is, but Simplicity's directions are terse at best and inaccurate at worst. You start the process by cutting lengths of yarn to their specifications. There is only one set of measurements, despite the fact that the pattern includes sizes 3-8. The first set you are instructed to cut is for the braid that hangs down.  You are to cut 60 36 inch pieces for each braid segment, then braid them all together and tie off both ends. I found it nearly impossible to braid the segments without tangling the yarn, so I tied off each segment individually, then braided them and tied off the braid. Using scrap yarn to tie off blends nicely. The second segment, which forms the crown part, is to be 18 inch long segments. Seriously, that has to be a typo. Even for a 3 year old that is woefully inadequate, and Myra (and in fact all of my children) have HUGE heads. Instead, I used the long braid that I already had made (which was the 36 inch pieces braided) and wrapped it around her head to approximate how much yarn I would need. It overlapped by about 4 inches, so I went with 34 inch pieces of yarn, which I thought would be a bit too long, but ended up being just right. I only trimmed about an inch of tails off. Crazy. So, measure, then overestimate. Trimming is MUCH easier than redoing the whole thing.
The other complete inadequacy in these instructions is the attachment. All Simplicity has to say is "Hand sew or glue the crown portion into a circle, them attach the braid, covering the intersection with a large flower." Hand sew a bunch of yarn tails together??? I really had no idea how to go about doing that, so I didn't.
Instead, I took some scraps of jersey and overlapping the ends of the crown, tied them together with the jersey strips. I used jersey partly because I had just cut out a cardigan and it was lying around, but also because the stretch allowed me to get the ties really tight. I then laid the braid over the intersection of the crown and lashed it on with more strips of jersey. I'm really glad I paid attention at camp when I was a teen. Who knew I'd use all those knots one day?
After the braids were secured, I hot glued some of the sequin trim I used on the skirt to the bottom of the braid, then hot glued the flowers in place.
I'm glad I struggled through putting this together, because it totally makes the costume, but I hope my notes make it a little easier on some of you. I think as a finishing touch I'm going to crack open a yellow glow stick so the hair actually glows on Halloween night. Was I the only one who used to paint themselves with glow sticks as a kid? Everyone I've said that to IRL looks at me like I'm crazy, but won't it be cool if Rapunzel's hair actually glows?

Monday, October 24, 2011

Simplicity 2506

The finish line is near... This is the last costume for this year, although I still have to put together Myra's "hair", it feels like quite an accomplishment to be so close to finished! 
But seriously, have you ever seen a cuter dinosaur?? That baby is ridiculously photogenic. Anyway, the pattern is Simplicity 2506. It is basically a jumpsuit, hood and booties. The pattern includes variations to make a dinosaur, angel, mouse, 2 bears and a devil, but it could be easily modified to be almost anything. I did make a few modifications, with the biggest being I made the suit out of fleece rather than felt. Really, who wants to wear felt?? I also skipped the fins along the hood and tail. They're really cute, but Duncan is supposed to be Rex from Toy Story and he doesn't have fins.
Instead of velcro as the back closure, I used a zipper. In retrospect (after wrestling Duncan into this for the pictures), I really wish I had made a snap placket across the inseam for diaper changes. It would have been really easy to do. 
I also modified to hood closure. The dinosaur hood is supposed to close with a tie, but that is a strangulation hazard, so I went with velcro here, so that it just pops off it it gets pulled on. Initially, I just stitched velcro to the corners of the hood, but it isn't quite long enough to close that way, so I attached velcro to either side of a strip of bias tape to connect the two. It isn't as pretty, but it does work. If I were making this costume again, I'd have used the hood pattern for one of the other views as all the others close with velcro.
I didn't have any of that cool gripper fabric that you find on RTW sleepers, so instead I used some dimensional fabric paint to paint some dino feet on the bottom of the slippers. Since the paint has a rubber texture, it provides some grip, and since Duncan is pulling up and cruising, I didn't want him slipping around.
The pattern calls for ribbing for the wrist bands. Since the recommended fabrics are all non stretch, I thought I'd just use the fleece, but it just didn't have enough stretch when I tried. I ended up using some black sweater knit, which looks kinda cool and should help keep the cold out. The tail is stuffed with fiberfil, but if you're making this, be careful not to stuff it too full. It exits the jumpsuit right at the seat, so if it's too full, baby won't be able to sit down.  Overall, this is a cute and versatile pattern that isn't particularly challenging to sew. Definitely a winner as far as I'm concerned!

Saturday, October 22, 2011

Ottobre 06/2009-7 & 03/2010-23

After the sewing of the Rapunzel dress, I was really looking forward to putting together this little man shirt made from easy to tame cotton.
This is Logan's Woody costume. He'll wear this with RTW jeans and a purchased cowboy hat. The  vest is from the 06/2009 issue of Ottobre. It's actually a baby pattern and not graded up to Logan's size, but I just added a couple of inches to the length and an inch to the width at center back, and it is perfect. I actually traced, altered, cut and sewed the entire vest at Sewing Summit in the BabyLock sewing room. It was so fun!
The outer fabric is quilting cotton and I lined the vest with flannel for warmth, and bound the front edges with bias strips. In the cartoon, it looks like Woody's vest has a rope-like trim, but I thought this striped fabric on the bias would approximate that look well and give me a nice clean and easy finish.
The shirt is from the 03/2010 issue of Ottobre. I've made it before here.This time I chose a flannel back homespun purchased at Cottonwood Fabrics in Sandy. (Thanks to Sewing Geek for recommending them!) The reason I chose this particular shirt pattern was two fold. I really like the slim fit that it has, particularly for wear under a vest. I also appreciate that it is a seriously simplified version of a man shirt.
The collar does not have a separate stand, rather is shaped to approximate one, and the button bands are cut on and folded over.  Even though this is a costume, I used Pam's shirt crisp interfacing for the collar and cuffs. It is so wonderful to work with, and particularly with this one piece collar, I needed the flexible stability it gives.
The cuffs are one piece fold-over, and the placket is a continuous lap. I did cut the lap binding on the bias, which the pattern didn't call for. I always like a little give in my continuous lap binding. I think it make for easier sewing.
So, true confessions time. When I cut out this shirt, I THOUGHT I had carefully aligned the dominant stripe in the plaid so that I could match it.
But I didn't. And it threw the whole shirt off grain. See how it looks like the back is sloping upwards? Yeah, off grain. So, one side seam is perfectly matched and the other is totally off. I'm so glad this is a subtle plaid, or I would be remaking this shirt. As it is, I'm just going to be unhappy with it. And naturally, he'll decide this is his favorite shirt and wear it every day. Sigh. Just a costume, right? At least the vest covers the back.

Wednesday, October 19, 2011

Simplicity 2065 finally!

Myra Her Majesty's costume royal gown is finished, and in plenty of time for Halloween the ball.
I wish I had posted a few "in progress" posts, as I have a lot to say about construction. Feel free to skip to the cute pictures and ignore the words. :)
The pattern I used I Simplicity 2065, which is a licensed Disney Tangled pattern for Rapunzel's dress. As with the last Disney Princess pattern I've made, I found this one to be quite low cut, overly long and large in the shoulders and upper chest. At least they are consistent. I did a bit of a cheater fix. Rather than re-draft the neckline and do a narrow shoulder alteration, I just pinched out an inch from the shoulder seams. This raised the neckline and tightened up the shoulders nicely. If only fitting patterns for me was so easy...
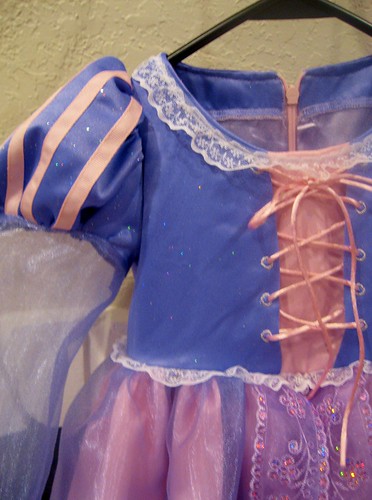
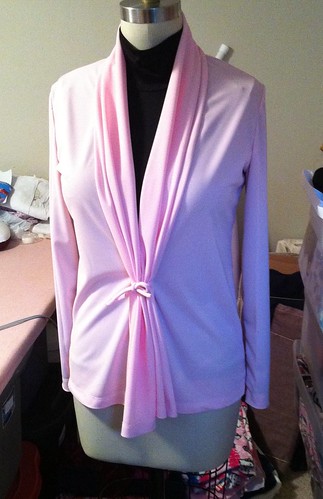
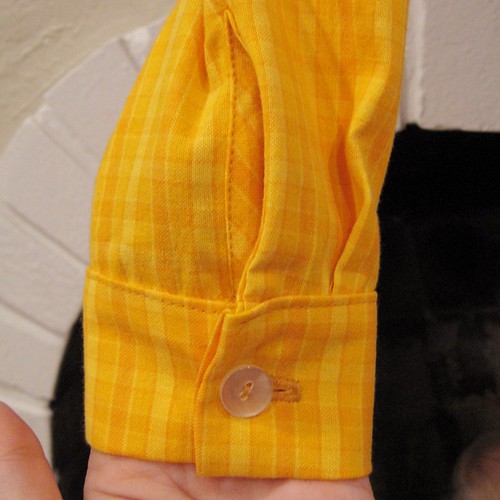
Here is the neckline closer up. In retrospect, I think I should have lowered the placement of the eyelets a little. There is a gap between the bottom of the eyelets and the waist, but the top eyelet is hidden under the lace trim. You can also see the glitter finish on the satin in this picture. I let Myra choose the fabric and trim for the dress. The purple and pink satin (both from Joann's "Special Occasion" line) have a glitter finish. I wasn't sure how this would survive in the wash, so I didn't prewash the satin. At least it will still be there for Halloween. I steered Myra toward the heavier weights of satin rather than the "costume" satin. I hate sewing that thin slippery stuff, and the special occasion fabrics have more heft.
The dress is fully lined. I used stash fabrics here, so it's a bit of a mish mash. The bodice is lilac satin left over from this dress, and the skirt is a rayon lining that I had hanging around. There is a 7 yard long strip of tulle stitched to the lining to give the skirt body, since three layers of gathered skirt weren't enough. The neckline is faced, which I went back and forth about. It probably wasn't necessary, since the trim is topstitched to the neckline, which provided stability and prevents the lining from rolling out.
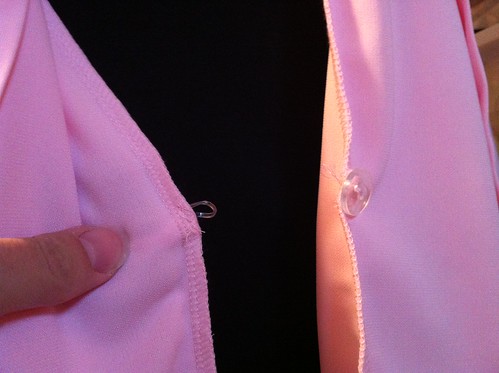
Here is the back view. I debated about how to close this. The pattern calls for a lapped zipper, which I think is reasonable, although I find it a bit more difficult to install with the overskirt in the way. I considered velcro, but velcro in the wash with organza and tulle is a recipe for disaster.
In the end, I went with my standby, the invisible zip. Naturally, I had a pink one in stash. It went in perfectly on the first attempt, and I love that I can attach the lining to the zipper by machine, so it looks good on the inside and encloses all the zipper seam allowances nicely.
Construction-wise I thought this pattern was fairly good. The instructions were logical and complete, and went in an order that made reasonable sense, with the exception of just a few things.
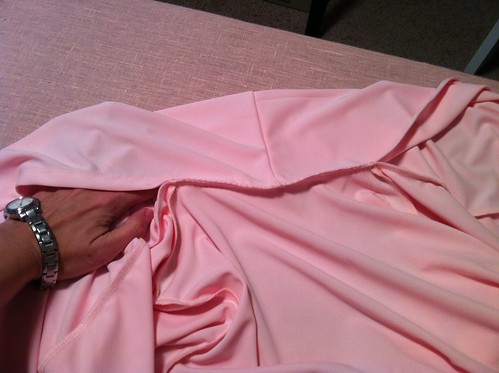
After constructing the bodice shell (for which the instructions were great), you construct the overskirt, narrow hem the front edges, do a 1 inch hem on the lower edge, then apply the trim. Once all that is done, you gather the overskirt onto the bodice and baste it in place. For the construction seams, Simplicity (in the "General Instructions" part of the pattern instructions) suggests that you either double stitch and trim closely or serge finish the seams. I'm not sure how well the double stitch and trim would work with this ravelly organza. Typically for sheer fabrics, I would do a french seam. For this, I serged with a narrow 3 thread stitch. For the front edges, rather than a narrow hem, I elected to serge finish, then apply the trim to cover the serged sedge.
Here is how it looks on the underside. I actually think this is a nicer finish than a hem, which would have added bulk and weight. This way, the overskirt is very light and floaty. I did not finish the lower edge at this time, as I wanted to check the final length of all the layers on Myra prior to hemming. Once I had finished the dress and was ready to hem, I serged off the hem allowance (I ended up taking off only 1/2 inch, so I'm glad I waited!), then applied the trim in the same way as the front edges, mitering the corners at the front.
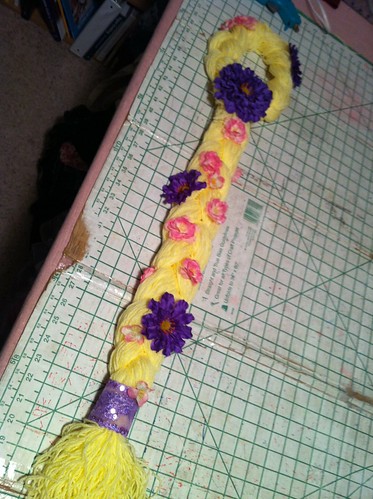
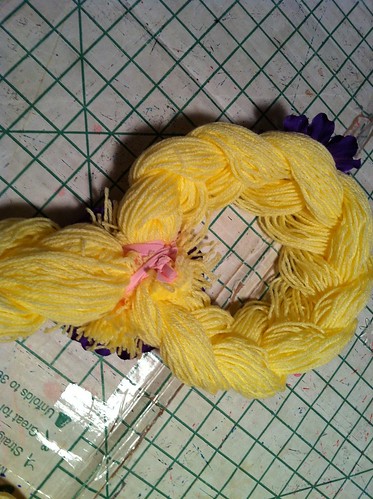
Isn't that lovely trim? I think is is Myra's favorite part of the dress.
For the underskirt hem, Simplicity allowed 2 inches, which they wanted you to double fold and hand sew. I've never had good luck invisibly sewing satin - it shows every teeny stitch. Instead, after measuring my hem on Myra, I lightly pressed it. Then I used the pressed edge to sew a line of fusible thread at the hemline. I serged off all but a 1/2 inch hem allowance, then fused the fusible thread to give a sharp crease. I then fused the hem down with steam-a-seam lite, rather than sewing it.
And here is the finished hem. It looks nice and crisp and the Steam-a-seam is quite sturdy. If she does manage to pull it out, repair is quite easy.
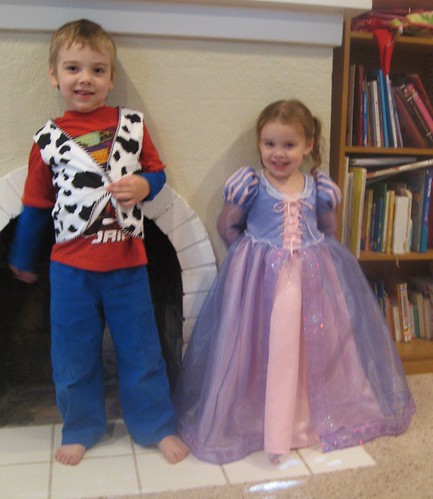
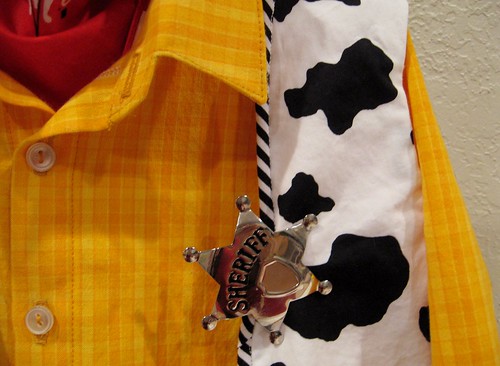
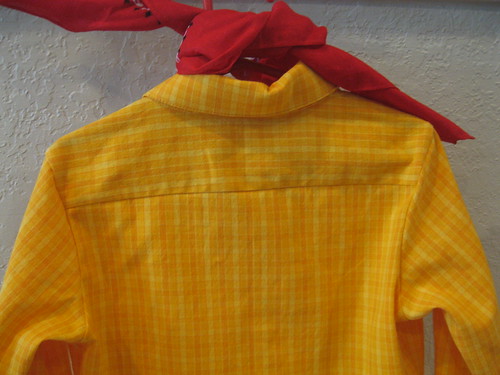
Logan wanted to get into the action with his Woody vest. I'll tell you about that once I make his shirt!
My only other piece of advice to those who are making this dress is this - Baste, baste, baste! I am typically not a baster. I like to just sew and let the seams fall where they may, but all these layers of slippery fabrics will bite you if you do not baste. Other than that, I really think that despite the many yards of annoying to sew fabrics, this is not a difficult pattern, but it does turn out a phenomenal princess dress. I suspect I'll be using it again, although perhaps with less fullness for dress up. It's perfect for a Halloween costume, but perhaps a bit too tulle-normous for everyday dress-up. (Credit to Ginnie for coining the word "tulle-normous" - Love it!)
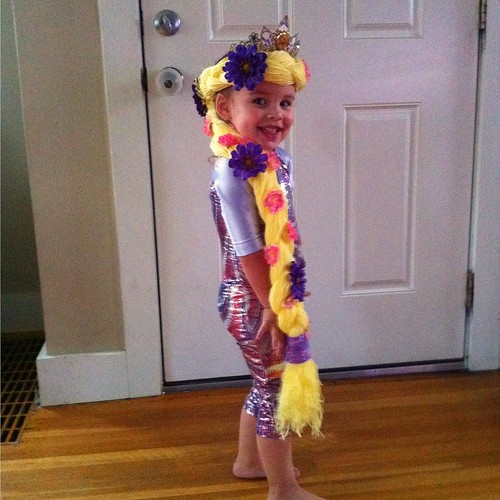
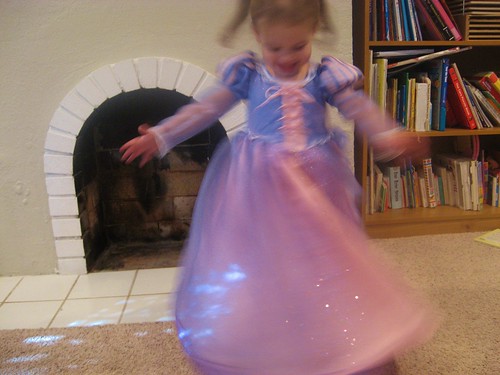
Sparkles and twirls! What else could a little princess ask for?

Sunday, October 16, 2011

FO: Norobi

Myra's not the only one knitting around here! I finally finished a project that I cast on before Duncan (who is now 10 months old) was born.
And it wasn't even a very complicated or large project either. This is Norobi, a knitted Obi style belt. I alternate between thinking that this is a really fun and funky idea and thinking that it is just odd. Since I wasn't sure how I felt about it, I used some leftover RHSS, so if I hate it, at least the yarn wasn't dear.
The main reason I decided to knit this was the way the edges and ties are constructed. The edges are finished with an applied I-cord and the ties are stand alone I-cord. I wanted to learn this technique, and this seemed like a good way. As you can see if you compare the top (uneven and loose) edge to the bottom (tighter and more polished looking), it was a learning process for sure. It didn't help that I put this project away for months while in the middle of the applied I-cord and when I picked it back up, I had totally forgotten how to do it!
Here it is from the back. It looks quite sleek and cute on Sandra Dee, but then everything looks good on her. I'm not even sure how I will wear this. What do you think? How would you go about styling a knitted obi? Or would you??

In the sewing world, Rapunzel is coming together. We had a final fitting this morning and measured the hem.
I still need to set in the sleeves (that one is pinned in place), hem the underskirt and overskirt and apply the trim to the overskirt hem. Myra loves it and I had to fight her to get it off. At least this one looks like a win! It better be! It wasn't difficult to construct, per se. It was just tedious. And I hate sewing polyester organza.

Thursday, October 13, 2011

More Pink...

Ladies (Sorry if there are any men following along - this one is for the girls), it's Breast Cancer Awareness Month, and I just came across this fabulous and fun way to remember the importance of doing a self exam.
If you're in looking at this in a Reader, pop over to see the video!
Click here to download the app. It will be available on the Android platform in a few days.

Please ladies, don't forget to give your boobies a little TLC, and get your annual mammogram when the time comes.

Tuesday, October 11, 2011

Jalie 2921

I'm supposed to be sewing up Halloween costumes, as you know, but I was distracted again by something shiny.
Or rather, something pink. I'd been thinking it would be a good idea to make something new to wear to Sewing Summit. It's totally irresistible to know you'll be surrounded by sewists all weekend and NOT make something new! Of course, I had my Simplicity 2403 dress, so I wasn't really stressing over it, but then I saw that PR is having a Think Pink contest in support of Breast Cancer Awareness month. What a fabulous idea!! I joined immediately, then surfed over to Eugenia's blog, where I saw a pink version of this pattern, and I knew I had to have one. Like immediately.
Here is how I wore it on Saturday. The cardigan is RTW (from Target) and the pants are New Look 6816, made of silk crepe and lined with silk habotai. They are the most luxurious and comfortable pants I own.

Since I've made this top before, I won't bore you with the fit details. If you are interested, I gave a complete review of my first version here. The only change I made was to use the 3/4 length sleeve and use poly ITY knit rather than cotton lycra. I'm quite pleased with this make as it fits well, is quite comfortable and rescues this skirt from orphan-hood. Win! OK, now I really am going to make that Rapunzel dress. Scout's honor!

Sunday, October 9, 2011

Best. Weekend. Ever!

Sewing Summit was so much fun!! I was having such a great time that my camera was nearly forgotten, but I did get a few pictures to share with you all.  The summit officially started Friday night with a reception and several fun events, but Mitch was working so I had to miss that bit. Saturday morning I was really ready to party! We had breakfast, where I met a bunch of lovely sewing ladies, then we headed to our classes.
Recognize my instructor? Yes, it IS Gretchen from Gertie's New Blog For Better Sewing! She taught pretty much all of the non-basic garment sewing classes, so I spent all day with her. It was so FUN!! We fondled beautiful fabrics, handsewed our hearts out, padstitched lapels and broke down the perfect wiggle dress. I learned a ton and had a total blast. Gretchen in amazingly sweet and absolutely as adorable as you would think. Maybe more adorable.
She brought some garments for us to admire, so I had fun pawing over her dresses and suits, all of which were beautifully made. She brought her bombshell dress to show us, which you can learn to make in her craftsy course
One of her students was at the summit as well and wore her bombshell dress! How fun is that? It was so amazing being around all of the talent represented at the Summit. So cool.
Speaking of amazing talent, I also got to meet Sunni from A Fashionable Stitch. She's from here in Salt Lake and it was so fun to meet her in person. We're also belt twins! Although her belt is so much more amazing than mine. Check out that hand embroidery. And it closes with snaps! How fun is that?!
After all the classes and chatting and mingling were done, we all got to hang out and sew in the Baby Lock sewing room. An entire ballroom filled with sewing machines!!! Is this heaven???
I had such an amazing weekend. I learned a ton of great new techniques; I'm not afraid of padstitching anymore, and I got some great photography and networking ideas, but the best part was that I got to spend a weekend with amazing women who didn't think I was crazy. Well, not for my fabric addiction anyway...