Saturday, June 29, 2013

SwimAlong 2013: Board Shorts

I know the SwimAlong has officially ended, but summer hasn't! I'm sure I'm not the only one still sewing swimwear, so we'll just all keep going!
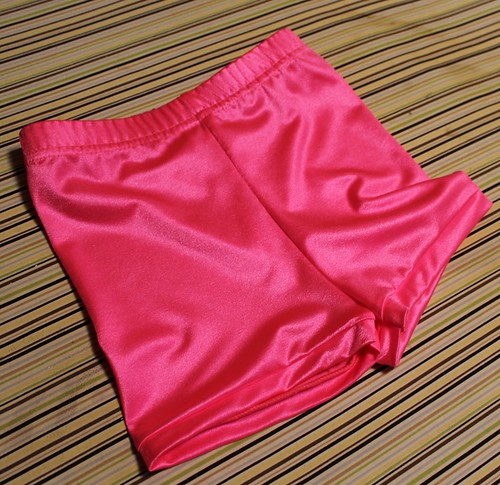
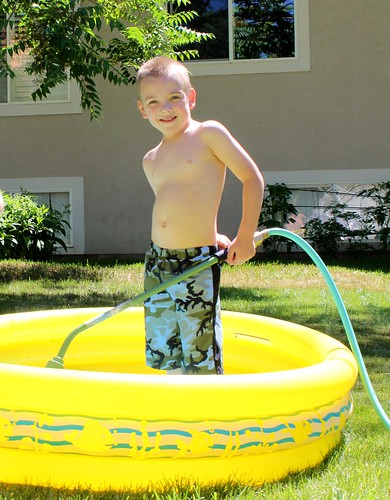
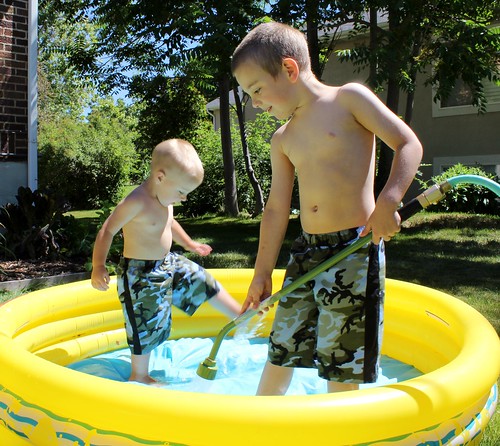
Poor Logan was wearing swim trunks at least 2 sizes too small. And while Duncan has two pair of hand-me-down trunks that fit him OK, they aren't great. So I decided to sew up matching board shorts for my boys, while they'll still let me dress them alike.
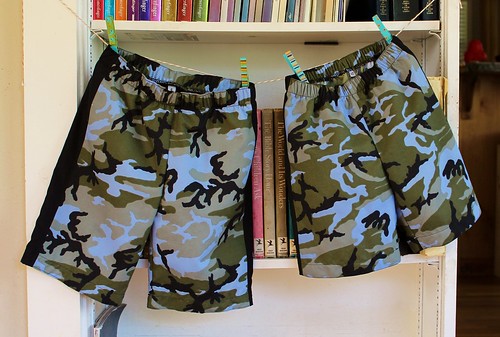
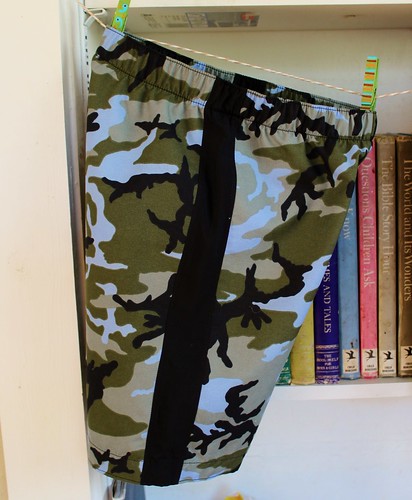
The boys are in two different size groupings (Logan is a 116 and Duncan wear a 92), so I couldn't use the same pattern. Instead, I just chose two basic elastic waist shorts patterns and styled them the same way. I eliminated all pockets and separate waistbands, and for Duncan's added a strip of fabric at the side seam to match the one on Logan's.
Logan's shorts are from the 03/2012 issue of Ottobre, model # 10. I've made them for him before, twice in fact, and he wears them regularly. Although these are drafted for a knit fabric, I knew they had sufficient ease to work in a woven. I did omit the pockets and added a casing for the waist, rather than a separate knit waistband.
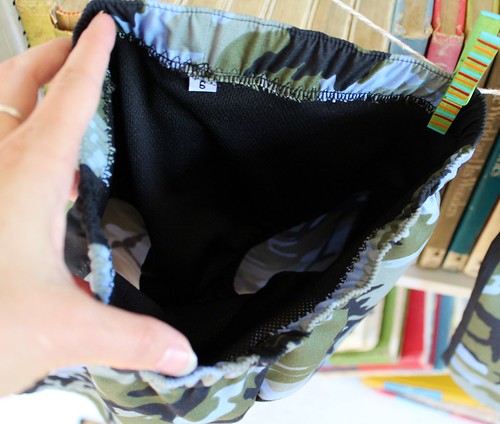
Logan's shorts also got a swimshorts style lining. This was so easy to add! I used Kitschy Coo's Boy Cut Brief pattern, since it only has side seams. The fabric I used is an athletic mesh, like you might see in lightweight running jerseys. I elasticated the leg openings with swim elastic, just like a regular swimsuit, and stitched the waistline to the top edge so that it was caught in the casing stitching. Logan says it is comfortable and that these are his favorite shorts. Yay!
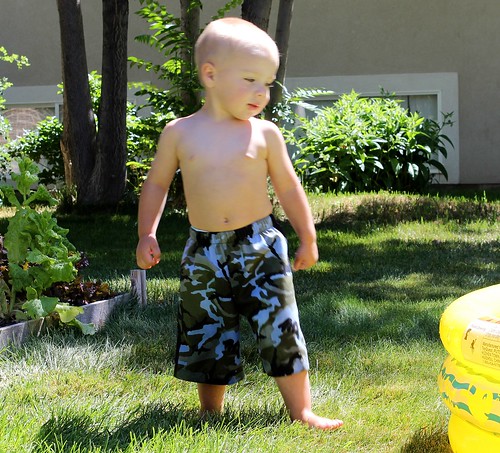
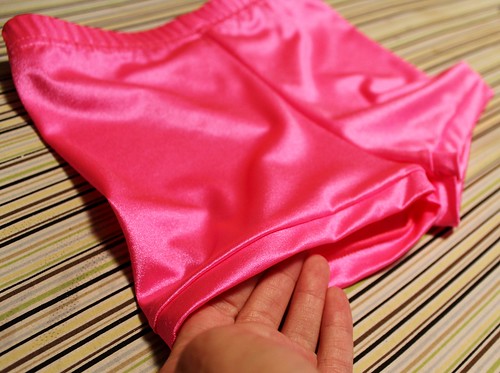
For Duncan, I used the 03/2006 issue of Ottobre. There is a series of shorts in that issue from the same block, one of which (#10) has a separate hem band. I used that version, omitting the hem band and hemming at the seam level, to make a shorter pant. As you can see, these are plenty long, so I'm glad I shortened them! Again, I omitted the pockets and added the side seam band. Since Duncan is still wearing swim diapers, I didn't include a lining, so these were even easier to sew.
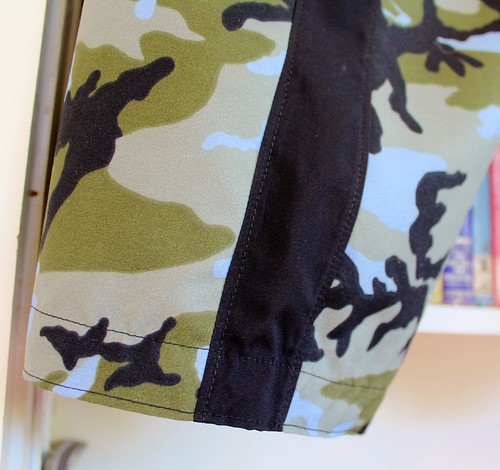
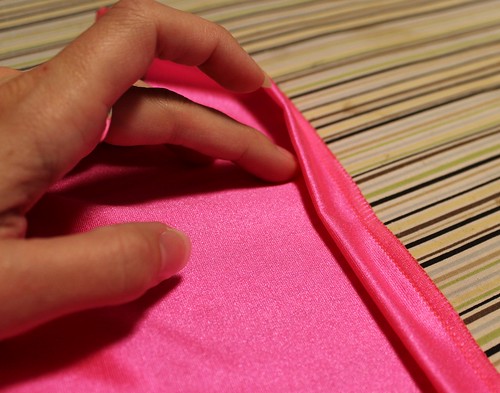
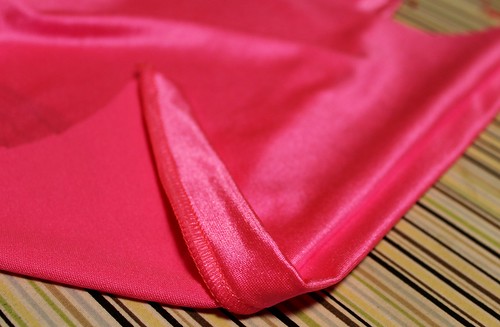
I noticed that the boys' RTW trunks have tons of topstitching, so I jazzed these up a little with topstitching down the side stripe, as well as a double line of stitching at the hem, which I echoed at the waistband. This had the added benefit of taming the somewhat unruly microfiber poly fabric I used.
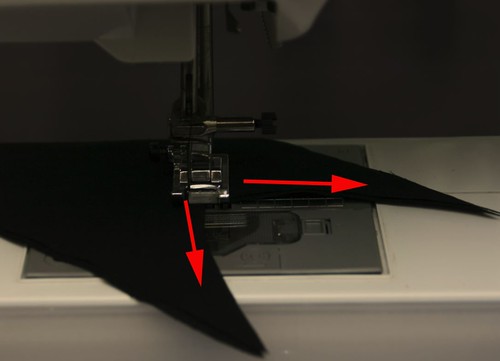
Both shorts are made of polyester microfiber "board shorts" fabric from RockyWoods.com. (The link takes you right to the board shorts page.) This fabric is exactly like the fabric you see in RTW shorts and I was very pleased with it overall, but it wasn't the easiest to sew. 
There are a few things that can help make  it easier. The first is to make sure you use a sharp, fine point needle. I used a Microtex needle in a 70/10 size. This has a very fine point, which is perfect for punching through this densely woven fabric, without puckering or causing pulls.
The other important tip I have is to be sure you press very well. Do test first to get the optimal heat setting on your iron. This is polyester and you can melt it. Use the highest heat you can without damaging the fabric, and use steam. Be sure to press each seam both flat and open or to one side. You also want to be very diligent about finishing your seams. This stuff is very ravelly, and it will be subjected to a lot of stress. You don't need a serger (although that is a quick and easy option if you have it), just finish the edges with a 3-step zigzag or use french seams.
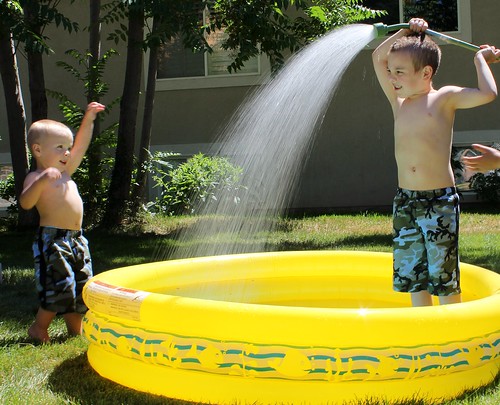
Despite the vagaries of the fabric, these whipped up quickly and the boys both like them. I know they'll both get a ton of use. If you're thinking about dipping your toe in the swimwear sewing pool, board shorts are an easy and fun place to start!

Thursday, June 27, 2013

Hemming knits: The faux band

I wasn't planning on blogging about these shorts, since there is totally nothing interesting about them, but I tried a new hemming technique that I thought was pretty cool, and I wanted to share it with you.
They are basic elastic waist one piece shorts. I used the 03/2011-20 pattern for skirted leggings, since I already had it traced at a shorts length. The fabric is nylon/lycra spandex from Spandex World.
You'll notice that the hem edge looks like a separate hem band, but it isn't! It's a standard single fold hem, no separate pattern piece, no wonky stretching. Now, this won't work on an area like an neckline, where you have an inside curve, but it is perfect for sleeve openings, leg hems or the bottom hem of a garment. Here is how it works.
First, turn up your hem allowance and pin. You can use the fusible thread technique from this post to get a crisp edge if you would like, but I kind of like the soft fold for this. Note: I'm hemming these flat, but this technique works just as well in the round.
Now fold your pinned hem back on itself, right sides together. If you've ever made a machine blind hem, the technique is the same. You should have three layers of fabric at the bottom edge now, the raw edge of your fabric and the fold of your hem. Line them up neatly.
Now sew along the bottom edge, giving a scant 1/4 inch seam allowance. Make sure you catch all three layers. I'm using  my serger for this step, but it works just as well using a regular sewing machine. Just be sure you are using a stretch stitch and catching all of the layers in your stitching.
It comes off the machine looking like this. The faux band is stitched firmly to the garment. Fold the band down and...
there you have it! It looks just like a banded finish, without the fuss! If you want a more streamlined look, give it a press or topstitch the seam allowance toward the garment and away from the band. For a more sporty look like this, just leave it unpressed.
Here is how it looks on the finished shorts.
Myra says they're comfortable, and it's a nice easy finish. Hopefully you'll find this a useful way to finish knits as well.

Wednesday, June 26, 2013

SwimAlong 2013: Strut your stuff!


Hey SwimAlong - ers! We're coming to the end of our series, but that doesn't mean you should stop sewing! I hope you'll continue to use the resources we've collected to make your swimwear sewing uncomplicated and fun.
Now it's time for those of you who have sewn up some fabulous swimwear to strut your stuff. Link up your pics or blog posts here and show us all what you've made! Since I know that many of us (myself included!) are still working on our suits, I'm going to leave the linky party open all summer. We'll close the links on the first of September. If you've sewn multiple items, please feel free to link them all. We love the inspiration!

Tuesday, June 25, 2013

Cake Patterns: Hummingbird, Pink skirt

Both views of the Hummingbird skirt are cute, but the flounce really caught my eye. I've had this zebra print stretch twill in my stash for a while, waiting for just the right thing to come along and this was definitely it.
Yes and yes!! I wore it with the raspberry pink rayon jersey top and I think it's perfect.
I decided to pipe the pockets, front seams and flounce area, to really make them pop. I was really impressed with how well the zebra print flowed across the seams. I made no attempt to print match, but it worked out really well, even on the bias cut flounce.
The skirt also has a customized sizing system, based on waist and hip measurements. My hip is 38 inches, and the 35 was 37 inches at the hip, so I went with the 40, but it ended up quite a bit too large and I took a total of 4 inches off at the side seams. As you can see, the skirt still looks awesome, since it is designed for side seam alterations. And since the waistband is customized to my waist measurement, it still fit onto the skirt, and on me.
While I love the seaming and pockets in front, really the action is all in back. This flounce! I love it so much. It is applied with a lapped seam, which was actually pretty easy, particularly since I had basted the piping, so I had a nice clean fold line. The flounce allows for amazing freedom of movement. I generally feel a bit restricted in pegged skirts, but I can make my usual long strides comfortably in this.
In fact, I can even dance! Or more relevant for my life, run after kids and sit on the floor.
With most multi-garment patterns, I generally have one piece that is a clear favorite. Not so here. Both top and skirt are pretty, fun to wear, easy to sew and fit my lifestyle. And I know I will make them multiple times.

Monday, June 24, 2013

Sewing Cake: Hummingbird top - Green view

When Steph unveiled the Hummingbird pattern, at first I wasn't going to bite. I had made a peplum top that I don't love and I have a zillion skirt patterns, but the more I looked at it, the more I realized how much I loved all the details. So I jumped and ordered my pattern just days before the presale ended, which means I get to play along with the sewalong! Yay! Go, Violetear House!!
I started with the top. I was going to keep pace with the sewalong, really I was! But I got impatient to wear my top.
Although it wasn't something I initially noticed about this pattern, I really LOVE the neckline! It hugs the neck closely in back and along the shoulders, but has a demure, but sexy scoop neckline. 
The cloverleaf peplum was one feature that really drew me to this pattern, and it totally lives up to the hype. It falls gracefully and is so flattering. Mitch generally dislikes full skirted styles on me - says they make me look hippy - but he says this top is quite slimming. I also love the way it falls in gentle scallops. I actually thought I'd chop the peplum even once I had it sewn on, but I really like it this way.
The pattern uses Steph's creative customized sizing system, and I was very pleased with the fit. This hot pink is actually my second version, but I changed nothing between the two. So nice to have it fit right out of the packet!

This one is my first version. I made it out of a mauve poly/nylon crepe knit from FabricMart. It's kind scratchy and I really just wanted it out of my stash, but the color is really pretty, so I'll likely wear it a bit despite the fabric imperfections.
I made this one on Saturday. My In-laws came and took the monkeys so that I could sew. I finished up the Hummingbird skirt (which I will show you tomorrow) and then whipped up this top. Since I already had the pattern ready, it took about an hour and a half from cut to finish. Not too shabby! I made this one out of a raspberry pink rayon/lycra jersey from Spandex World. It's very soft and the color is really amazing.
So, Humminbird green is definitely a win for me. It's comfortable, classy, sexy and easy to sew. And both versions look awesome with my brocade printed jeans!

Friday, June 21, 2013

SwimAlong 2013: Swim Coverups

I'm so thrilled to have LadyKatza of Peanut Butter Macrame here today. If you don't know her already, you are in for such a treat! She is an amazing lady and a very gifted sewist. She has an incredible talent for blending vintage and modern styles absolutely seamlessly. She's here today to share with us the perfect complement to your gorgeous new swimsuit - a chic and stylish beach coverup. 

Howdy y’all! I’m so happy I can share with you this nifty little cover-up and that Katie was kind enough to ask me to do this, even though I’m probably late. I do things last minute ALL THE TIME.  So, the pattern is a free download from fabric.com, you can get it here. It’s basically a kaftan with contrasting trim and straight forward directions. I do want to share with you a few things I felt needed to be clarified and small tweaks to the pattern. **Important** Almost all seam allowances are 3/8 of an inch.
First off you want to go with your hip measurement.  This is essentially a rectangle with some elastic and ties for shaping, which works very well for a semi-sheer cotton or linen. The kimono styling of the sleeves means you really don’t need to make adjustments. Since this is a PDF pattern from an indy company, I DO recommend looking at the layout sheet, it looks like this:
The other thing I recommend is not going strictly by the layout you are shown in the pattern, for one, the piece that is used as the elastic channel is cut on a fold, or it needs to be doubled in length if you are not going to cut on a fold.
Don’t forget that your neckband, arm band, and hem band are all going to be from a contrasting fabric. My main fabric seen above is a cotton lawn, I used a plain black cotton lawn as my contrast.
The directions call for interfacing the arm bands and hem bands but since they are doubled over, I did not feel the need for this. I only interfaced the neck band, which is actually two pieces that are sewn together, the front V and the back arch.
I highly recommend the interfacing from FashionSewing Supply, by the way, it’s better than anything else I’ve used.
Fuse the separate neck pieces first, then sew them together as the directions show.  The next bits you want to sew are the tie ends, arm and hem bands.
The tie ends are long rectangles, iron them in half right sides together, sew one end and the long side, leaving the other small end open so you can turn them right side out. 
Use a pin to pull out the corners and press. Then you will take a 3/8 inch wide piece of elastic that is a couple inches shorter than your back width, sandwich the elastic between two ties at each end and sew yourself a little square. Then set them aside.
The arm bands have a dovetail shape to them for the underarm. When sewing them I suggest starting from the middle and sewing outward, this will give you a cleaner point.
Once the two pieces are sewn you will want to fold them in half and press. Be sure to clip the center point and press seams first.
Once all the small pieces are done you will sew the shoulders together of the two main kaftan pieces, then press the outside edges of the neck contrast in by 3/8 of an inch. Next, pin and sew the neck contrast, right side down on the wrong side of the kaftan fabric, shown here:
You will then want to flip the band to the RIGHT side of the kaftan and press flat. When turning you can use a pin to pull the corner out to a sharp point.  
Topstitch all the way around the outside edges where you should have already pressed under.  Once that is done sew up the side seams of the kaftan and attach the arm and hem bands as shown in the PDF instructions.  Next I put the kaftan on and marked where I wanted the elastic channel to go, pinned it in  place and then topstitched it down. The instructions show you how to press the elastic channel before topstitching.
Here is the elastic channel sewn down.
I use this nifty notion that has a slide grip for threading elastic or ties.
And here is one side pulled all the way through. Put the kaftan on at this point and tie the ties into a bow in the most comfortable place for you. VIOLA! Beach cover up.


Alright folks, grab your sunscreen, hats, and beach towel and head on out. Now you can lounge fabulously while the kids wear themselves out in the water. Cheers!

Seriously, how gorgeous is she?? I love how easy, breezy and still completely fabulous this is. I need one! And also a fabulous hat. Be sure to check out the lovely coverup she made for her daughter as well. So sweet! Thank you for sharing it with us, LadyKatza!