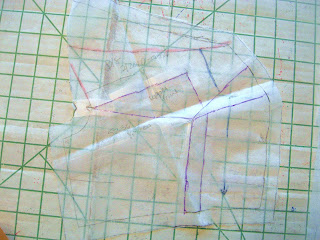
I've had a couple of requests for a few more details about the alterations that I made to my burda style tee, so I took some pictures of the final pattern pieces. I wish I had a few "in process" pics for y'all, but I'll try my best to describe what I did. I'm not saying this is the best way, just that it is my way!
So, the alterations that I made were a 1 inch FBA and raising the neckline all around. Since I made the neckline alteration first, that is where I'll start! The first thing that I did was sort of tissue fit the pattern pieces to get an idea about how much I wanted to raise it. I really wanted a neckline that was up to my actual neck in back, but tapering down to a nice vee in front. It looked like I needed about 3 inches on the side and back to get me there, so I just added 3 inches to the height of the neckline on the back and sleeve pieces. I just drew the seamlines out straight, since I knew I was going to muslin this, so I thought I'd just work out the shaping on the muslin. For the front piece, I started with 3 inches at the sleeve side of the neckline, and tapered down to nothing at the neckline. Now, the height of CF really has very little to do with the height of the front bodice pattern piece, but rather with the amount that you gather and what the height of the loop that holds it in front, so I drafted my own pattern piece for the loop, using the height I wanted my final front neckline to be, and doubling the final width so that I could make a tube.
So at this point I did an FBA. We won't talk about that one... OK, I will. When I did this FBA I neglected to halve the amount that I needed to add for my bust, so I ended up with double the FBA.
Right. So after I threw away that pattern piece... No really this muslin was actually quite useful. You can see how large the neckline is. I used this to pinch out the raglan seams to give the neckline the shaping it needed to conform to my body. I shaved the amount that I pinched off of both sides of the seams on my pattern pieces.
I really did throw out and re-trace that front bodice pattern piece and redo the FBA. I did the FBA on this top in the traditional way and then rotated the dart into the gathered area at CF, much like you would a princess seamed top. For a great tutorial, check out Debbie Cook's.
So, the pattern pieces - in their final state:
This is the upper front bodice, which is clearly the most altered. The pink lines represent the original pattern piece. As you can see, I "shaved" off a significant amount where it joins to the raglan sleeve, but also raised the neckline quite a bit. The purple lines are for my FBA and the blue line is the original grain line, just for reference.
Here is my sleeve pattern. Again, the pink line is the original pattern line. On this one, you can see where I raised the neckline and then shaved off both front and back where they seam to the bodice pieces. I also took off about 3/4 of an inch from my original 3 inches that I raised the neckline, so the final change was really only about 2 1/4 inches.
This is the upper part of the back bodice. Pink lines are the original. As with the sleeve, I just shaved off what I had pinned out on my muslin and dropped the back neckline the same 3/4 inch as the sleeve.
So, I hope that helps anyone who is hoping to make some of these same changes to this top. I am really pretty happy with how it all came out. This is probably the most I have ever altered a pattern, so I am fairly pleased that it worked (eventually)! If you have any questions, or if this isn't clear please leave me a comment or send me an email and I'll try to help clarify.


2 comments:
Phew, that made me dizzy! You are so advanced! I'll bookmark that for when I'm ready to tackle that level of difficulty in a couple of years.
Thanks for sharing the changes you made! I traced out the pattern and now I need to try my 1st FBA adjustment!
Post a Comment